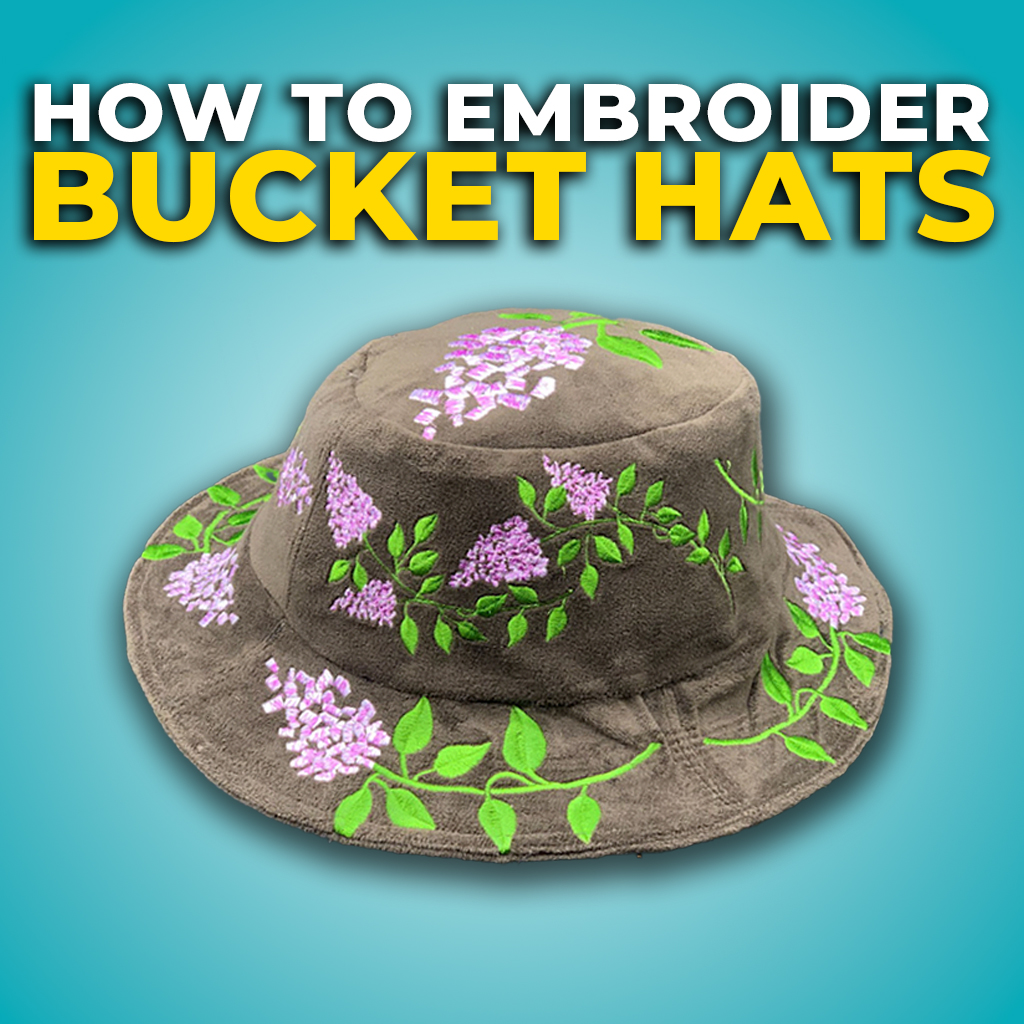
Bucket and boonie hats have been worn by fishermen and gardeners for years, and now they’re a trendy fashion item! These accessories are incredibly versatile and have lots of room for embroidery! With a lot fewer pitfalls than baseball caps, add this to your “to-do” embroidery list.

Our easy step-by-step guide has just what you need to transform your bucket hat into a one-of-a-kind embroidered piece. We’ve got some great tips and tricks to make the process a breeze and make them stand out.
Bucket hats are easier to embroider than caps. You can do them on a flatbed hoop, magnetic, or cap driver.
Your bucket hats are about to become your favorite canvas – let’s embroider them together!
Bucket Hat Embroidery Designs
Bucket hats are not heavily stabilized, which is great because they can be easily embroidered.
You can embroider anywhere on a bucket hat, but in this article, we’ll focus on the front crown and brim.
Most designs stitch great, even on the brim, because they make most of these hats from cotton. Please ensure the brim is created with soft fabric before embroidering.
Remember, you should not attempt to embroider on the brim of a hat cap. This will damage your embroidery machine! Check out our Guide to Embroider Hats and Caps to learn more.
Because bucket hats have smaller front crowns, the design you embroider should not be larger than 2.5 inches tall or exceed 4 inches wide.
Check out our 30,000+ high quality embroidery designs, perfect for embellishing your next project! Or, if you’d like to create your own embroidery design for your hat, check out our Design Doodler which easily converts doodles into machine-ready embroidery designs, all without digitizing!
Though the vertical part of the bucket hat appears straight, it is not. Adjust your design if you’d like to fit this slight curve.

If you use letters, curve them if possible.
Using embroidery fonts is fun! Create your own personalized saying, name, or cheer on your favorite team! With over 1,000+ embroidery fonts we have what you’re looking for!
Materials To Embroider A Bucket Hat

- Stabilizer: We suggest using a medium-weight cutaway, but you can use any type that works for you. Just remember that you need to stabilize your work so it wears well.
- Scissors
- Temporary embroidery spray
- Tape to secure your hat
- Ruler
- Pins
- Fabric marker (optional)
- Embroidery software (only required if you want to edit your embroidery designs to curve perfectly on the brim of your hat)
- Embroidery design
- Bucket hat
How To Hoop A Bucket Hat For Embroidery
You can hoop a bucket hat on a cap driver for a multi-needle machine in the same fashion as you would a cap. Since not everyone has a cap frame, we’ll focus on how to hoop these by “floating” on the stabilizer.
You will want to choose a firm stabilizer, like a medium tearaway or sticky stabilizer.
Start by hooping your piece of stabilizer.

Pin the center of your bucket hat in the hoop. You can find the center point by folding it in half.

Mark the center point.
We use a washable marker for our demonstration. You can use a pin instead of washing the marker off your hat.
Line up your points to mark a center line on the hat.

Line up your hat brim’s center point with the hoop’s center point and pin near the seam. Align the top center point and pin to the hooped stabilizer.
How To Embroider A Bucket Hat Brim
Lay your hat flat and take a picture of the brim curve. You’ll use this to create a placement line for perfect results.
When you take a picture of your hat, position the camera so it’s parallel to the surface the hat is on.
Insert the picture into your digitizing software and digitize a line along the edge of the brim (your placement line). Add the objects you want to your hat brim, and prepare to embroider!


Hoop your stabilizer and stitch the placement line. Remove your hoop from the machine.

Spray your stabilizer with a light spray of temporary embroidery spray.
Align the bucket hat along the placement line and pin it in place. Secure the remaining fabric of the hat using tape, pins, or clips to hold it away from the embroidery machine’s touch.

Place your hoop in the machine and embroider!


Do you want to embroider on the front crown of the bucket hat? Here’s how you do it…
How To Embroider A Bucket Hat
Fold the sweatband towards the brim of the hat. Secure it with a pin. This will prevent it from coming into contact with the machine.

Turn it right side out and pin the center bottom and top of the hat side on your hoop (align the center line with the center of your hoop).

Fold the hat over to expose the stabilizer. Lightly use a temporary adhesive spray to spray the hat fabric to the stabilizer. Do the same for the other side.

Smooth out the hat, but remember to let the fabric curve naturally.

Secure the excess fabric close to the hoop using pins, clips, or tape to prevent the machine from embroidering it.

Place your hoop in the machine (be sure to trace or check correct placement), and begin to embroidery. Watch the machine carefully to ensure the fabric is not close to the needles or your presser foot.

After you finish stitching your design, voila, you have finished your personalized bucket hat!

Create Your Own Embroidered Bucket Hat
For those of you who like a challenge, why not create one from scratch? Many easy sewing patterns are available online. You can use a picture of your pattern in embroidery software to make a placement line for a custom bucket hat.
Insert your artwork inside those lines and embroider before you put the hat together.

You can create small designs or multi hoop if you have smaller hoops. Here is a truly unique hat made from an old throw pillow. What are you going to revamp?

Conclusion
Bucket hats are a fun way to personalize your style. Using the floating method allows multi- and single-needle embroidery machine users to embroider.
Here are a few important tips to remember:
- Pin the sweatband away from the front crown when embroidering.
- Make sure to smooth the lining and the hat fabric.
- Revise your design accordingly because of the curved brim.
- When embroidering, ensure the hat material isn’t in the way of the machine presser foot or needles.
You can transform a basic hat into a unique accessory that reflects your personal style with practice and creativity. Give it a try, and we can’t wait to see your results.
PS Check out our Embroidery Legacy Design Club to learn how to save on our huge collection of 30,000 quality designs. Or, if you’ve never tried our designs before, download our Free Embroidery Legacy Design Kit.

Leave A Comment