Explore a world where creativity blooms, and we celebrate nature’s beauty through stitches!

Explore the art of digitizing trees and plants, bringing the wonders of the outdoors into your embroidery projects. From textured trees to tall grass, we’ll show you step-by-step how to capture the essence of nature with every embroidery design you create.
How To Digitize Trees In Machine Embroidery
Digitizing an Oak Tree
When drawing trees, think of them as many connected objects, like the trunk and branches. Don’t see them as one big thing.
Let’s look at a majestic oak tree.

Here are the steps we will take to create our tree:
- Insert your artwork into your embroidery software.
- Outline the tree.
- Mark out the large areas of the tree.
- Using texture, create negative (empty) space and dense fills.
- Create layers for color.
- Add in visible branches and trunk.
In this tutorial, we are using the Design Doodler Software. Are you new to creating embroidery designs?
Download your free Design Doodler trial to easily turn your drawings into embroidery designs – without any digitizing skills needed! Remember to follow the link to easily create your own nature designs!
Insert your artwork in your embroidery software.

Please outline the tree, but keep the details minimal as we only establish shapes.

Define the major components. Try using a different color- we can always change to another.


Decide on a texture to use; do NOT try to draw individual leaves. We only look for dark, medium, and light textural areas.
We’ll use vermicelli (or the running stitch), but you can use any style.

Here is how you look at your shapes. In this case, our shape has a light source on the upper left. Therefore the object will be lighter closer to the light and darker further away (think of it like the moon).

We will not fill it with solid stitches; this is just to illustrate. Here is our shape filled with our texture. You can make the darker parts by doodling many layers- using layers is better than making smaller turns.

Start by working from dark to light from object to object. Remember to overlap your objects to look more like a tree and less like a bunch of grapes!

Here is our tree with the objects filled.


Remove the outlines and add branches using a steil stitch (we used 2 mm). Remember that you do not need to “draw” in all the branches; only add the branches you can see.

Here is our finished tree!

And this is the design after it was stitched on the embroidery machine in one and two passes.

Are you interested in learning how to digitize? Discover the secrets of creating beautiful embroidery designs with our Embroidery Digitizing 101 Course.
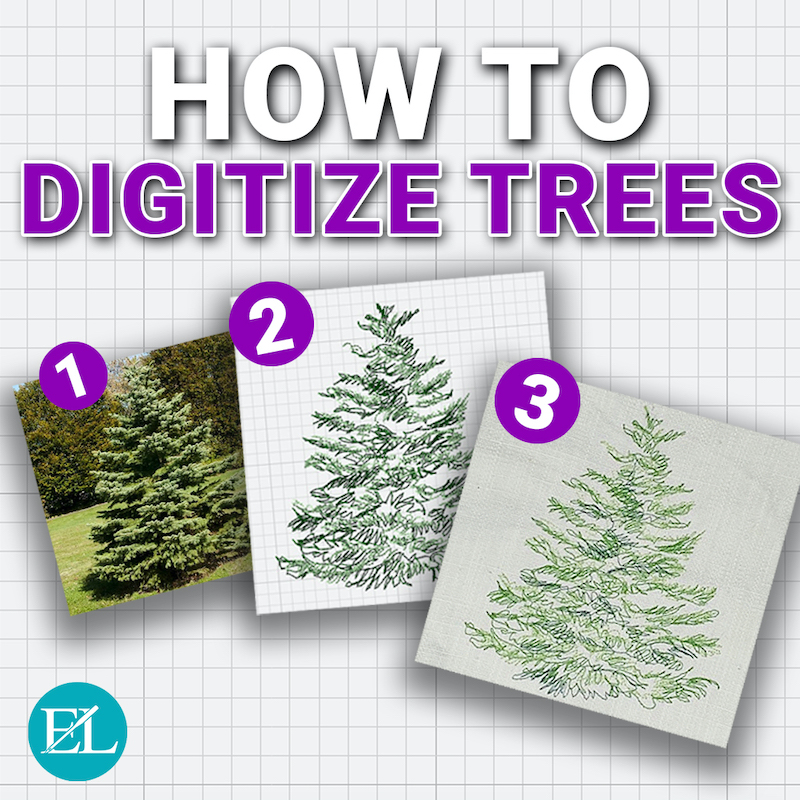
Digitizing a Pine Tree
A pine tree is truly an upside-down ice cream cone! The lower right will look dark, with our light source on the upper left. Since Pine trees are more open than other trees, you will see light through the tree. This makes the center of the tree an extremely dark area.
For this tree, we will use color to show dark and light. Let’s start by looking at a cone shaded.

Now, insert your artwork.

Here is the texture we want to use for the branches.

For this demonstration, we’ll use bright colors to see the top of the pictures. We will start with the “darkest” color. Remember that the tree’s center and the branches’ bottom will be dark.

When you have the dark areas defined, move to the light color (we’ll demonstrate this with pink).

Let’s change the colors to greens (light and dark) and see what we have!


And here is our final tree after we remove the artwork in the background.

After removing the background, we used a dark green to adjust and add some dark areas.
Here is our stitch-out!

How To Digitize Grass In Machine Embroidery
What about grass?
Grass is just a different type of “tree” with no branches. We will use the same concept above: look for the light source and choose two or three colors.
We will work from dark to light to create the volume. Here is the texture type we will use. Remember that you can experiment with the stitch length and the thread weight to create a more lifelike plant.
Insert your artwork in your embroidery software.

Define your texture. For this grass, we are following the directions displayed.

Work from dark to light to add the blades of grass.

Then, add the medium shading (we’ll use blue for this demonstration).

And finally, add the lightest shading (shown here in yellow).

Change your colors (dark, medium, and light) to your realistic colors.

And here is our completed clump of grass.


Conclusion: Practice Digitizing Nature In Machine Embroidery
With some practice, you can master all kinds of plants, flowers, and trees, which you can use to add some natural beauty to your stitchouts!
Remember these important tips when digitizing nature:
- When working on plants or trees, consider them as a group of objects; each object has a volume that you can illustrate with darks and lights.
- Remember where your light source is. This will help you create consistent volume.
- To create darker areas, use layers of stitching and do not try to sketch dense areas.
- Generally speaking, we work from dark to light and are not afraid of punches of white or other colors.
- Consider experimenting with different stitch types, thread weights, and sketch styles to create your texture. Don’t try to draw individual leaves.
P.S. Don’t forget to explore the unbelievable magic of the Design Doodler! We encourage you to share your stitchouts with us! Happy Stitching!


Leave A Comment