
This Partial Applique Tool Tutorial is by Linda Rayburn
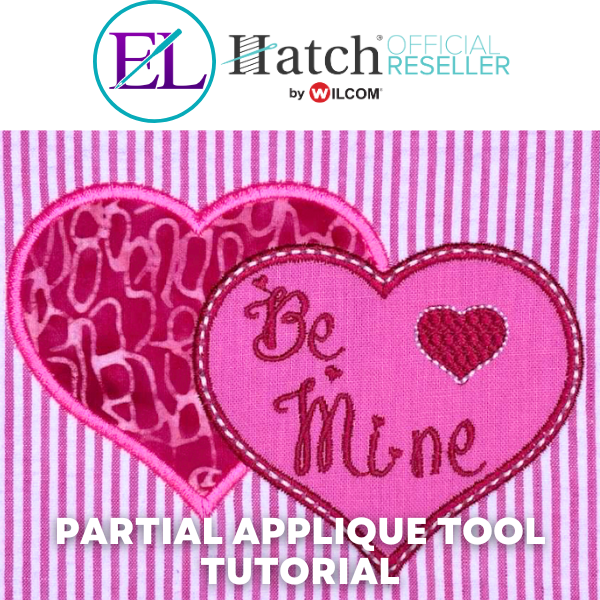
This tutorial teaches you how to create a partial applique embroidery design using your Hatch Embroidery Software.
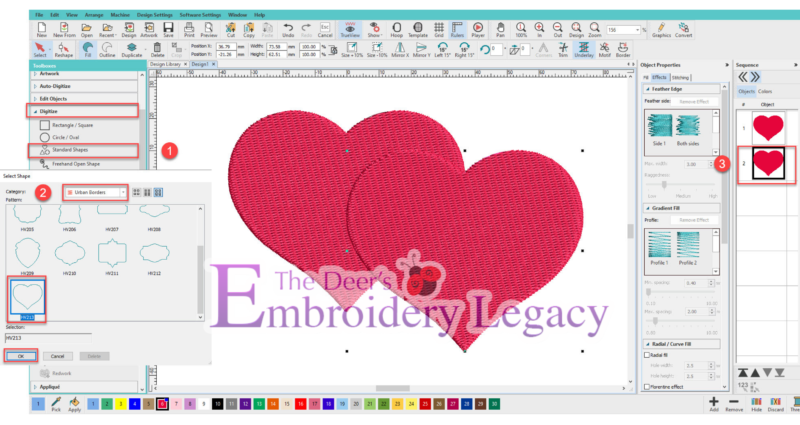
Step 1: Select Digitize > Standard Shapes
Step 2: Select Urban Border > Select the Heart HV213. Hold Down the Control Key and Right Click and drag a Heart on the screen.
Step 3: Select the Heart > Duplicate. Move the heart so it is offset from the first heart.
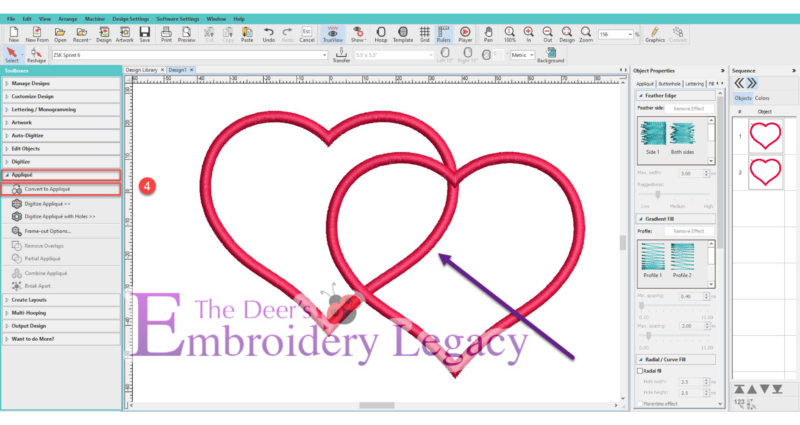
Step 4: Select All > Applique > Convert to Applique
- Note: Convert to Applique tool can only be used on Closed Shape Objects.
- Notice the overlapping Satin border when both appliques are created. We will eliminate this area of the Satin border in the next step.
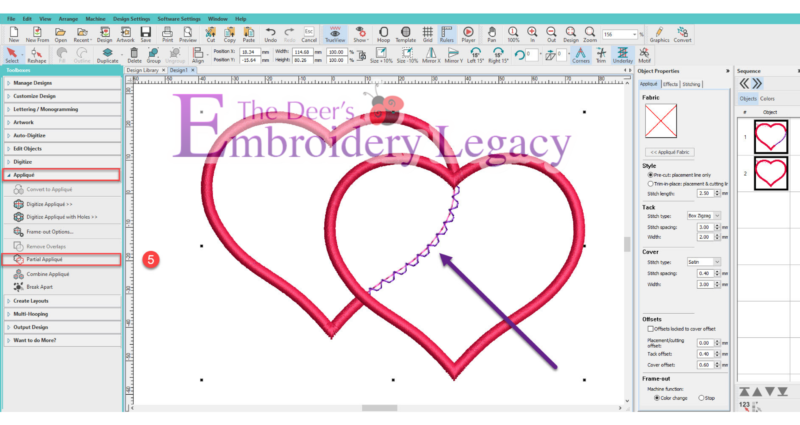
Step 5: Select All > Applique > Partial Applique. Notice the Satin Border is removed.
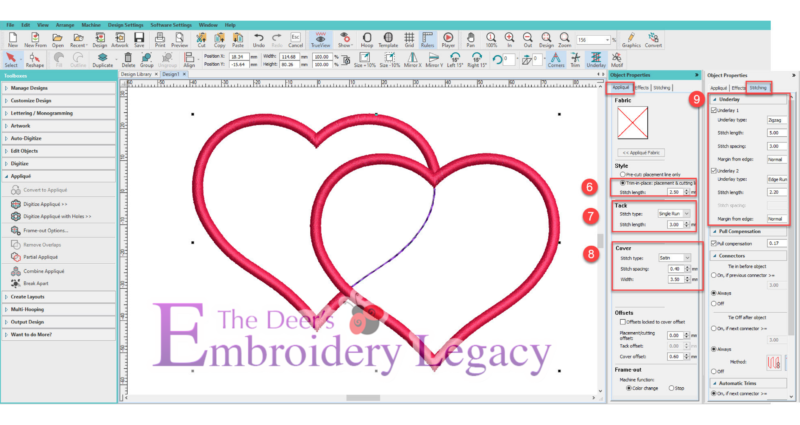
We will fine-tune the Applique. These are preferences I like, but please use what you prefer.
Step 6: Select Applique Tab > Change to Trim in Place.
Step 7: Change the Tackdown Stitch to a Single Run. I find trimming close with the single run easier than the Box Stitch.
- Give the Box Stitch a try to see which you prefer.
Step 8: Change the Satin Cover stitch to 3.5mm. I prefer a wider satin stitch on larger objects.
Step 9: Select Stitching > Change the underlay for the Satin stitch to Zig Zag and Edge Run.
- The Zig Zag holds the fabric to the stabilizer, and the Edge Run creates a crisp edge to the Satin Border.
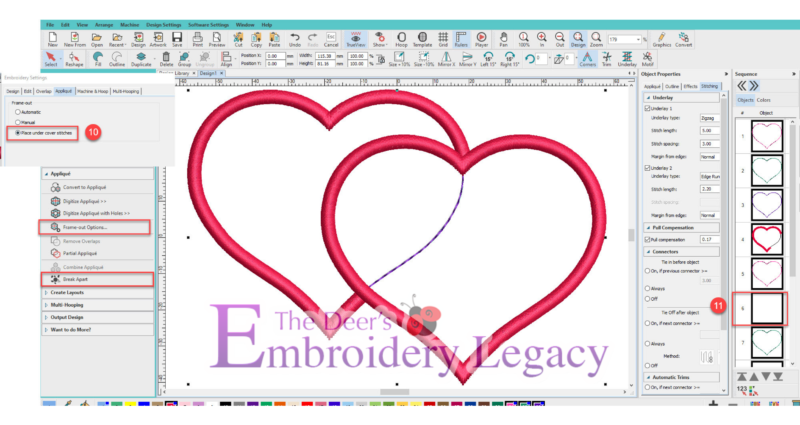
Step 10: You can set your Frame Out Option. Some people prefer their machine stop and move the frame/hoop out to make it easy to access the Applique for placement and trimming the fabric. If you’d rather not have your machine move the hoop, select Place Under Cover Stitches.
- Note: When Automatic Frame Out is selected, you may get an Error Message that the design is too big for the hoop.
11. Select All > Edit Objects > Break Apart. Now, you will see all the objects in the Applique.
- The Empty Boxes on the Sequence Docker represent the Frame Out. You can delete these if you’d like; they will not affect the stitching of the Applique.
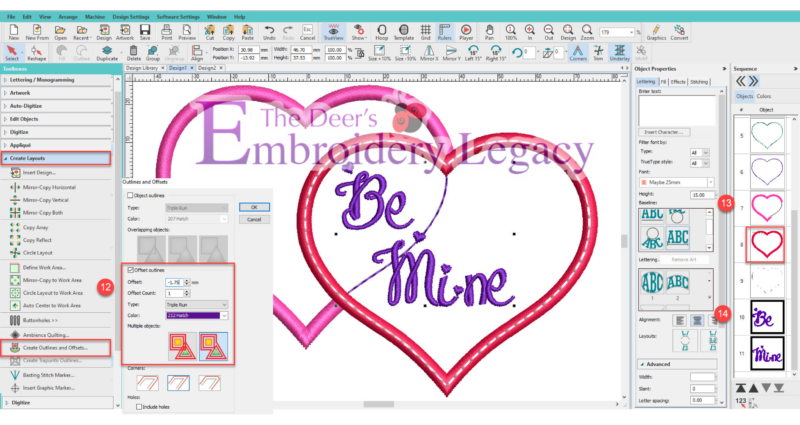
Step 12: Select the Heart > Create Layouts > Offset > Enter -1.75mm (use 1/2 the width of the 3.5mm Satin Stitch) > Bean Stitch
- I prefer to turn off the Variable Stitch Length
Step 13: Move the first partial heart Satin Border so it stitches just before the full heart Satin Border.
Step 14: Add Text if you’d like!
How to Stitch the Partial Applique
Step 1: Hoop the background fabric with stabilizer, then run the Placement Line for both hearts.
Step 2: Lay the first Applique fabric down and stitch the Tackdown Line. Trim the fabric close to the tackdown line.
Step 3: Lay the second Applique fabric down, stitch the Tackdown line, and trim.
Step 4: Stitch the Satin borders and text.

Congratulations, you have just created a two-fabric Applique using the Partial Applique tool.
Now, get creative and post your designs.

Have fun creating your own partial applique.
Click on the links below for a few useful links regarding this project:
- ESA Embroidery Font Maybe 25mm
- Basic Applique Video
- Applique Blog
- Give this partial applique technique a try on the Quilters Collection 2 Flexi Fill Heart Wreath
Join our Wilcom Hatch Embroidery Software Facts Facebook group for more helpful tips & tricks or any Hatch-related questions. Don’t forget to check out our 1,000+ ESA fonts to perfectly embellish your next embroidery project.
Interested in downloading this Hatch tutorial? Feel free to save this easy step-by-step Hatch tutorial in PDF format by clicking the button below.



Leave A Comment