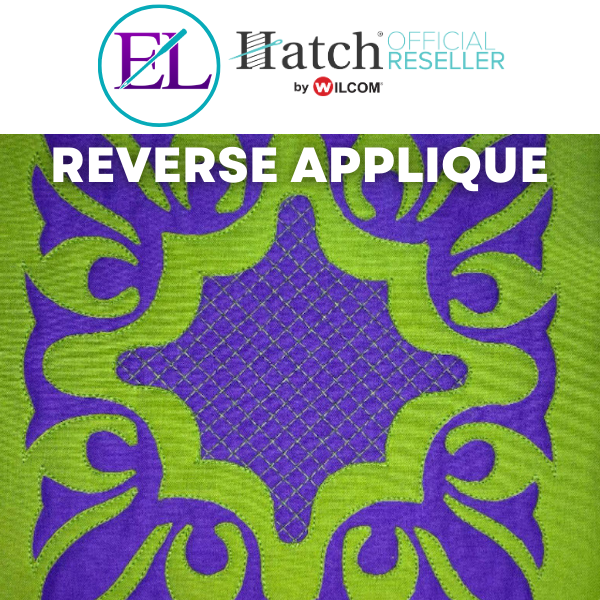
This Reverse Applique Tutorial is by Linda Rayburn
This tutorial teaches you how to create reverse applique designs using your Hatch Embroidery Software.

Don’t have Hatch but still want to participate in this tutorial? Download a free 30-day trial of Hatch through us and we’ll even throw in some bonuses!
This tutorial will how you have to create a reverse applique design using a design from our ESA Quilter’s Collection 3 pack.
Be sure to download the EMB file first.

Step 1: Bring in the EMB quilting file. Center it on your screen by placing a 0 in the X and Y positions.
- Note if you have Hatch 3, select the design and click on the “New Center Design Tool”.
Step 2: Duplicate the object.

Step 3: Select the bottom object > Right Click and > Hide
Step 4: Select the top object > Edit Objects > Break Apart. Now delete all the outside objects and only leave the remaining middle section.

Step 5: Select the Inner Objects > Create Layouts > Create a 2mm Offset
Step 6: Delete the Inner Offset.

Step 7: The Offset will now be on top of the Sequence Docker. Change to a Fill.
- Change the Tatami Settings to 8mm > Travel On Edge > Stitch Length 4.0mm
- Remove All Underlay > Change Stitch Angle to 45.
Step 8: Duplicate this fill. Change the Stitch Angle to 145.

Step 9: Unhide the bottom object. Save your design and now you are ready to stitch.
Supplies:
- No-show mesh cut-away stabilizer
- Batting
- 2 pieces of fabric in different colors
- Thread to match
Stitch Reverse Applique:

- Hoop the stabilizer, batting, and the fabric you want to be revealed.
- Stitch the center cross hatch design. Stop your machine.
- Lay the top fabric over and secure.
- Note: you can add a basting line to your design if you’d like.
- Stitch the full pattern on top.
- Use a seam ripper or sharp pair of scissors to carefully cut a hole in the TOP fabric.
- Carefully trim away the top fabric very close to the stitching line revealing the contrast fabric underneath.
Now stitch out your own reverse applique quilting design! These look great on pillows, bags, and any other decor.
Join our Wilcom Hatch Embroidery Software Facts Facebook group for more helpful tips & tricks or any Hatch-related questions. Don’t forget to check out our 1,000+ ESA fonts to perfectly embellish your next embroidery project.

Leave A Comment