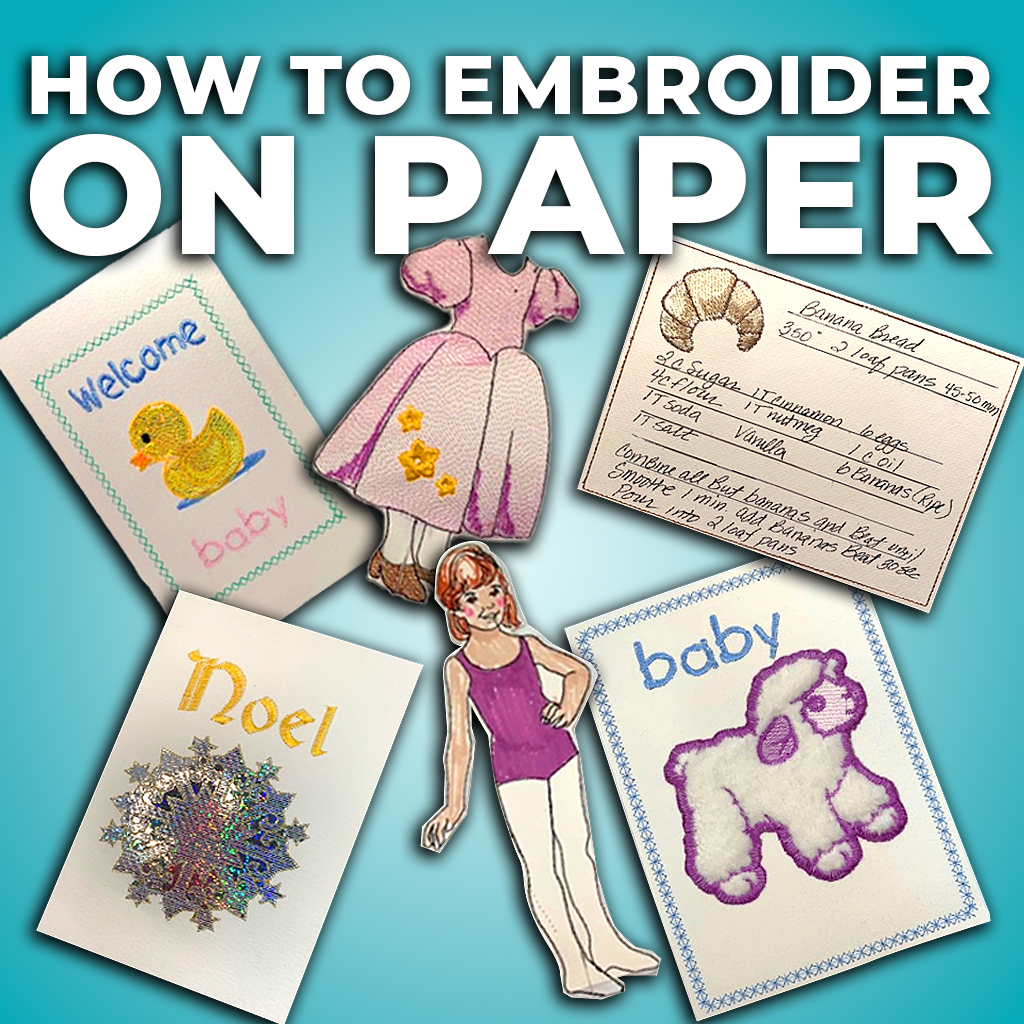
Christmas, birthdays, well wishes, … what do these special occasions all have in common? They generally start with receiving a card! Have you ever wanted to transform a simple piece of paper into a masterpiece with meaning? Making your own unique embroidery card can create cherished memories and a heartfelt message.

Did you know it is easy to embroider on paper? Discover unique ways to use paper and embroidery. Let’s discuss helpful tips for achieving the ideal outcome to make your own custom embroidered card and projects.
What is the best embroidery design paper?
Let’s look at the difference between two paper types (poster board and watercolor paper) with the same design.
Poster Board is highly processed cardstock with more wood fiber than rag or linen, so it tears more cleanly and evenly. When you stitch closely and continually perforate the cardstock, it will more easily tear on the perforated line.

Here is a version done on an inexpensive poster board.
Watercolor paper has a high rag content and is less likely to tear.

Here is a version done on watercolor paper.
Should I hoop or float paper with embroidery?
This is one occasion in which you always float. Hooping paper would crease and bend it, so floating is your best option!
You should hoop your stabilizer, lay down your heavy paper, and stitch for best results. You will then trim it and cover the backside with decorative paper to hide the stitches and tails.
What stabilizer should I use when embroidering paper?
For stabilizer, we recommend medium-weight cutaway.
Most cutaway is polyester, consisting of fine fibers that mimic fabric. Tearing is not easy and is not as affected by the needle perforation.
The no-show mesh works well for light paper (and bathroom tissue).
Tearaway stabilizer is meant to tear, so it will not provide the support you need for more dense designs.
We never recommend using a wash away stabilizer because removing it with water ruins the paper.
An option for less stable papers is a lightweight fusible stabilizer! Use a dry iron on medium heat and tack it down. Continue to stitch as usual.
Machine embroidery designs for cards
What types of designs work for paper embroidery?
Look for designs with fewer stitches to avoid poking holes in the paper multiple times. Choose linen paper over recycled wood fiber paper for a fabric-like surface.
Want to create your own embroidery designs without digitizing? Try a free demo of the Design Doodler software to see how easily you can doodle and watch your creations turn into stitches!
Here are the basic guidelines for paper embroidery:
- Less is MORE! Choose lighter designs with fewer needle points.
- Lighter designs would include more running stitches and more open spaces. You can use tatami and satin, which we will discuss below.
- When choosing a design, edit it to remove the underlay.
- Underlay is important, but removing it is critical because you don’t wear or wash it, and we want fewer stitches.
- Change the density to lessen needle points. Here are the recommendations for two types of stitches.
- Tatami stitch: remove underlay and change the density to 1.0-1.2 mm space (Hint hint… same settings as using mylar!) Depending on the paper, you can increase the density for a full color.
Always ensure the embroidery design you choose is digitized well. Check out our 30,000+ high-quality embroidery designs to find something for your next project.
-
- Satin stitch: usually, your satin stitches will be in the form of lettering. Using less density will get the best result and not ruin your paper. More dense can create too many needle points.
The image below is what your satin stitch will look like. Depending on the type of paper you use, you may adjust, but a good guideline is a 0.50 mm spacing between stitches.
We have removed the underlay here, but it does not affect the finished product.

The thread is entirely up to you. We used 40-weight poly neon thread and white bobbin thread for these examples. Matching your bobbin thread to your paper is important, but white is usually the best choice.
How to finish the back of your embroidered card
You can finish the back of your stitching to hide the bobbin thread and tie-offs. You can use so many different materials, including:
- Gift wrap
- Mylar
- Brown or kraft paper
- Card stock
- Fusible stabilizer covered by the above coverings.
Machine embroidery cards on paper or cardstock tutorial
This tutorial will help you create cards, tags, postcards, and even paper dolls! While the results are different, the basic method is the same.
Materials needed
Here is the list of supplies you’ll need:
- Your choice of paper: watercolor paper, piece of cardstock, handmade paper, or pre-made cards
- Medium-weight (2.5 ounces) cutaway stabilizer
- Temporary spray adhesive
- Colored paper or gift wrap to cover the back of your work
- Ruler
- Pencil
- Optional: glue stick, colored pencils, crayons, ink sticks, permanent markers
We urge you to experiment, and don’t get discouraged! Embroidery on paper is a lot of trial and error, but we know you will master this.
As we said above, start with watercolor paper. You do not need to purchase the most expensive kind; start inexpensive and learn.
Most watercolor paper has two different sides. One is textured, and one is smooth. You can embroider on either, and each has its merits!

A note about temporary spray: use spray sparingly! Though it is temporary, there may still be residue which can trap fibers or fuzzies.
You will use spray only to tack down the paper, but you can also use painter’s tape. Learn more about how to master embroidery adhesives.
Step-by-step how to make embroidery cards
Since our card will be 5×7 inches, we will use the 12×8 inch watercolor paper. We are leaving additional length on the edges to trim later after we have applied the backing. If using pre-made cards, make sure to measure carefully.
Here are the steps for creating a gift card:
- Digitize your object; remember, we recommend removing the underlay and lessening the density.
- Digitize a guideline for the fold of your card. Ideally, this is 1 inch longer on both sides so you can see how to line up your card.

3. Hoop a piece of medium-weight tear-away stabilizer in a hoop large enough for your card when it is folded.
4. Stitch out your guideline on the hooped stabilizer without the card and remove your hoop from the machine.

If you have a big hoop for two cards, put them with the “open” sides facing each other. This will prevent damage to the other half of the card.
5. Place half of your folded card along the guidelines and secure it with non-stick tape. Do not use sprays or adhesives as it will leave residue on your card
Remember that your card needs to be laid down front side up to stitch the design correctly. It is helpful to take a pencil and place a very light arrow on the front of the card pointing up for reference.


6. If you’re using a handmade card, create a fold by laying the card on a soft surface (we used leather) and run the back of a pair of scissors along a ruler after measuring (don’t press too hard or you’ll break the paper).

A piece of tape can be put alongside the outside of the folded line, which can secure the card and aid in placement.
7. Monitoring your machine while embroidering the design is crucial, and please slow down your machine. Do not be alarmed if you see some loopy stitches with your stitched design; it is not uncommon when working on paper. Also, watch for flagging, which is the bouncing of the frame and hoop (caused by the flaps of the card sticking up).
8. After your design is finished, please resist the urge to pull or tug on the card while removing it from the hoop! Use a pair of craft scissors and trim the stabilizer about ¼ inch from the edge of the stitching.
9. Stick a colorful or shiny backing onto your card design, like gift wrap or mylar. Even kraft paper can be cool! You can use spray or a glue stick, but you may find that the glue stick is easier to control.

9. After you have glued on your backing, let it dry, or if your card wasn’t pre-made, trim it. Voila! You’ve created your own embroidered card.

Here are a few things to remember when lining your card:
- When you spray, fold the card backward to ensure you do not spray the “message surface.” You can also tape a piece of paper over that surface.
- Use a thin paper, mylar, or fabric to close your card.
- Using an adhesive spray or stick will allow you to correct any wrinkles.
Embroidery paper ideas
Your options for what to create with paper in machine embroidery are endless! A few of our favorite things include:
Gift cards


Gift tags

Paper dolls


Luminaria

Recipe cards

Conclusion
Embroidery on cardstock offers numerous possibilities. We urge you to experiment for yourself, get creative, and keep these points in mind:
- Less is more, and avoid dense designs.
- Remove underlays from satin and tatami.
- Work slowly! Slow down your machine for better results.
- Work cleanly! Keep oil and grime away from paper.
P.S. It’s easy to make your own embroidery card with the Design Doodler, no matter your skill level! Download your free Design Doodler demo to create your own gorgeous design in a few clicks!

Thank you for the info on stitching on paper for card making. I have stitched a few in the past and want to do more,
You’re most welcome! It is super fun!
Thank you for explaining this process! Very clear and precise. Motivated!
Welcome 🙂 glad it helped!