Your embroidery machine has finished stitching the design. You hold the hoop up; the embroidery is flawless.
You feel excited that you have finished your project! You remove it from the hoop only to see markings around your stitch out! Is your garment ruined after all your hard work?!

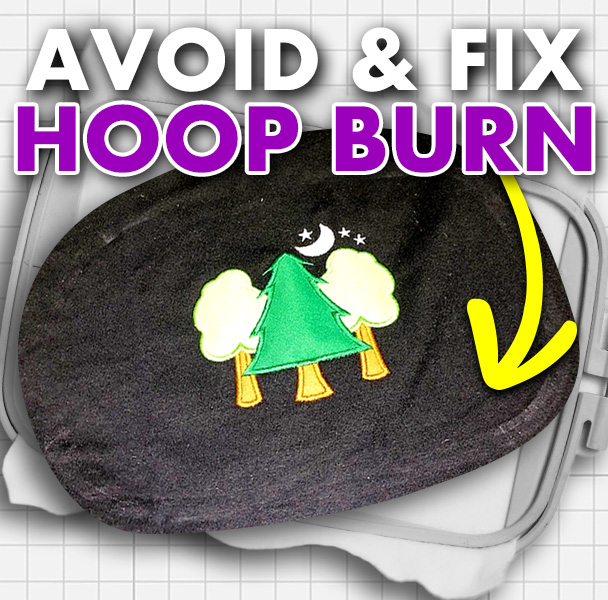
Let’s learn more about hoop burn and how to treat it without an expensive visit to the embroidery emergency room!
What Is Embroidery Hoop Burn?
It is the frustrating shiny mark left on the fabric in the shape of the hoop used. Fabric fibers distort from the compression and friction from the hoop halves.

We all want even, tight (but not TOO tight) hooping to ensure it does not shift when stitching an embroidery design. So what do we do?
We turn those tension screws on our hoop so it is nice and tight without the fabric in it. Then, we rock, twist, and smash to secure them while the fabric is in it. In the process, crushing your fabric can leave marks that may remain.
The hoop causes friction as it moves under pressure and compaction due to the lack of space available. Press air and moisture out of the fabric to force it into place.
Imagine shutting your fingers in a car door; that’s hoop burn. When this happens, you have two things working at the same time.
What Fabrics Are Affected By Embroidery Hoop Burn?
It’s important to know the type of fabric when treating burns. Petroleum and natural fabrics can react differently and be more sensitive.
Though you wouldn’t think it’s possible, under a lot of pressure and movement, you can slightly melt and compact petroleum-based fabrics. This can happen to fabrics such as microfiber, nylon, or polyester (think of the fabrics you can melt even with a low iron).
It resembles a rope burn; it has the sensation of a burn, but it does not result from heat. Friction and pressure make it feel that way.
With cotton, silk, and other “natural” fabrics that rely on moisture to stay soft, you can actually press out the moisture and air between the fibers and smash them down. To restore what was taken away, simply use plain water.
Fabrics such as velvet, terry cloth, and netting can be harmed if their threads or piles are crushed or moved, which can destroy the finished item.

Learn more about the different main fabrics used in machine embroidery.
How Can You Remove Hoop Burn In Machine Embroidery?
In virtually all cases, you can remove or, at the exceedingly least, lessen it!
Here are some of the best solutions we have found (let us know any solutions you have tried that are not on this list):
- Steam/water spray– use a clothing steamer or steam iron to steam your clothes quickly. Make sure to hold the steamer or iron at a distance from the fabric. Alternatively, you can spray some water from a spray bottle to make the fabric fibers moist again. Lightly brushing the damp (but not wet) fabric with a soft brush is often helpful.
- Laundry– for those garments that can be laundered, wash the item in the washer to leave your garment fresh.
- Vinegar– is often under-used and misunderstood as a household cleaner. You can use a dilute solution, spray lightly on your fabric (do not spray on rayon), and steam with a steamer. Make sure to test natural fabric in an area you cannot see to ensure there is no color damage. Wash your garment and your set!
- Lint brush– for fabrics like velvet and terry cloth, the best method is often to use a lint brush or sticky roller to tease up those fibers and loops.
- Spray starch– can also help to rehydrate droopy, dry fibers.
These methods will not be very helpful for non-washable fabrics or surfaces such as leather and vinyl. Let’s discuss how to prevent it.
While these suggestions may not remove all of the marks, they will help. We do suggest that you test any treatments on an out-of-the-way corner on your garment or stitching to ensure they are colorfast and can be treated with water.
How To Prevent Hoop Burn In Machine Embroidery
The greatest help is to avoid overtightening. This may sound tricky, but how do you know when tight is tight enough? Check out our machine embroidery hooping basics tutorial below for helpful tricks and tips.
Learn how to properly hoop your items for embroidery with our Complete Embroidery Hooping Guide. We will show you tips and tricks for great results!
Certain methods can minimize damage, but they are not a complete solution. However, they will help your project turn out smooth and undamaged. Check out our tutorial below for helpful tricks and tips.
Magnetic Hoops For Machine Embroidery
Magnetic hoops are very easy to use and reduce the marks on fabric. They come with a top and bottom, with extremely powerful magnets embedded in them.
If you want to simplify hooping, try Mighty Hoops! They work with many different embroidery machines, are less likely to experience fabric shifting, reduce wrist and arm strain, and make hooping the hardest fabrics easy! As a reseller, you’ll receive free shipping in the continental USA and design bonuses if you purchase through us!
You must be cautious when handling these because snapping your fingers between them will leave a mark. Patients with pacemakers should exercise caution as the magnet’s strength can disrupt their device, and they should refrain from using it.
Any hoop works perfectly with the Echidna Hooping Station as it makes hooping easy without the struggle!
Floating In Machine Embroidery

Floating is exactly like it sounds: you float the fabric. This hooping method works for small projects such as ITH or light fabrics. In short, you hoop a piece of stabilizer and then baste, with stitching or spray, the item you are embroidering.
This method is not recommended for shirts, hoodies, blankets, etc., as they are larger and will shift during embroidering. Floating is useful because you are never actually hooping your fabric and, therefore, cannot damage it.
Masking Fabric In Machine Embroidery

You can make a mask like a mat in a picture frame to protect your sensitive fabrics (leather, suede, velvet, silk, etc.) from hoop burn. With fabrics like velvet, which has a nap, take an extra piece of the same fabric and lay the nap side down so you are nap to nap. This provides a cushion and gives the hoop a good grip.
Get your complete guide to properly embroidering on leather and vinyl garments to avoid problems and get better-embroidered results.
Conclusion: No More Embroidery Hoop Burn!
Here are a few of the points we covered…
- The fabric needs room to breathe; don’t squeeze it! Make sure hoops can easily close and do not over-tighten.
- Spraying water or washing the item usually fixes most issues (depending on the fabric).
- Try a new way to hold fabric, like floating or using magnetic hoops, for easier embroidery.
P.S. Don’t forget to check out our Echidna Hooping Station to make hooping easy without the struggle! You can also check out our Embroidery Legacy Design Club to save 90% on embroidery designs now that you know how to fix and avoid hoop burn!

I liked the hooping information. Especially masking your design with the same fabric. Thanks for the informative posts
Glad you liked it, thanks for reading Sandi!
I have watched a few of your videos, they are very informative. very easy to follow along, they have taken a lot of the guess work out of what is needed to be successful in the embroidery business. thank you so much for all the information you provide.
We appreciate your feedback & support Jacqueline 🙂