When choosing your home décor, how often do you find the perfect decorative pillow to accent your home? If you’re like most people, the answer is almost never… So why not make one?

It can take many store stops, and too many aisle walks, to find exactly what you have in mind to perfectly compliment your home décor.
Instead of looking for the perfect decorative pillow, why not make what you envision for your home? You can personalize your pillows to showcase your look best, and when making it yourself, you know the outcome will be something you would’ve wanted to buy anyways. Not to mention you can brag to others how you created them yourself!
Why Create & Embroider A Custom Pillow?
Changing the look of your decorative pillows can give a different feel to your space to nicely accent and bring your personality into any room. Plus, why not show off your creative embroidery side to you friends and family?
Whether you’re changing your pillow pattern for a modern living room beachy feel, or to something cute for a little girl’s bed throw pillow, change is easy. Varying the look can be as simple as changing the fabric and design you use. Deciphering which stabilizer to use with each fabric is easier than you think too, simply check out our complete guide to embroidery stabilizers.
As you create new pillowcases, you can switch the actual pillow, allowing you to change your room’s accent as often as you’d like while on a budget (shh no one has to know)!
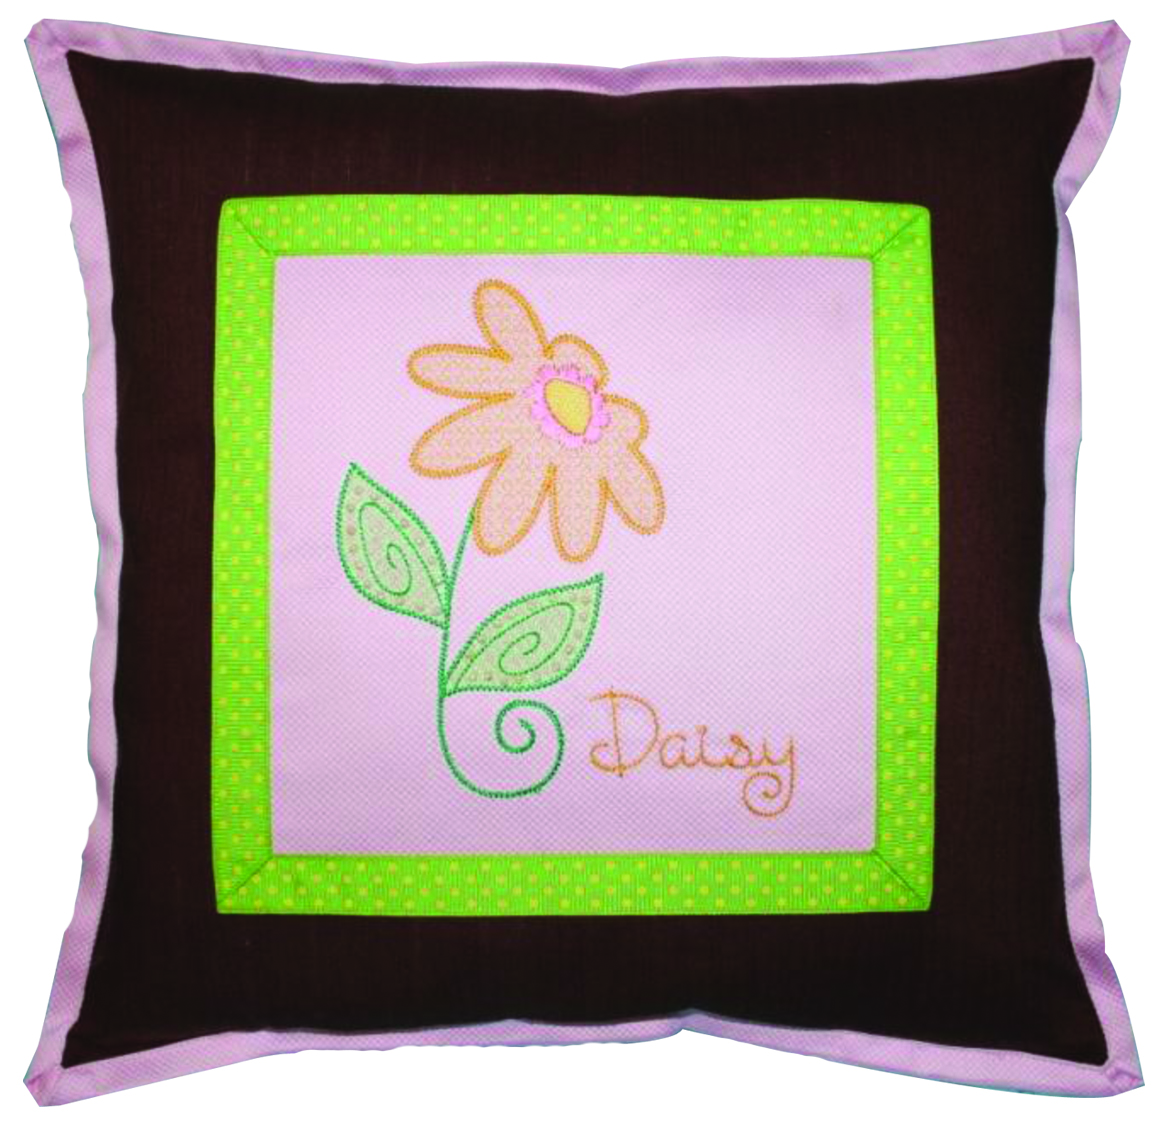
Now keep in mind, you don’t have to use this Daisy Design for your pillow. To really personalize your custom embroidered pillow, you can choose from our giant database of close to 30,000 quality embroidery designs, or you can create your design text or image with our free 30-day Hatch embroidery software trial!
Not only do you get to make something you know you’ll love and will be unique, but you’ll also save money while doing it!
Supplies Required For This Embroidery Pillow Project:
- 2-3 pieces of complimentary fabric
- Ribbon
- 16″ pillow form
- Daisy design
Daisy pillow with ribbon trim project tutorial:
Click here to view our beautiful collection of pillow patterns. These designs are also included in the Embroidery Legacy Design Club. Click here to learn more about the club.
Step 1 -Embroider your fabric with your daisy design, square up your fabric. In this case, our center is a 12″ square.

Step 2 -Protect your embroidered piece, serge, or over-edge stitch around the outside.

Here you can see the edges have been serged, and the thread end is tied off.

Step 3 -Center your embroidered piece onto the other fabric for the front of your pillow. For a 16″ pillow form, your larger square should be 17″, giving you a ½” seam allowance. For added stability, you can also serge the outside edge of your larger square.

Step 4 -Use a basic zigzag stitch to sew your embroidered piece to the larger square.

Step 5 -Add a ⅞” ribbon trim around the centerpiece. To cover your zigzag stitching and help keep your trim straight, mark a ½” border around your center square. Extend the lines past the corners so you can see where to pivot your stitching.

Instead of joining the trim in the middle bottom of the center square, hide the ends in the bottom left corner. Pin the ribbon along your marking line on the first side, leaving about ¼” extra at the beginning of your seam to turn over.

Step 6 -Turn under the beginning edge of your ribbon, lining up the folded edge just slightly inside the marking line. Start stitching close to the outside edge of the ribbon and continue until you reach the first corner.

Step 7 -When you approach the corner, stop stitching when you reach the second edge marking line. Raise the presser foot and pivot your piece.

Step 8 -Line up the ribbon along the marking line and pin in place. Carefully fold the ribbon corner out of the way and continue stitching along the outer edge to the next corner. Follow the same procedure for the third corner, and stitch the fourth side of the ribbon, stopping 2-3″ from the end, leaving the needle down.

Step 9 -At the last corner, the needle should be down about 3″ from the corner. Trim the end of the ribbon about 1″ past your corner. Fold the ribbon back along the edge of the ribbon on your beginning edge.
Finish stitching to the end and backtack the seam end.

Step 10 -Trim a small amount of the underside of the ribbon at an angle.

Step 11 -Fold the end of the ribbon under, creating a 45° mitered corner. Pin in place and continue pinning the inside edge of the ribbon along all four sides.

Step 12 -At each corner, fold the ribbon under, creating a mitered corner and pin in place.
Instead of starting your stitching directly on the first corner, move a few inches past the corner and start your seam. This will help conceal the beginning and end of the seam.

Step 13 -When you reach each corner, leave the needle down, raise the presser foot, stitch along the mitered edge to the corner, and then reverse the stitch back to the inner corner. Leave the needle down, raise the presser foot and pivot the piece, then continue stitching.

Step 14 -When you’ve finished, you will have four beautifully mitered corners, and the beginning and end of your trim will be hidden in a corner.

Step 15 -This is how the front of your pillow should look. Add an 17″ square backing piece, stitch ½” seam allowances, and use a 16″ pillow form to complete your project.

Step 16 -Voila! You’ve created your personalized pillow.

Conclusion: Embroider Your Own Custom Pillow
Now that you know how easy creating your own custom decorative pillowcases is, why would you ever need to buy another store-made one? Creating something to brag about that perfectly accents your home décor and is budget-friendly is a no-brainer! What are you waiting for? Start some new pillow décor!
Also, if you need a design for this pillow, browse our giant collection of over 30,000 machine-friendly embroidery designs, or if you’ve never tried our designs before, download our free Embroidery Legacy Design Kit.
Happy stitching!
Beautiful!
Thanks Lori! Glad you like it.