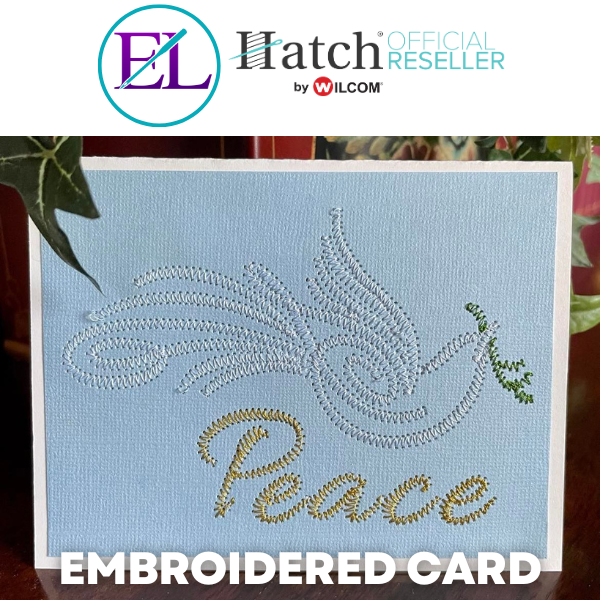
This Embroidered Card Tutorial is by Linda Rayburn
This tutorial teaches you how to create an embroidered card embroidery design using your Hatch Embroidery Software.
Don’t have Hatch but still want to participate in this tutorial? Download a free 30-day trial of Hatch through us and we’ll even throw in some bonuses!
Remember to download the free ESA Dove file for this project below.

Step 1: Select Digitize > Outline > Square. Drag a Rectangle on the screen. This will be the Placement Line.
Step 2: Select the Rectangle > Click on the Lock to Unlock it > Resize the Rectangle to 5.25” wide x 4” high.
- Center the Rectangle on the screen by placing a 0 in the X and Y Position.

Step 3: Open the Dove EMB file by selecting the Design Tab and finding where the design is stored on your computer.
Step 4: Resize the Dove to approximately 120mm wide x 55mm high. Center it inside the rectangle.
Note: If you own the ESA Animal Swirls Glyphs you can bring it in using the Lettering tab.

Step 5: Select the Dove > Edit Objects >Break Apart
Step 6: Select the Dove > Object Properties > Change the Manual Spacing to 1.7mm.
- This will reduce the Density of the design, preventing the stitching from cutting a hole in the cardstock.
Step 7: Remove all of the Underlay by unchecking the box. Also, Increase the Pull Compensation to .8mm
- Removing the underlay will prevent extra stitching and less perforation of the cardstock.
- Increasing the Pull Compensation makes the Satin Stitches wider.

Step 8: Select pieces of the Branch and change them to Green.
Step 9: Delete the Eye and several pieces of the Branch. By deleting these small and extra overlapping objects, you will get better stitching results.

Step 10: Select the Blue objects below the Branch and move them up in the Sequence Box so the Dove stitches all at once.
Step 11: Add your Text. I used the ESA Allura 25mm font in this example. Place it under the Dove
Step 12: To adjust the letter spacing on the text if needed, Select the Text > Reshape (Hot Key H) > Right-click on the letters you want to move closer > Drag into position. This will move all letters that are to the right.
- If you Left-click on a letter, only that letter will move.

Step 13: Select the Text > Edit Objects > Break Apart (you may have to Break Apart several times until it is grayed out > Change the Manual Stitch Spacing to 1.7mm, > Remove All Underlay > Change the Pull Compensation to .80mm
Step 14: You will notice some Running Stitches under some Letters. This is because the Start and Stop points are not at the very beginning and end of the object.
- Select the Object where you see this happening > Select Reshape (Hotkey H)
- Right click on the Start Point the Green Square and move it to the Beginning of the object.
- Right-click on the End Point of the Red X and move it to the End of the object. The inside running stitch will now go away. Repeat this where necessary.
Step 15: Delete any tiny objects, if necessary, in your text. Save your design as an EMB file and Export it to your machine’s file format.

Stitching the Embroidered Card
Supplies:
- 1 piece of Cardstock 5.25” wide x 4” high
- 1 Folded Note Card 5.5” wide x 4.25” high
- Tear Away Stabilizer
- Temporary Spray Adhesive or Masking Tape
- 2 sided Tape
Instructions:
- Hoop the Tear Away Stabilizer and stitch the Placement line.
- Lightly spray the back of the Cardstock or use masking tape to secure the paper to the stabilizer on the Placement Line.
- Stitch the design.
- Un Hoop and carefully cut the stabilizer away from the back of the cardstock.
- Use 2-sided tape to secure the cardstock to the front of your notecard.
Perfect for birthdays, Christmas, or baby showers, stitch out your own embroidered card!
Join our Wilcom Hatch Embroidery Software Facts Facebook group for more helpful tips & tricks or any Hatch-related questions. Don’t forget to check out our 1,000+ ESA fonts to perfectly embellish your next embroidery project.
Leave A Comment