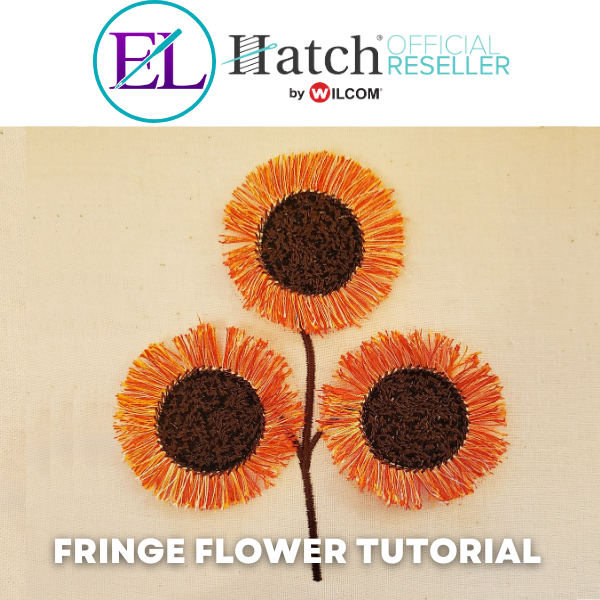

This Fringe Flower Tool Tutorial is by Ena Hitt
This tutorial teaches you how to create your very own fringe flower embroidery design using your Hatch Embroidery Software.
Don’t have Hatch but still want to participate in this tutorial? Download a free 30-day trial of Hatch through us and we’ll even throw in some bonuses!
")
Step 1: Use Digitize Open Shape > Satin Stitch to digitize the Stem and Branches for a flower
Step 2: Select All (Control +A) > Digitize > Branching
- You can select your Entry and Exit Points, or you can double tap Enter, and Hatch will determine the Branching

Step 3: Use Digitize Circle- Outline- Running Stitch to create 2 Circles
- The Outer Circle should be no more than 50mm; The Inner Circle should be no more than 26-32mm
Step 4: Select both Circles > Align > Align Centers
- The inner Circle will be placed in the middle of the larger circle
Step 5: Select both Circles > Type “K” on the keyboard to lock them in place so they won’t move
- These Circles will be used as a guide to digitize the fringe. They will be deleted once the fringe is created.

Step 6: Digitize the Fringe -Select Digitize Blocks > Fill > Satin Stitch to digitize around the inner and outer circle.
Please Note: Depending on the type of embroidery machine you have, the maximum stitch width of a Satin Stitch is 9-12mm. Your machine may stop stitching if the satin stitch is too wide. Please adjust your satin stitch width accordingly. Try a test stitch out to know for sure,
Step 7: Select the Fringe Object > Change the Stitch Settings to Manual Spacing > 0.75mm and have Auto Split Unchecked.
Step 8: Remove all Underlay

Step 9: Select the Fringe Object and Duplicate it twice
Step 10: Change the Color of the second Fringe Object and change the Manual Spacing to 1.0mm
Step 11: Change the Color of the third Fringe Object and change the Manual Spacing to 2.25mm
Step 12: Select the Circle outlines > Type Shift + K to unlock them
- Now Delete the 2 circles

Step 13: Turn True View off (T) Select Digitize Closed Shape>Outline>Triple Run. Digitize a Circle just inside the inner edge of the Fringe objects.
- This Triple Run stitch will hold all 3 of the Fringe Layers together when you get to the final step

Step 14: Digitize the center of the flower using a Close Shape > Filled Circle with a tatami stitch.
- Make sure the circle is larger and covers the Triple Run Stitch
Step 15: Select the Fill and Change Stitch Spacing to .50mm > Travel On Edge > Edge Run Underlay

Step 16: Select the Center and Duplicate it 2 times
Step 17: Change the Color of the second Center object.
- Change from Tatami Stitch to Stipple Stemstitch > Loop Spacing 2, Stitch Width 2, Stitch Spacing 1, Angle 50, Stroke 1
Step 18: Change the Color of the third center object > Change from Fill to > Outline > Stem Stitch

Step 19: Select All of the parts of the Flower > Right Click and drag a new flower in place on the stem
- Repeat with the third flower
- The design is now complete. Save as an EMB file and export to your machine file.

Step 20: Stitch out your design and leave it in the Hoop. Turn the hoop to the back side. Carefully use scissors to cut the threads just inside the outside edge of the flower.
- Be careful not to cut the fabric, only the thread.
- Turn the design over and use your fingernail or soft brush to “fringe” your flowers
Note: Depending on your embroidery machine, it is important not to exceed the 9-12mm distance when creating the satin fringe.
Congratulations, you have successfully created fringe flowers!
Join our Wilcom Hatch Embroidery Software Facts Facebook group for more helpful tips & tricks or any Hatch-related questions. Don’t forget to check out our 1,000+ ESA fonts to perfectly embellish your next embroidery project.
Hi this is a great lesson on fringe flower, does it stay in your account for future reference or does it disappear after a little while, i hope it stays in my lessons because i can see myself using this a lot
thanks
hazel
Hi Hazel, feel free to save the page in your tabs 🙂