Have you ever wondered how to add a touch of realism to your dog and cat embroidery portraits? If you want to learn how your thread can resemble lifelike details like fur and hair, you’re in the right place!

Texture is vital in embroidering people’s and animals’ fur and hair. We will build on the skills we learned in our first embroidery portrait article.
We suggest reading our first article of this series, Easily Create Custom Pet & People Portraits with your Embroidery Machine before continuing. This will help you understand the subject better.
We’ll look at a few ways of filling your outline and creating some texture. Our goal is to use less fill when creating designs to avoid excessive stitching, resulting in bulletproof embroidery. Instead, we will use color blocking and embellish the fills with additional textural lines.
In this article we’ll be using the Design Doodler, which is an embroidery software that is as easy as creating a design in the click of a button! Try a free demo of the Design Doodler to create your personalized designs.
Embroidery Texture Accents
Texture accents are when you add a few more lines to accentuate something in your portrait. It makes a beautiful addition to your line drawing!

In a few strokes, it can take line-drawn dog embroidery to a fluffy furry friend.
Embroidery Texture Fill
Texture fills are basically more lines added in to flesh out the design. Try this after working through the general outlines. These will provide detail and can bring the subject to life. Using texture lines is effective in creating a 3-dimensional face.

Let’s discuss an easy way of picking what you will accent and how much to do.
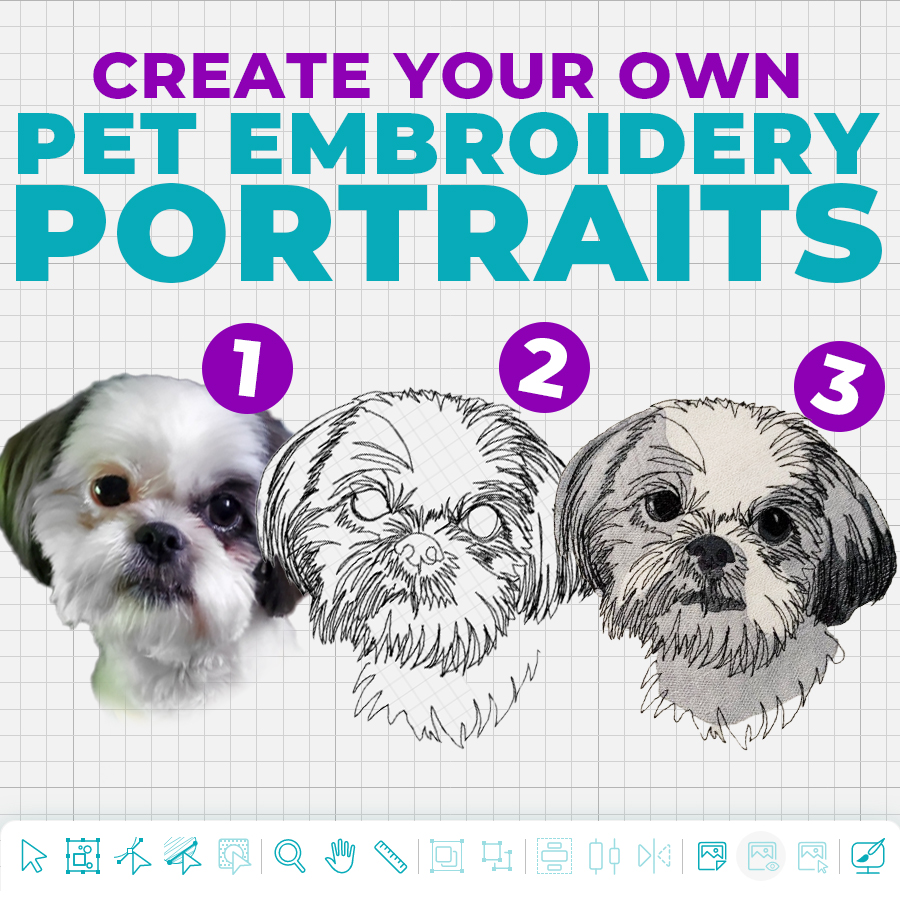
Start with an outline you like. We suggest choosing a simple animal with short or medium hair with only a few colors.
We’re using Mille, a super cute Shih Tzu, for this example. Here are the steps we took:
- Choose a good-quality photo (not a thumbnail; you might need to resize it larger).
- Insert the photo into your Design Doodler Software.
- Create a basic outline.
- Draw around the perimeter.
- Draw in the eyes (just the iris and outline of the eye. Right now, we will not color the iris and pupil).

4. Outline the nose; simple is all you need.

5. Choose several features to outline
- Chin
- Ears
- Snout
- Any fur feature that makes your furry friend unique.
- Remember, less is more! Experiment with the least amount of detail you can use.

Adding Texture In Embroidery
With this simple outline, we can create fill and texture with lines! Adding texture using lines can simulate a couple of things:
- Depth and shadow
- Color
Let’s explore both of these techniques.
Look back at Millie; she has recessed eyes, neck, and ears, and her nose is sticking out. You can fill in more to show depth.
Fill in more on the areas farther away from you and leave the ones closer less filled.
Look at Millie again; she has basically three colors on her face: black, grey, and white.
We can use more line fill to show darks and lights. Fill darker colors more, fill light colors less, or even leave them blank!

Practice with a basic pet picture. Add more fill for darker colors and recessed areas to make your stitching come alive. Let’s check out color blocking!
Embroidery Color Blocking
Color blocking in fashion changes how the body looks without changing the body itself. It involves using clothing as a canvas to create bold and contrasting colors.
We will use this theory to fill in and reduce stitches while still creating a great portrait. We can find the “color blocks” and turn them into digital form. Then, we can use our line technique to fill and add texture.
One of the first ways to color block is to change how we look at pictures. When you get right down to it, pictures are just areas of color, some large and some small. We will stay on a huge scale. We have a couple of tricks to make it easy for you.
If you have not heard of a “cartoonizer,” check them out online. Free versions can get you started. A cartoonizer is a graphics program that takes a picture and adds filters. Some will allow you to color block.
Here is what Millie looks like when she is color-blocked.

If we break this down into three colors (light, medium, and dark), here is how the cartoonizer helps.

Using this information, this is what she looks like as a filled digitized dog.

Different variations of this technique exist, but here are things to keep in mind:
- Your color blocks don’t have to touch each other; sometimes, a little gap helps give the design some interest.
- You can leave areas blank if you’re stitching on white.
- Use a less dense fill. Shade these areas, but they don’t necessarily need to be covered.
- You can use loose fills and overlap them to blend.
- Remember that your fill does not have to all go in the same direction. Changing the stitch direction will create some nice texture and 3D effects.
Putting them all together
Whether you choose one or all techniques, they can produce a great result! Here is what Millie looks like with all the techniques together.

In future articles, we will discuss eyes and other features like noses in further detail. However, here are some examples of eyes and noses.
A colored area (the iris) and a dark (almost black center that looks into the eye (the pupil) exist. Because it is a wet sphere, you will often see a glint of light or white. Please be careful adding these. The satin stitch is your best choice, and please keep it minimal!
Also, remember that accents are not in the same place on each eye! If you are working from a photograph, use that for guidance.
Here is the order you build your eyes:
- Lay down a crescent of color for the pupil.
- Digitize your pupil (the dark part) and make sure they overlap; it is one place we want saturated color.
- Add your glimmer of the eye using the satin stitch.
Here is another take on the eyes.

Doodled by the talented Christine Buhr
Great use of black and white and just colored eyes to make them pop!
Other tricks to create embroidery fur
Let’s look at different types of fur…
- The picture above displays short fur, which you can achieve with just a single line. You can use short zig zags or hash marks for the slightly longer hairs.
- Exceedingly long fur, like Miss Kitty, requires a combination of color block fill and hair texture.

You can see the beige underlay under the long hair.
- To create curly fur, you can draw out the curls and fill the tips or darker areas.

Other ideas!
We have absolutely NO end to the possibilities! Your imagination is the only limit to what you can create.
Many other ideas you can try!
- Create easy fur using applique! A fun fabric, fur can create beautiful textures and patterns.
- Use a coarse woven fabric and fray the edges for a more 3D fur appearance.
- Experience with different colors. Who says a Doberman must be black and white, not purple and green?
- Try out permanent watercolor pencils and see what a little imagination and an iron can do!!
Check out what permanent watercolor pencils did to our portrait of Mille.

Interested in trying other products with your embroidery? Here are our recommended products for fabric paint and fabric pencils. Let the fun begin!
Conclusion: Create Your Own Dog and Cat Embroidery Designs
Of course we had to share what Miss Millie would look like and all the techniques we just went over together.

We have covered a lot, but there will be more in future articles about pets and people. We will focus on eyes, noses, and other unique features to make your portraits great!
Here are some of the main takeaways we have for you:
- Less is more! We tend to do too much, which muddies the portrait.
- Use computer aids until you are more adept. Try using a cartoonizer or other graphics program to simplify your design.
- Create your own take on the portrait. Each artist has their own unique point of view. You may create a Millie design in a whole new way!
Remember to start slow. It takes time to learn how to make portraits with the Doodler or other software. Starting simple makes the process easier.
PS If you haven’t already, try a free demo of the Design Doodler Software to easily turn your pet portraits into lifelike embroidery! And be sure to join our Embroidery Design Doodler Software Official Group for great tips, tricks, and other fantastic doodles!


Is there a video on how to create an animal print, I recently lost our 15 year old cat and would love to create a memorial of her. Thank you
I’m so sorry for your loss Claudia! We do have a video on using the Design Doodler to create a design from an animal print. You can watch Ken show you here: https://www.youtube.com/watch?v=Tp420ttQwG0&list=PLa-zHiRgIxqNmL8pBCyA0oyrp380g8TbU&index=4