You know those wonderful symbols which stamp an item “forever mine” and look pretty good doing it? That’s right; I’m talking about the monogram! Monograms create something personable and are a prestigious way to mark something your own, which can be why they are so expensive. We’re going to show you how to create your own monograms without the hefty price tag.

This article will cover:
- What monograms and ciphers are, where they came from and where they can go
- Embroidery monogram fonts
- Some ideas to personalize your own monogram using Hatch embroidery software and ways to create monogram embroidery into something uniquely your own
- Tips when creating monograms
- And finally, how to digitize custom monogram designs
What Is A Monogram?
A monogram is a motif made by overlapping, intertwining, or combining two or more letters to form one new symbol. Monograms combine the initials of an individual or a company, and these can be used as recognizable symbols or logos.
Want an easier way to think of it? When you combine letters, and each one depends on the other to contribute a portion, it is a Monogram (mono=one). It makes up one new symbol.
Want to make it a little more complicated?
Ciphers! They bring to mind ultimate spy movies and code-breaking but sorry, this kind of cipher is a bunch of letters on your gym duffle bag. A cipher also combines letters, but they don’t have to be layered or overlapped, and if you took one out of the set, it would be readable. A series of unconnected initials is properly referred to as a cipher and is not a monogram.
Need a visual?
A monogram looks like this: (2 or more letters intertwined to make a new symbol)

(Thomas Jefferson) Look carefully…
Need a bit more help?

Johann Sebastian Bach
Many monograms were letters from the owner’s name intertwined forward and backward.
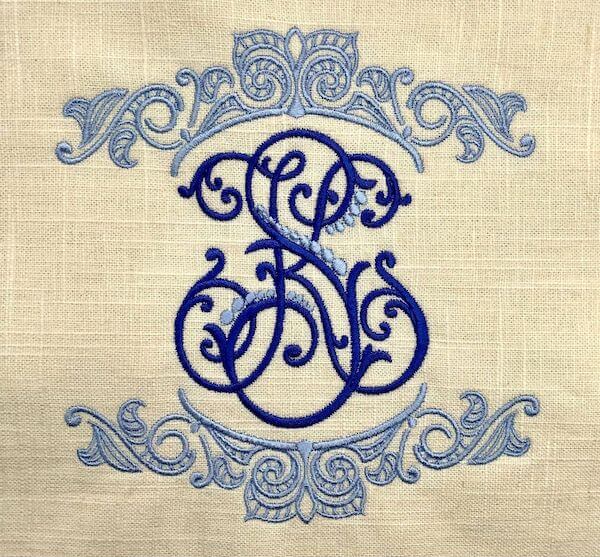
A cipher (remember it is the opposite of what you have always thought) is two or more letters and are not woven together, however, they can overlap. Such as the image below.

This image was made using our ESA font Diamond Monogram 50 mm, click here to see it now.
It sounds confusing, but nowadays, “monogram” has also come to mean anything sewn, painted, engraved, embroidered, or embossed on clothing, luggage, books, and as many things as you can imagine. They are intended as a mark of ownership, some simple and some plain.
Now that we know a bit about the differences between monograms and ciphers. Let’s look at the history. You will probably know more than you think about them and might be surprised if you poke around in history books to see how many you already know!
Monograms first appeared on coins as early as 350BC. The earliest known examples are of the names of Greek cities which issued the coins, often the first two letters of the city’s name. Monograms have been used as signatures by artists and craftsmen on paintings, sculptures, and furniture, especially when guilds enforced measures against unauthorized participation in the trade.
What Are Monograms Used For?
Some companies and organizations adopt a monogram for a logo, usually with the letters of their acronym. So that we don’t overstep copyright, we will not name them here but let’s say that numerous sports teams and designer companies have monograms. Fashion is a heavy user of monograms. There are three major purse designers that all use ciphers for their logos (remember, a cipher is a grouping that allows you to read the individual letters). These have all become internationally known “logos” for these brands.
Problems With Monograms
I want to introduce you to my good friend Beauregard Pernicious Robespierre. (not his real name…) Let’s think about the letters BPR. Should we take these letters and stack them one on top of another, you end up with a B with a bit of tail on it.

Not really readable, right? So if this is a monogram (intertwined letters to form a new symbol), this just does not work. To have a monogram, you sometimes have to get creative with it! You could try this.

Not super readable either, right? If you glance at it, you see B with a bit of tail. You can also turn letters around (a famous handbag and clothing designer comes immediately to mind).

Better but now reading as B and R. Sometimes the choices are not there, so you have to go a different direction. How about this?

Now, this is a cipher. It is readable; I can take one letter out, read it and still see the other letters. There is a Large R in the middle- generally speaking (but not a rule), the middle letter represents the last name, the left the first name, and the right the middle (or maiden) name. This cipher is the most common type for shirt cuffs, pockets, collars, bags etc. You can whip this up so quickly and cleanly on your own or using the built-in Monogram Groupings in Hatch embroidery software.
Please note that in Hatch software, these are called “monograms,” even though we call them ciphers in this article. The use of the word monogram is okay because that is in the English vernacular.
Embroidery Monogram Fonts
There are many different ways to embroider a monogram, but the most effective ones require some form of embroidery software.
Yes, you can purchase finished monogram embroidery designs (click here to view ours), but most professional embroidered monograms are made with keyboard fonts whether they be ESA, BX or Truetype formats (click here to view a complete guide on the different embroidery font types).
We prefer to use .ESA based fonts because they’re true object-based fonts that give you better-embroidered results… Plus they’re incredibly easy to use!
That said, creating monograms for your embroidery projects is easy with the right tools. Wouldn’t it be nice to create your own monograms with a few clicks of your mouse? We have a treat for you…

Download the free trial of Hatch embroidery software and try creating your own monograms free today! Try out a free 30-day trial & get exclusive bonuses when you download from us as an official reseller. You’ll get full access to all of Hatch’s top features so you can “use it like you own it,”, plus we’ll even throw in a free monogram video lesson!
How To Create Monograms In Hatch
To create a monogram and cipher in Hatch 2, open a new document, and select “Lettering and Monograms” on the left side. This directs you to the pre-installed fonts and design setups to use for ciphers.

Here is the Monogram layout choice tab. You can choose designs, ornaments, and borders.

Simply choose your font and then type in the three letters of the letter set you want to embroider, and they will appear in the format you select.
")
This design can be resized to work with your application and hoop. The choices are endless and beautiful and take only minutes to do!
Now, remember that the classic terminology seems a bit backward, but we will still talk about ciphers and monograms for this article. The Hatch 2 software calls them “monograms.”
How To Create A Monogram
You can create a Monogram (one set of intertwined letters) in several ways…
Choose 2 or 3 (or more if you are adventuresome) letters in a font you like. Remember not to choose a complicated font because the more details you add, the harder it will be to read the letters. Here is a simple one: KAK
Here is a monogram for Karen Kirkegaard Autumnbow (famous International jetsetter and international spy). Be inventive!! You will notice that together the Ks are symmetrical- if I turn one around, they can sit back to back and read well! The A is also symmetrical on its own, so it is perfect in the center.

Here are the two Ks together.

Here is the A added in.
Pretty cool, huh? The combinations for Monograms are endless! And these monograms are done using plain old letters found in the Hatch 2 program.
Remember that you need to work with each of these letters separately so that each letter is an individual unit that you can move around and manipulate. If you enter them all three together, you will have a cipher; they will be locked together and not be as creative.
So what happens if you do not have symmetrical letters? You still have lots of creativity but just a different kind.
How about CLB? Not a lot there, but we can still make a beautiful Monogram. The trick here is NOT to try to make it symmetrical- and just interesting enough to start. You can supplement this design with some more goodies. (coming a little later…)

You can still see the C, the L, and the B, but they are not so “readable” as the cipher. Now on this one, the letters have been manipulated a bit. The B is twice as large as the other letters (change the size using the “select/lettering,” and the L has been stretched out. Use the “width” setting under the advanced tab after you have selected the letter.

Fonts For Embroidery Monograms
The hardest part is choosing your font and the layout of how you want to stylize your letters. Each different font and single tweak to a design can greatly impact what your outcome will look like. This is fun because no matter what you change, it will look different! You’re able to personalize monograms more than you know.
Have you heard about ESA embroidery fonts? They’re a super-easy way to create quality embroidery lettering and are “Embroidery Specific Alphabets.” They are an embroidery font file format specific to Hatch and Wilcom embroidery software. They’re keyboard fonts that are the most customizable form of embroidery font. They can be easily adjusted, resized, and reshaped to give you professional results.

If you’d like to learn more about ESA fonts and what they are and do, click here to read more.
Did you know at Embroidery Legacy we offer more than 800+ ESA Embroidery fonts? We believe the more embroidery fonts equals more creative potential. Each of our fonts have been tested and inspected by John Deer, the world’s most awarded embroidery digitizer. We guarantee every one of our fonts will give professional results each time!
Did we mention we have several ESA font categories to choose from? Our categories range from applique, basic, 3D, gothic, monograms, holidays, script, just to name a few! Click here to check out our almost 1,000 ESA fonts we offer.
Now things can get interesting…
We have a pretty cool arrangement; it looks interesting and flows well, but we can do a little more… and a little more is a good thing. Why not try adding an element- a branch, leaf flower, swirls, anything that expresses “you!” Here is the same monogram but with two simple elements added.

These are called ESA Flexi shapes, ESA glyphs, and ESA flexi fonts! These will help bring your fonts and monograms to the next level.
- Flexi shapes are an easy way to create unique shapes in your Hatch software; since they are assigned a keystroke, you can customize these shapes
- ESA glyphs help embellish your font using a shape or a letter; there are also customizable
- ESA flexi fills are more flexible fonts, allowing you to create beautifully dramatic effects.
To check out our many ESA shapes, glyphs, and flexi fills packs, to help bring your monograms to the next level, click here.
Simple, clean, and nice. It should be noted that when you start, start simple! Less is usually more, and you have to remember that these are generally not used in a large format like a full back piece on a jacket. Until you know what works be very simple. When using nature elements, keep in mind that natural things grow in natural ways. They do not have to be symmetrical or perfect.
Tips To Creating Monograms For Embroidery Machines
Now that we have looked at these basic ways of doing ciphers/monograms, let us look at the most challenging. Want to go crazy? Digitize your own! A monogram done by you is the most personal thing you can make. With a few simple guidelines, you can be up and running creating your own history. Start by deciding what letters you need and what characteristics they have (symmetrical, circles, triangles etc). Look at examples other artists have done throughout history. Ready?
When designing a monogram, you can take three letters (or so) and sketch them out. Here is a monogram for EBH in the sketch (on the back of an electric bill)) and how it ended up. There is an E and a B, and two H’s crisscrossed to make a nice framework. He was looking for a shape he liked and then fit the letters in.
Tips to creating the perfect monogram:
- Start simple. Use a simple font; if it is too complicated, you will be the only one who knows what it says. Start simple, learn what works for you and then develop your skill.
- A little planning goes a long way! Plan a shape, a theme, a “skeleton” to build on.
- Less is more when you have a working copy, print it out, and stand back. How does it look from 10 feet away? If I walk in the room and see linens, will it look good from farther away than a computer screen?
- Add elements sparingly. Too many small elements will give you bullet-proof embroidery.
- Use glyphs from the Deer’s Embroidery Legacy website. These are designed to be resized, and they are professionally digitized. Unless you feel comfortable digitizing your own flower, why not let an expert provide the file, click here for more.
- Try to use Flexi Fill fonts to give texture. Like the Glyphs, they are professionally prepared, so they work and provide soft, supple embroidery, click here to view flexi fill fonts.
- Try frames or glyph adornments above or below the font. If you have seen the monogram choices in Hatch 2, the more ornate choices use frames.
Here are some ideas from our very own, Linda Rayburn. She has brought so many beautiful and inventive uses of the historic monogram combined with the modern twist frames, borders, and fills. Besides being beautiful- her monograms are extremely stitch-friendly. They could have only a few trims which make for a soft and supple stitch out. It seems intimidating at first, but with practice, this becomes a sort of game to be the fewest trims possible.

Beautiful GA example.

MM This is a very inventive example, if you have two letters that are identical, why make them the same? Combining here gave a lovely example.
Linda added the ESA Frame 2 Glyph “G” to this design.
How To Digitize Monograms Designs
Here are a few great tips from our very own Linda Rayburn, known on our Hatch Facts Facebook group for providing great tips for your digitizing needs!
- Try out our Free Personalized Hatch Project: Monogrammed Towel. During this free project, we give you our ESA monogram font we use in this lesson 100% free (regularly $9.95!). Click here to download your free lesson with Linda! You can see how easy it is to use ESA within your Hatch software to create a custom embroidered monogram. (Don’t have Hatch? No worries, we’ll supply you with a free 30-day trial!)
- Always print the artwork.
- Find the objects that are furthest back in the design and start there.
- Use a pencil or colored pencils to path the design and make notes of challenging areas.
- Properly path the underlapping and overlapping Satin objects with Run stitches for efficient stitching.
- Always test stitch your design and watch it sew out. Stop your machine when you see a section that could be changed or improved, and make a note of it on your artwork. Go back and revise the design
- Start with simple designs and have fun!
- Linda applies the theory of properly pathing designs and digitizing lettering she learned in John Deer’s Digitizer’s Dream Course whenever she creates Monograms and Ciphers.
Interested in learning more about what pathing is and why it is so important when digitizing? Click here to find out more.
Conclusion: Start Your Custom Monogram Embroidery Project Today
Okay, overloaded? Take a breath. Start simple and keep experimenting. Of course, we all want to do the most on our first try, but it will take patience and practice to develop your skill. I highly suggest using ESA fonts and then add some small elements to develop your design gradually.
To see how easily you can create your own monogram designs, don’t forget to create your free custom embroidered monogram with our very own Linda Rayburn. We even throw in a free ESA monogram ($9.95 value) as a bonus with this lesson! Click here to see how easy it is to start your monogram journey now.
We would love to see your work in our Machine Embroidery & Digitizing Made Easy Facebook group! If you need help understanding these features in Hatch 2, please ask us in our Wilcom Hatch Embroidery Software Facts Facebook group, where we talk about everything Hatch related!
Until our next journey through the embroidery looking glass…. Happy Stitching!
P.S. Don’t forget to check out our almost 1,000 ESA fonts by clicking here. We have something for every project; why not broaden your creative potential!
Leave A Comment