It’s math class at the Embroidery Legacy. Everyone get your rulers, calculators, and thinking caps on! Wait, you’re not a fan of math? But did you know that the embroidery you already use utilizes math, and you’re probably a bigger math whizz than you think?

We will discuss some basic math you may or may not already be using and why knowing this is essential to achieve the best results with your embroidery stitch-outs. Let’s dive in!
Machine Embroidery: Measuring Inches to Millimeters
Depending on your location, you use the Imperial System (inches) or Metric System (millimeters) for your units of measure.
Take a meter and divide that into 100 you get 100 centimeters (cent=100). Take a centimeter and divide that by 10, and you get a millimeter, which we use often in embroidery. There are about 25 millimeters (25.4mm to be exact) in an inch.

We are not suggesting you use one system or the other. Still, there are advantages to the metric system (millimeters) when creating embroidery because you think in 10s. If you are more comfortable using the Imperial system, here is a conversion.
1 inch ÷ 25 (number of mm in an inch) = .04 inch per millimeter
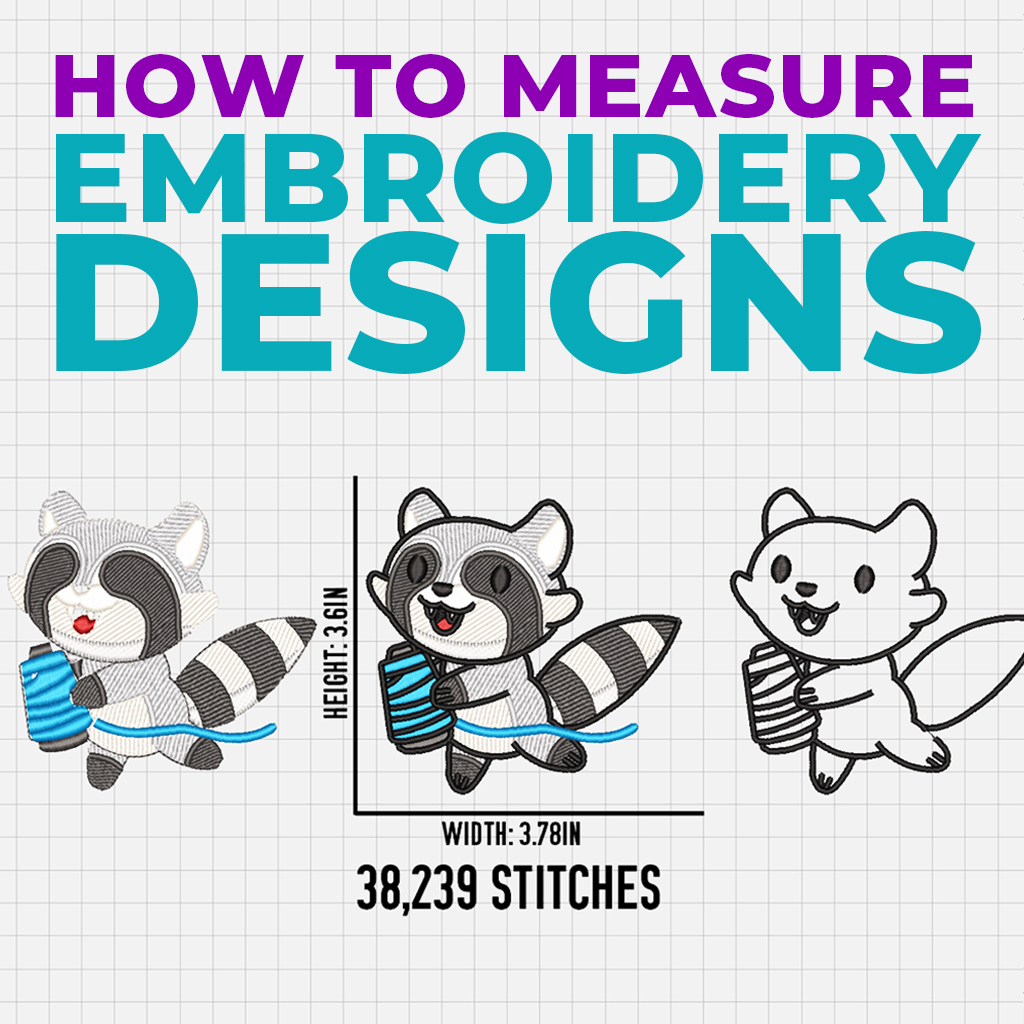
What Does A Grid Have To Do With Embroidery?
A picture (in this case, your design) is placed over a grid, and your embroidery software figures out where the stitches lay. Using a grid is like using algebra, using an x, and y axis. The axis is always fixed, and where the stitch points are is the variable.

Calculating Percentages In Embroidery
There is that word again: cent. Must mean part of 100? Well, yes, it is.
If I have a stitch out and want it smaller, how much smaller do I want? A little or 20 percent smaller? How about larger; 20 percent larger? These calculations can be done in two different ways.
The easy way with Hatch software:
Select your design and look to the top toolbar. You will see two boxes locked together with a little padlock. If you change either box, both will “resize” by whatever number you choose.

If you only want to change one (the horizontal (or X-axis) or the vertical (or Y-axis), unlock the lock button and resize to your desired amount.

Interested in an easy-to-use embroidery software to create your own personalized embroidery designs? Try a free 30-day trial of Hatch Embroidery Software to use it like you own it.
You can also manually calculate by taking the number of inches (or mm) and multiplying by the percentage up or down you want.
To go up, let’s say, by 20%:
5 inches x 1.20 (100 percent PLUS 20) = 6 inches
Let’s say we want it to go down by 20%:
5 inches x .80 (100 percent MINUS 20 percent) = 4 inches
Resizing can be pretty easy once you do it a few times.
A word about sizing up or down using the 10% button. There is a button that allows you to size up or down by 10%. Remember, the 10% resizing calculation is based on the design size when you do the calculation!! If you resize 10% and then press the button again, it will not reduce the design size by 80%. It will reduce the design size by 10% (90% of the original design size) and then 10% of that new resized design (so 81% of the original design size).
Calculating Stitches In Machine Embroidery
When the machine calculates the number of stitches you have, it considers the density and length of stitches. If you shorten the stitches’ length, they will be more dense. If you make them larger, they will be less dense.
Calculating Embroidery Thread
Hatch and many other programs can calculate the amount of thread and bobbin thread each design needs. Remember, this is ONLY an estimate and not exact. Give some slack to this number to ensure that you have enough.

Calculating Time In Machine Embroidery
Calculating time is not as confusing as it sounds! It just involves the amount of stitches your design has and the speed at which your machine is set to run.
If I want to know how long (approximately) a design will take to stitch, I divide the total stitches by my machine speed stitches per minute.
The design above has about 25,600 stitches, and let’s say my machine is set to the speed of 600 spm (stitches per minute):
25,600 stitches ÷ 600 stitches per minute = 42 minutes.
It will roughly take 42 minutes for the design to finish stitching.
However, remember that this is not the actual stitching time; this is just an estimate. Trims will add on time (about 120 stitches per trim), and starts and stops to trim or check stitching will also add extra time.
Want to learn more about embroidery machine speed? See why it is important to adjust your embroidery machine speed & how it can affect your embroidery results?
Conclusion: Using Math In Embroidery Is Helpful
Don’t worry if things seem a bit confusing. It is a lot of information to consume! Take some time away and then take another read-over. You’ll get this! Pick one area that means a lot to you (number of stitches, time, etc.) and learn that while using your embroidery software. This math will only make sense if you can apply it in real life.
Want to learn more about embroidery and the theory behind it? Check out our Digitizers Dream Course and work through three comprehensive levels of training to become the best digitizer you can be!


Leave A Comment