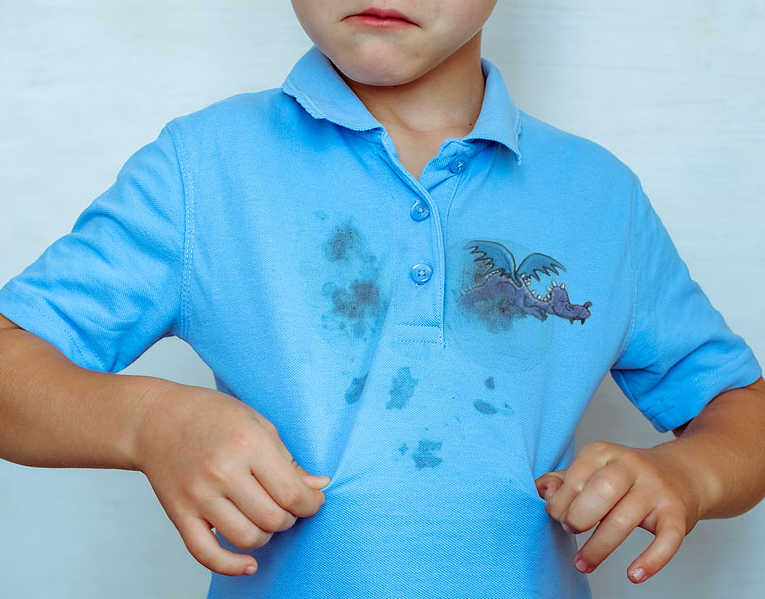
Imagine you’re at lunch wearing your favorite new shirt with a cool design that you have embroidered and/or digitized. You’ve gotten so many compliments!
You’re just sitting and taking it all in when…. splat!
That delicious chili you ordered is now on your shirt and your embroidery! Tragedy. What do you do now?


There are many reasons why embroidered garments require more care. Not considering them can lessen the life of your item or ruin your garment completely. You are not only dealing with the unique properties of the embroidery but also with the garment’s fiber content, the backing, how dense the stitching is, etc.
Let’s roll up our sleeves and get to the laundry!
Embroidered Garment Stains
Stains can be organic (like dirt or blood) or inorganic (like petroleum, paint, ink). You need to identify the type of stain first.
Organic stains can use soaps and water; inorganic stains generally require solvents and stronger cleaning products. They come from everywhere in all forms, but here are some of the issues you will find:
- Food: Food particles have dual problems: removing the actual food and removing the residual stain. They can be oily, gritty, and colored (many people who use tea/coffee/beets to dye fabric know they are permanent).
- Oil: Regularly oiling the bobbin casing can cause staining if you are too aggressive when you oil. Oils can be organic, like olive or animal fats, or inorganics, like motor oil or sewing machine oil.
- Cosmetics: These are problematic because they are meant to color. We need to deal with these quickly so they do not set.
- Perspiration: If washed right away, it is manageable, but if ironed, it can set the stain in.
- Inks, dyes, and paint are all inorganic and require different handling than organic stains.
- Blood: Surprisingly, saliva is the best way to clean it. (Although we don’t recommend licking your clothes).
How To Wash Embroidery Designs: Considerations
For washing embroidery designs, two methods of laundering exist: machine washing and hand washing, each with pros and cons. Machine washing is handy, and it works well if you follow simple rules.
Handwashing is the best because you can see if your solution works and control what happens with the garment. There is also dry cleaning, which we will discuss later. So that said, here are some key issues to consider.
- Thread: Very important to consider. You can’t use bleach on silk thread, or you will end up with a beige mess. Unless you test a portion of the thread in an inconspicuous place, do not attempt even with “nonbleach alternatives.”
- Rayon also can be damaged by bleach and peroxide (bleach alternatives). Know what is in your thread before you start.
Want to understand the different machine embroidery thread types and how to use them? Learn how to apply them in your work by reading our Types of Machine Embroidery Threads article.

- Snagging: Satin stitches in long runs over 7mm can catch hidden hazards in the machine, such as clothing with zippers. Rubbing on other rough materials in the washer or surfaces in a sink can also cause them to become abraded.
- Curling: Depending on the backing, the density of the design, how you clean it, and how you dry it, it can cause your design to curl up or ripple if not treated right.
- Drying: In addition to the curling issue above, properly drying can lengthen the life of your garment.
- Ironing: This is a hot-button issue! You can steam backings and make them wave or melt, melt adhesives, melt stitching, and more.
- Color Bleed: Color bleeds can happen in hand laundering, but when using a washing machine, you usually won’t notice color bleeding until the end, when your white shirt is now pink.
Should You Wash Fabric Before Embroidery?
Polyester embroidery is durable and stands up to the washer, dryer, etc. (though natural drying is best). You should wash rayon embroidery, silk, and wool by hand, but they require special care.
")
Embroidery on polyester, cotton, or nylon clothes is strong, but wash them before embroidering, especially cotton. Cotton, unless pre-shrunk, can shrink, distorting your stitching. Even if a garment claims to be prewashed, you may still want to wash it. Even a polyester garment may have threads, linings, etc, which are cotton and can shrink.
Many embroidered bags, tote bags, backpacks, etc., are designed to be durable and washed. Unless there is a question of color bleed, you can launder (keeping in mind the cautions for different embroidery) without any problems. Specialty bags such as raffia, leather, and others are a no-no in the washer, so always consult the care label.
How To Avoid Shrinking When Washing Embroidered Garments
Rayon is made of wood cellulose and is quite porous, making it soft and shiny, but when submerged, you may panic when it curls and becomes hard. Rayon thread can (and usually will) shrink when wet. The cells release water when it dries, and the overall stitching will relax.
If you need to iron rayon thread, always use a medium iron with no steam, a pressing cloth and iron from the backside.
Whether washing by hand or by machine, hotter is not better. If you have to make a choice not knowing anything else choose cool or cold water.
Different types of shrinkage:
- Felting occurs with clothing constructed of animal hair fibers, like wool or mohair.
- The strands of hair have microscopic scales along their surface that, exposed to heat, water, and abrasion, can cause them to felt together. Human hair is the same, by the way, and the locking of these scales together is how people dread their hair into locks.
- Consolidation shrinkage occurs when moisture, heat, and agitation during washing and drying are combined.
What Embroidery Can’t Be Washed?
There are two types of fabrics: natural (like wool and silk) or man-made (like polyester or nylon).
- As mentioned above, Silk cannot be laundered with harsh chemicals, never with bleach or bleach alternatives.
- Some rayons act strangely in washers; they are technically man-made from wood cellulose, but the natural wood has many absorbing properties. Man-made fabrics are extremely durable but remember; your embroidery may not be even if they are.
Want to learn more about the main fabrics used in machine embroidery? Read our 3 Main Fabrics Used In Machine Embroidery for better stitched results.
As an example of the difference between natural and man-made fabrics, you could put a packet of colored drink mix in your washer and end up with a strawberry-colored silk shirt and a perfectly clean polyester one. Likewise, you can put synthetic dye into a washer with the same silk or wool shirt and poly shirt and end up with a perfectly clean silk shirt and a dyed polyester one.
Always, always, check your garment label for laundry instructions before you attempt anything.
Should I Dry Clean My Embroidered Garments?
Dry cleaning still involves liquid, but clothes are instead soaked in a water-free liquid solvent, which dissolves the bonds of oil, etc., and helps to wash it away. Many people avoid dry cleaning due to residual chemicals and expense, and it is not recommended to attempt to dry clean at home or use solvents as they can be hazardous to your body, and if you mix the wrong things, it is disastrous.
Home-use products are on the market, but it is better to take your garment to a reputable dry cleaner and allow them to professionally clean it than risk ruining your garment if you are unsure of the chemical being used. Yes, a cost is involved, but it is worth it if the garment is unique or sentimental.
When going to your dry cleaner, you will want to ask them to spot clean specific stains and then turn the garment inside out. Make sure that you tell them the fiber content of the thread and request that they dry clean inside out and only use a medium iron with no steam from the backside of the stitching.
How To Dry and Iron Machine Embroidery
Naturally drying is always best. Yes, it takes longer, but it is worth it in the end. Using a dryer has extremely high heat and agitation, which can wear out your embroidery and cause shrinkage. If you must dry in the dryer, use the lowest heat setting (or no heat at all, just air) and only tumble till lightly damp.
Ironing can make your garment look wonderful and also ruin it. Fifty years ago, irons were only a few settings and could be very hot. Newer irons have many options and features, but they can also be powerful enough to damage your ironing board.

Please make sure not to use the steam setting. The goal is to flatten and not brutally scrub the embroidered piece until it is shiny and flat. Embroidery has a natural loft, which is this puffed-up quality, making it three-dimensional and lustrous.
Polyester, nylon, and other fibers (like stabilizers) melt under high temperatures, making your embroidery a solid melted mess. Be careful when using hot temperatures.
Most stabilizers are man-made and can be melted. Iron-on stabilizers, backings, etc., can cause problems for embroiderers if they are ironed too hot. This is because it makes them ripple.
Interested in learning more about what stabilizer to use for your embroidery projects to achieve more professional results? Read our Machine Embroidery Stabilizer Guide to help you become a better embroiderer.
Pro Tip: Use a pressing cloth. When finishing your cleaning, do not directly iron. Other than squashing your loft on your stitching, you can overheat the stitching if you use steam or it is wet. An ironing cloth provides a nice buffer between the heat and the garment.
Putting your iron on a plastic wrapper or something dirty by mistake can get on your stitching. Using a plain cotton pressing cloth, pillowcase, or sheet can save your garments. Avoid using colored or textured cloths.
How To Wash Machine Embroidery
Okay, so how do we go about this? Well, here is a minimally invasive method for laundering your embroidery.
- Inspect the garment and determine if it has any debris that you can brush off with a soft brush.
- Check the label on your garment; make sure that you follow the maker’s directions.

As a general rule, start with this:
- Gently wash in tepid soapy water. Handwashing is best. Dish detergents work well but require more rinsing than laundry products.
- We suggest using a mild detergent and remember, “Less is More,” as you only need a small amount and can add more later if you need.
- Rinse in cool or tepid water until there are no suds. You can hold the embroidery under gently running water without high-power sprays (less is best).
- Do not wring. Wringing causes creases; it pulls embroidery stitching and backing out of shape and sometimes can break threads.
- Place the garment on a clean towel and lay it flat. When you do this, let it lay naturally, and do not pull or tug. Smooth out with your hand. After the garment is flat, roll the terry towel with the garment up into a “jelly roll.”
- Gently squeeze the towel roll. This allows the terry cloth to absorb extra water.
- Let air dry until slightly damp.
- Check for stains or marks (If you find any, repeat steps 1-6)
- Iron from the backside with a medium iron, no steam.
- Iron with the garment laid on a clean, dry towel. The toweling absorbs more water and supports the stitching.
- Allow to finish air-drying.
If machine washing is necessary:
- Turn inside out.
- Do not wash with studs, snaps, metal zippers, or other objects that would snag.
- Wash on cold or cool.
- Do not wash with new-colored clothing, especially cotton or silk, as these can bleed.
- Dry same as above.
Laundering Machine Embroidery with Beads, Sequins, Bangles
Though we won’t discuss this in detail, the main points you need to keep in mind are:
- Always follow the supplier’s instructions on your garment.
- Hand wash inside out.
- Do not dry in the dryer.
- Dry flat.
- Do not iron (spangles, beads, and sequins can be plastic, which can melt).
Removing Bad Stains On Embroidered Items
You will inevitably come across a stain that simply will not release. Unless you can live with it, here are some inventive ways of making treasure out of trash.
- Cover the stain with an adornment, applique, or other feature. Attempting to over-embroider can create dense stitching with its own problems.
- Buttons are a fun way to cover a small spot.
- Cut out the embroidery and applique a new object over it (remember not to cut out knits).
- Fabric and other paints can also be a creative way to cover up a troublesome stain.
Do you have leftover embroidery scraps you aren’t sure what to do with? Recycle these leftover pieces and recreate them into usable items. Discover 7 Easy Ways To Recycle Your Leftover Embroidery Stash & Fabric Scraps.
Conclusion: Follow These Best Tips For Washing Embroidered Items
Wow. We have covered a lot here. Let’s quickly recap some of the essential things we covered.
- Always read the garment laundry instructions.
- Remember that your thread content and fabric content may not be the same.
- Turn your garment inside out.
- Iron with a medium iron, no steam.
- Use a clean, pressing cloth, and make sure your iron is clean.
- Do not wash in hot water.
- Wash only your garment to avoid color bleed.
- Use no bleach unless you have tested the garment and the stitching for colorfastness.
- Clean the stain as quickly as possible.
Changing your thought that laundry is no longer a chore but an adventure may help you keep your embroidered clothes longer!
When cleaning your garment, thoroughly consider the stain and its requirements. Remember that the stains may not come out, and plan to either live with it or be creative and cover it up.
P.S. You can elevate your embroidery experience with our Embroidery Legacy Design Club! Save up to 90% off retail prices and choose from 30,000 high-quality designs; your projects will not only be beautiful but also budget-friendly!


Leave A Comment