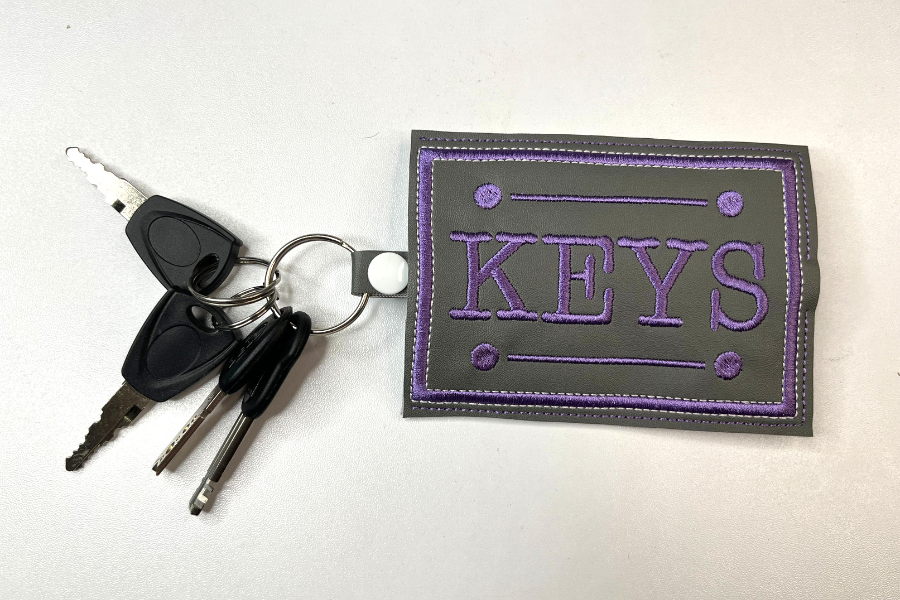
Have you left your house in a hurry, only to notice you grabbed the wrong keys? Maybe you need an easier way to carry your keys around so they aren’t poking through your pockets or damaging items in your bag. Why not create your own personalized embroidered key holder?

In this tutorial, we’ll show you how to easily create a unique embroidered key holder that can be personalized in a few minutes.
Why Create This Quick & Easy Embroidered Key Holder
If you have multiple keys in your house, it’s easy to take the wrong ones! You can use different fabric and thread colors to personalize your key holder.
This key holder makes carrying your keys around easier. Keeping all your keys in one place helps to organize them, protect them, and eliminates them from damaging other items in your purse or bag (such as your phone).
This key holder saves pocket and purse space and eliminates that annoying key jingle.
This key holder is practical as there are two different snaps to attach your keys to when in or out of the key holder.
You can use leftover recycled materials in your stash to be wallet-friendly, and it only takes minutes to stitch and put together. This is a great project for those who like to be eco-friendly with machine embroidery. Why pay unbelievable prices online for a mass-produced gift when you can personalize and have fun?
These personalized key holders are quick and easy gifts for friends and family to differentiate your keys & keep them secure. We will show you a unique key holder which you can easily make and personalize in a few minutes for all those special occasions!
You will only need a few simple materials, and you can edit the wording on your keychain with your embroidery software. Let’s get started!
Supplies Needed To Make This Embroidery Key Holder
You may have most of the supplies in your stash, don’t forget this is the perfect project to recycle old fabrics!

- Vinyl or leather
- 2 pieces of 4 x 6 inch
- 1 piece 0.5 x 7 inch
- 7×7 piece of felt
- Snap fasteners & snap fastener pliers
- Tear away embroidery stabilizer
- Embroidery machine
- Embroidery spray adhesive
- Embroidery thread
- Embroidery scissors
- Key holder embroidery design
Looking for high-quality machine embroidery designs? Check out our other in-the-hoop embroidery designs (don’t forget also to check out our free embroidery designs.)
- Optional but recommended: painter’s tape & chopstick
Quick & Easy Key Holder Tutorial:
Step 1: Spray your adhesive spray to one side of the felt pieces, and attach it to your tear-away stabilizer. Smooth it out so there are no wrinkles.

Step 2: Hoop it within your embroidery hoop with the felt faced down, and stabilizer faced up.

Step 3: Lightly use your tacky embroidery spray to tack one of your 4×6″ leather or vinyl and smooth it out.

Step 4: Place your hoop in the machine and stitch it out until the last tack down line embroiders.
To further personalize your key holder, you can edit this embroidery design with different text, such as names or other words.

Step 5: Remove the hoop from your machine and lay it upside down on your table.

Step 6: Spray adhesive to the back of your other 4×6″ piece of leather or vinyl to the back of your stitching (the good side of the leather or vinyl will face you), and then smooth it out.

Step 7: Return the hoop to the machine and stitch the final tack down line (the outline of your design).

Step 8: Remove your hoop from the machine and remove your design from the hoop. Clear up the back threads if needed.

Step 9: Tear away the stabilizer and then cut around (or trim) the outline of your design. You will now have a pocket.

Step 10: Take your 0.5×7″ leather or vinyl piece, attach a stud snap fastener to the end of this long piece and then a socket snap fastener a little beside it (be sure to give enough room for a key chain to attach in that space once it’s folded over).


Step 11: We need to put this long piece through the key holder. We found it easiest by using a piece of painter’s tape to the end of the leather/vinyl and pushing it through with a chopstick.

Step 12: Pull the leather/vinyl piece so it almost comes out of the smaller hole but still remains in the pocket. Attach a stud snap fastener to the very end of your long piece. See where that lines up at the top of your key holder. Attach a socket snap fastener. Trim around the snap if you wish.

Step 13: Optional: add another socket snap fastener to the very top of the smaller hole (to ensure your keys will always be attached to your key holder, even when they’re being used).

Step 14: Your key holder is finished! Apply your keys to the double-ended snap. Your keys can be pulled into the key fob, or you can attach it as a key chain.


Conclusion: Create Your Personalized Key Holder
This project is a great quick and easy gift for birthdays, the office, or even yourself! This is a great project to personalize and keep your keys filed neatly away and save pocket or purse space.
P.S. Check out other high-quality embroidery designs to perfectly embellish your next embroidery project!

Leave A Comment