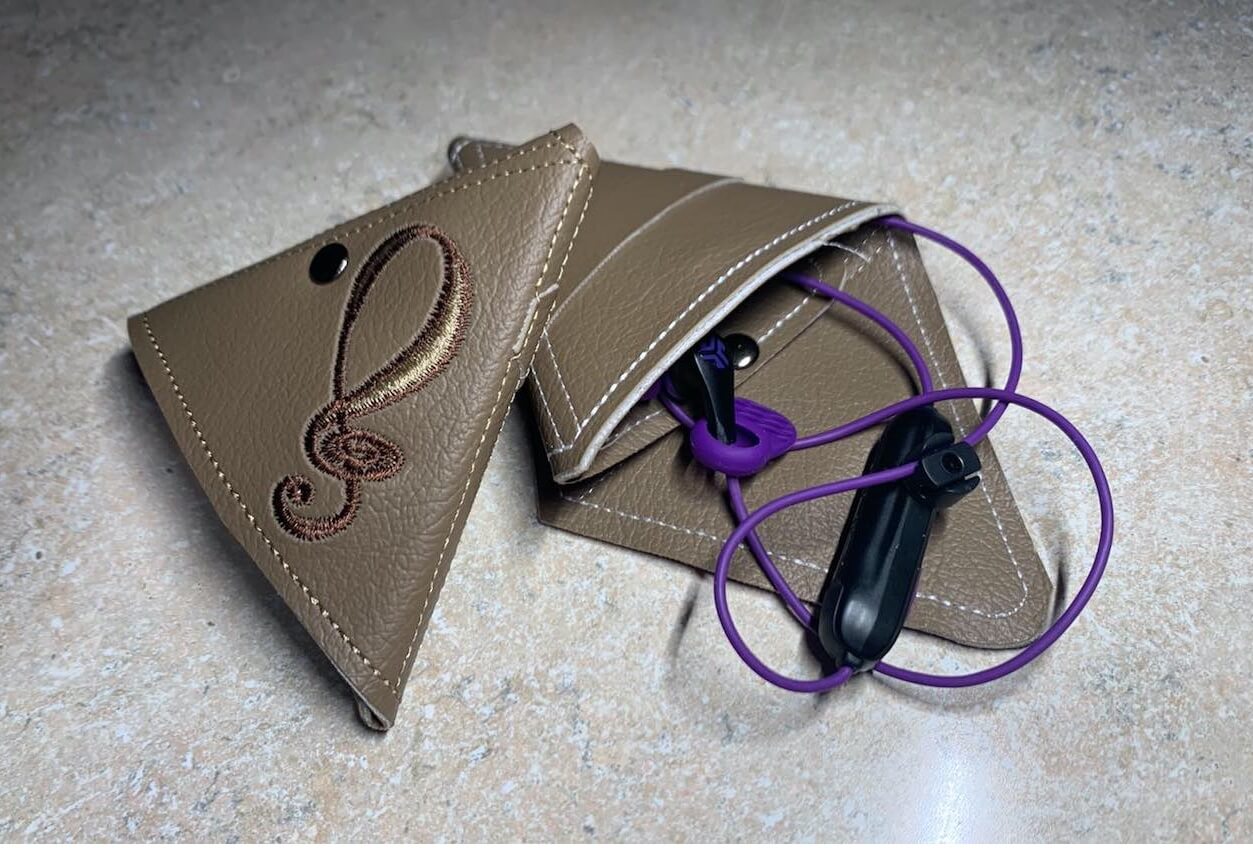
Earbuds are some of the greatest devices, but if yours don’t come in a carrying case, you can sometimes lose them in your never-ending bag or constantly have to detangle the cords to use them. Why not make your own?
")
In this tutorial, we’ll show you how to easily create and personalize your own embroidered earbud case.
Why Create This Embroidered Earbud Case
Earbuds are great, but being small, they can often be misplaced or hard to find. Using a case will help you easily distinguish where they are and help to keep them neatly stored to avoid the hassle of detaining a cord and to find them quickly and conveniently. This case is the perfect addition to your on-the-go lifestyle.
Creating your own earbud case is cost-effective! You can repurpose or use leftover vinyl or leather in your fabric stash.
Feel free to change the color of your fabric or thread to create the unique look you desire. Add a personalized touch by adding initials or your favorite designs to customize your new case.
Our In-The-Hoop Embroidery Legacy Earbud Case design includes the EMB file format, so you can import it into your digitizing software and personalize it for yourself, friends, or family. They make great gifts!
Supplies Need to Make This Embroidered Earbud Case
- Embroidery machine
- Vinyl or leather
- One 10×10″ piece
- Two 10×4″ pieces
- Two 3.5X0.5″ pieces
- Tear-away embroidery stabilizer
- Embroidery adhesive spray
- Embroidery scissors
- Metal or plastic rivets
- Pin or marker to make a spot for your clasp
- Embroidery Legacy In-the-hoop earbud embroidery file – this file comes with 2 different earbud case versions
- Painters tape (optional but recommended)
Looking for high-quality machine embroidery designs? Check out our other in-the-hoop embroidery designs (don’t forget also to check out our free embroidery designs.)
Embroidered Earbud Case Tutorial
Step 1: Hoop a piece of tear-away stabilizer and put it in your machine. Stitch the first outline.

Step 2: Remove your hoop from the machine and turn it upside down. Using a light spray of temporary adhesive, place down your 10×10″ piece of vinyl on the BACK side of the hoop so it covers the whole stitch line (there should be a margin of ¼ inch).
It’s optional to line the sides with painter’s tape so it stays in place.

Step 3: Flip the hoop so it’s right side up. Use a light adhesive spray on your two 10×4″ vinyl pieces and place them over the stitch outlines.


Step 4: Place your hoop back in your machine and let the music symbol & lettering stitch, keep stitching until you see the little straight line (this is where it indicates your next piece placement).

Step 5: Place the bottom of your 3.5X0.5″ vinyl piece over the stitched outline and secure the ends using painter’s tape.

Step 6: Return the hoop to your machine and finish stitching.

Step 7: Once finished, remove your hoop from your design and tear away the stabilizer around it.

Step 8: Remove the pieces of painter’s tape and trim the little leftover bits.

Step 9: Using a nice sharp pair of scissors, trim around the outside edge of the case design.

Step 10: Fold up your earbud case to create the perfect triangle.
Step 11: Use a pin or marker to create marks for your grommet.


Step 12: Create small holes for the rivet using a hole punch.


Step 13: Insert the rivet and secure it.

Step 14: Fold the case so it clips together, and insert one end into the slit to create the perfect earbud case, and you’re done!

Conclusion: Create Your Earbud Case
Our ITH embroidered earbud case is a fun and quick and easy project for summer, birthdays, or even yourself! What color will your next case be?
P.S. Check out our high-quality embroidery designs to perfectly embellish your next embroidery project!

I can’t figure out where the grommets go or where to punch the holes. Have I missed something. A picture maybe?
Hi Judy, thanks for your question! We’ve added another image in the blog to show where the rivets should be 🙂