Embroidery appliques are a simple, yet visually stunning technique! If you’ve ever thought that there might be more than one way to use applique in your machine embroidery, you’re right, there is! Let’s look at a few different embroidery applique techniques and what they involve.

P.S. Want to skyrocket your creative potential by learning how to do different embroidery techniques? Learn the secrets, tips and tricks behind 14 different popular embroidery techniques (including applique) with our new Embroidery Fun Effects Course.
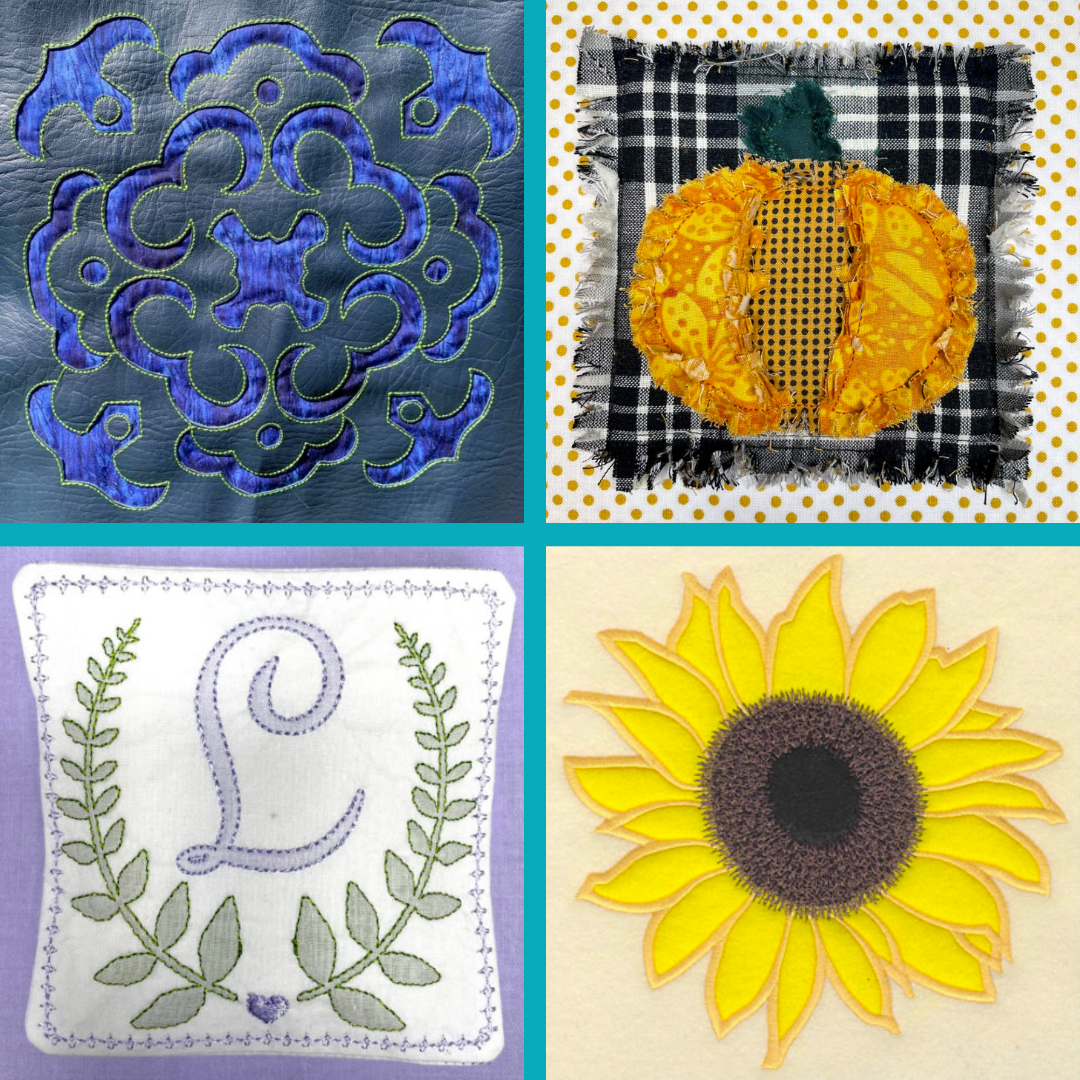
Smooth Edge Embroidery Applique
Smooth edge applique includes the typical applique that you think of when hearing “embroidery applique”.
Smooth edge embroidery applique is when you add a smaller piece of fabric to the top of your material and use stitches to keep it in place on your fabric.

Check out our collection of close to 3,000 high-quality applique embroidery designs or download a free applique design in our Free Embroidery Legacy Design Kit.
These are great as they give a clean, well-put-together look to your machine embroidery designs, but they often take longer as you need to cut the fabric close after the tack-down stitch.
Want to learn more about applique and how to achieve this technique? Check out our step-by-step embroidery applique tutorial.
Raw Edge Embroidery Applique
Raw edge embroidery applique is just like the name implies, the fabric is left raw and gives a messy, seamless edge. It is often used with smaller projects and can give a more realistic look.

Create your own raw edge applique design with our free tutorial using Design Doodler software.
With raw edge embroidery applique, cut the shape of your desired fabric close to the size of your design. The final texture of your raw edge will depend on the fabric you’ve chosen. You can also choose to add extra cuts in your fabric to give it a more frayed look depending on the desired look of your final stitch out.
Learn more about the main fabric types used in machine embroidery.

Try a simple applique on the top surface. Create your own in-the-hoop pumpkin mug rug with our free tutorial.
Reverse Embroidery Applique
Reverse embroidery applique is also as the name implies. Rather than normal applique, it is reversed. With normal applique, the extra smaller fabric is added to the top of the material and cut, with reverse applique, instead, you layer fabrics and trim the top layer of material, so the bottom layer of material is exposed and shown.

This is created by hooping two layers of cotton material and stitching out a quilting glyph from our ESA glyph quilting collection. You then trim carefully, and your fabric design is revealed!
Remember, you don’t have to only use cotton fabric; you can also use vinyl for a fantastic effect that can be applied on tote bags, wallets, and more!
Embroidery Applique Techniques That Are Outside The Box
Let’s discuss a few different techniques that can be sewn on an embroidery machine that aren’t quite applique, but look like it.
Madeira Linen Embroidery
Madeira Linen Embroidery is an old technique from Madeira Island, part of Portugal. It is created using applique similar to quilting applique in which the edge is turned under and tacked down.

Upon the white background, linen or cotton pieces were sewn on top of or under the base material. Sewing lightly colored fabrics on the bottom surface of the fabric muted them and gave an even more extensive range of color variation.
How To Create A Madeira Embroidery File In Your Digitizing Software
Psst. If you’re new (and we all were at some point) don’t forget to check out our what is embroidery digitizing article and our guide to what is the best embroidery digitizing software?
We have a sneaky trick for mimicking this technique which you can create on your machine.
Start simple! It is easier to start with simple small shapes you can easily trim than to go overboard and get frustrated.
Here is one type of placemat:

In this example, the trimming is done on the bottom. The border is a 5 mm satin stitch with a triple run inside and outside. When finished, you can trim to the edge.
First, the acanthus leaves are outlined, then a decorative running stitch is stitched on the surface.
All you do is hoop a wash-away stabilizer, a layer of linen fabric, and a top layer of cotton organdy.
Learn the best embroidery hooping tips & tricks for professional results.
It is then stitched, and after un-hooping, it is trimmed, and the excess fabric is carefully trimmed off the back side. This leaves a smooth top and minimizes the trimmed edge look.

You will want to wash these carefully and by hand; rough handling of this technique in a washer can pull the fabric on the back from the stitches.

Try this technique and play with different colors, patterns, and shapes. Remember that you can be topsy-turvy and stitch on the bottom or applique on the top.
Check out our ESA Glyphs and Shapes to help customize your next project.
Using Satin or Tatami Stitch to Mimic A Madeira Applique Effect in Machine Embroidery
Our final idea on our applique adventure is using satin stitching instead of fabric for the same effect without trimming!
Thank you to Linda Rayburn, a moderator of our Facebook groups, for this great take on Maderia embroidery.

This effect is created by stitching out-filled sections of embroidery in satin or tatami (for larger areas), laying down a piece of sheer fabric, and then stitching over it to both tack down the fabric and to provide a decorative border or objects. You will not cut anything away; when you make your finished item, both layers of fabric will remain.
The easiest way to create this is to digitize your object and then copy and change it to an outline so your second (top) stitching lines up.
Conclusion: So Many Ways To Have Applique Fun
What do we want you to remember?
- You don’t always have to embroider on the top of an object!
- Think upside down or in-between!
- Think of layers and using transparent fabrics to mute strong colors
- Think of layering textures or taking advantage of fabric textures.
Our greatest hope is that you take away some of our love and passion for embroidery, education, embroidered art, and the embroidery family we have. We appreciate you spending time with us, and we love to hear your ideas and suggestions.
P.S. Don’t forget to check out our collection of close to 3,000 high-quality applique embroidery designs.
did the “guitar gnome” as a pillow for a friend musician and it came out OUTSTANDING! from buying the download to done iwith the pillow in 4 hours. I cant wait to buy MORE!!!
We’re so happy to hear 🙂 thanks for your feedback Mary