Kudos to all of you who digitize your own designs! It’s a great feeling, isn’t it? Pick artwork, digitize it, and then the moment of truth when you push that button and…. VOILA! A great design is born!

But what happens to that design before it gets to the machine? How do you figure out what to digitize and where to source your art? Let’s discuss how to create or find artwork for digitizing and the different formats you can use.
Why Do We Need Artwork for Machine Embroidery?
All machine embroidery starts with some type of artwork, well, almost all. While there are rare designers and digitizers who can dream up designs without the benefit of a sketch, most of us need to plan out and put to paper the designs we want to create.
Creating a paper and pencil or digital design is an excellent step in creating well-thought-out embroidery. It gives us an idea of scale, colors, and overall look, but this drawing creates a roadmap of how we plan to digitize our work. Skipping this step results in hundreds of trims, dense bullet-proof designs, pucker problems and more.
How Do I Create Artwork for Machine Embroidery?
When creating artwork for machine embroidery, first and foremost always keep pathing/mapping and layering in mind. Both of which are covered in our fan-favorite Digitizer’s Dream Course! Here are a few other tips that take that into account as well:
You have your idea- you have pen and paper or a great illustrating program, but how do we proceed? Here are some steps to take when mapping out your embroidery masterpiece.
- Create a quick sketch or outline of your design. This will help with scale. Don’t worry about color right now- we’re looking for shape, movement, character, etc. Working in black and white will free you from thinking of too many things. Remember, there are graphics available on the internet.

2. Map out some color. Once you have your black and white sketch, you can lock in some color. Don’t worry about fine details. We are simply looking for the overall color background which holds your design together. Remember that large areas of color with shading on top rather than many smaller pieces fit together will produce a softer embroidery. So, for example, if you are making a bunny, you might start like this…

3. Add highlights and details last. Once you have your color-blocked out, you can add texture, highlights (like the glint in the eye, the very light tips of the ears), and finer details (nose, mouth etc.)
Once you develop your own “recipe” for creating your designs, they will become more consistent and even stitching. As you become more adept at creating your own designs, you will find that you can develop a recognizable signature of your own.
Types of Artwork for Machine Embroidery
There are many types of artwork you can use as the basis of your digitized design, and each produces a very different effect. Here are several, but the sky is the limit when thinking about art that inspires you. It depends on your goals- are you looking for realistic stitching or a cute cartoon?
- Line art – line art is similar to the bunny above. It is accurate and totally created from lines of varying widths (hint…. When digitizing, use varied line widths to give a wonderful lively effect). Line art can be found on the internet using an image search with a filter that shows only black and white.
- Cartoons– cartoon figures are SO perfect for embroidery. They are already set up in a way that works for the nature of layering color and lines. Like the line drawings above, they are simple, yet a good cartoonist will use exaggerated features, varied line, and other tricks to create a character that jumps off the screen. Spend some time looking at cartoons and how they are created. There are even free courses online in video form, which allow you to follow along and create your own unique characters.
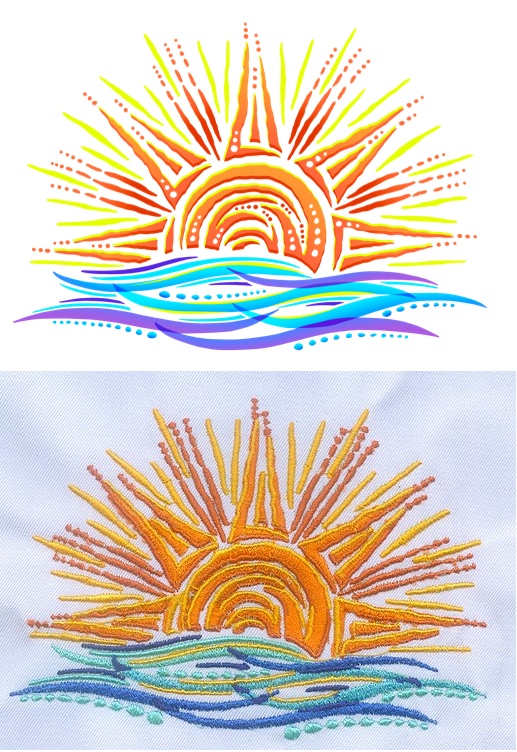
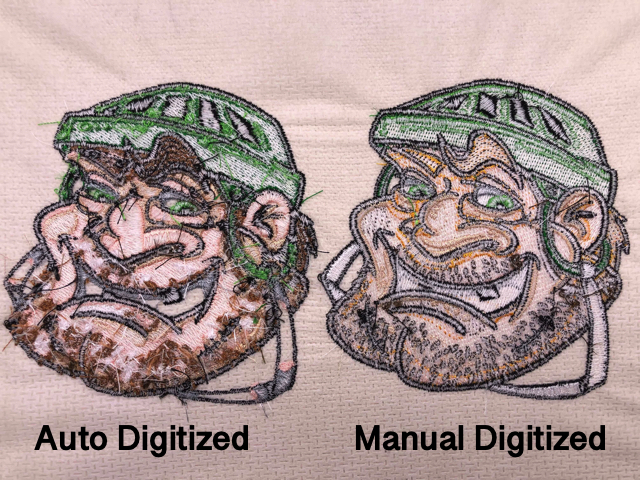
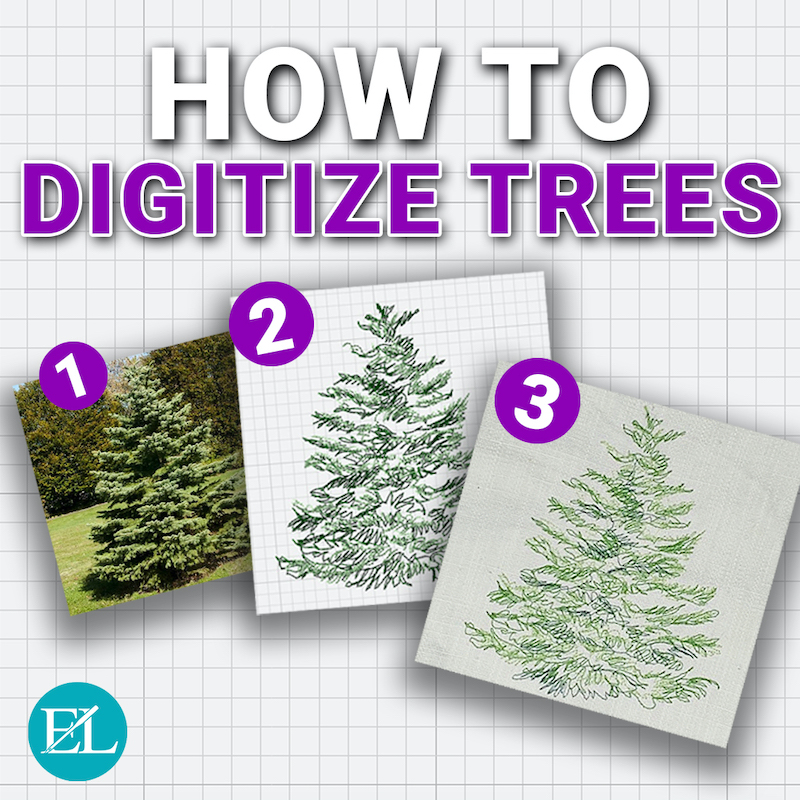
- Photographs– Of course, some embroidery software have photo stitch, but there are other ways to use a photograph. You can digitize on top of a picture using it as an accurate roadmap. Here is an example:

- Graphic and letters – You can find so many graphic shapes (sun, moon, stars etc.) or letters that you can use to digitize a design. Now letters are a bit tricky- for alphabets, you will want to use an ESA (embroidery specific alphabet) created by a professional digitizer. But sometimes you want one letter, and there is a perfect one right in front of you! You can use that artwork to serve as a guideline for your digitizing project.
How To Digitize Artwork For Embroidery
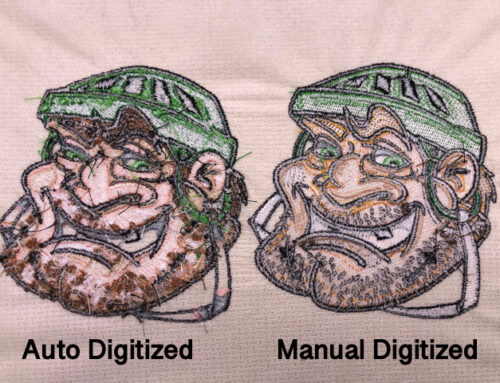
As John Deer says “I can count on my hand the number of times I’ve had artwork that’s perfect for embroidery… 99.9% of artwork is created with a printed medium in mind (like a magazine) and because of that, you’ll very rarely get artwork that is perfect for digitizing embroidery. With print/ink you can capture very fine details as opposed to embroidery, where we’re using something physical (thread) as a medium. Unfortunately, thread has a mass which dictates how much detail can go into a design. But don’t let that deter you! As digitizers, our goal is to adapt to the type of artwork we want to turn into stitches. That may at times mean making strategic adjustments to certain aspects of the artwork we’re working with but still, almost any artwork can be digitized in some way or another!”
- Less is more in embroidery detail. In our videos, you will always hear “your brain fills in the details.” Please don’t try to cram a ton of detail into your designs. You will end up with bulletproof embroidery, and many of the tiny details you inserted simply are not needed. Your brain will fill out the design.
- Start small. When creating a design- don’t start with the Sistine Chapel. Start with a postage stamp. Work on something manageable, easy, and interesting for you. Trying to work on too large a design will frustrate you quickly.
- Resizing artwork. ALWAYS work to scale! That means if your bunny is going to be 2×3 inches make your artwork that size. Trying to digitize in a very small or very large format and resize will create problems for you. A general rule of thumb for resizing is up or down 10%.
Want to easily create your own embroidery designs? Click here to check out our Digitizer’s Dream Course where we guarantee to show you how to digitize in your own embroidery software. We teach you not only the how to do something, but also the why & when to do it!
Artwork File Types for Embroidery Digitizing
Many different file types can be used for most software brands. Below are a few file types that can be imported into most digitizing software programs for you to use as a template:
- .pdf – stands for Portable Document Format and was created by Adobe in 1992. It is essentially a snapshot of a document or graphic, which can include text formatting and other features.
- .jpg or jpeg – JPEG stands for “Joint Photographic Experts Group”. It’s an image format for compressed image data.
- .bmp – A bitmap is a digital image composed of a matrix of dots. When viewed at 100%, each dot corresponds to an individual pixel on display. In a standard bitmap image, each dot can be assigned a different color. Together, these dots can be used to represent any type of rectangular picture.
- PNG is short for Portable Network Graphic. It’s a particularly popular file type with web designers because it can handle graphics with transparent or semi-transparent backgrounds. The file format isn’t patented, so you can open a PNG using any image editing software without licensing.
How To Import Artwork Into Your Embroidery Software
Importing your artwork can be done in several ways. For artwork files (.pdf, .png, .gif etc) you can save those in an artwork file for your embroidery or as a stand alone file in your computer.
To import your artwork you can open the file, copy it and paste it directly into your workspace!
Conclusion
We have covered so many things but here are a few important points to keep in mind:
- When learning start small- try manageable projects with simple artwork
- Remember that no artwork is really ever perfect for embroidery and it’s ok to make certain adjustments
- Work with your artwork to scale
- Be mindful of your artwork sources
- Create your own “recipe” for working with your artwork; it will make your work consistent.
If you want to learn how to create your own beautiful embroidery designs, there really is no better place to start than our Digitizer’s Dream Course where we’ve taught tens of thousands of embroiderers how to digitize with proven results… What will you digitize?

Thank you for another fantastic, informative blog
Glad you enjoyed it Kaz 🙂 thanks for the support!
Brilliant tips – thank you
Thanks for reading Dawn 🙂