Are you looking to create something elegant and easy while on a budget?

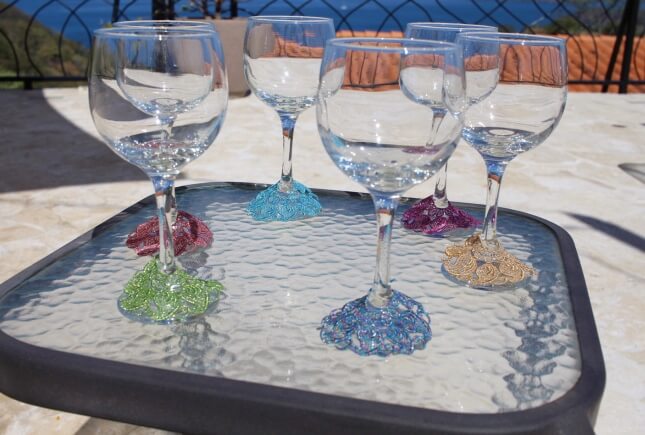
These DIY stunning in-the-hoop lace wine charms are a great way to increase your creativity while embroidering! They’re perfect for gifts, decor, or to use yourself!
Why Should You Create These In-The-Hoop Metallic Wine Charms
These DIY in-the-hoop charms are multipurpose as you can use them to accent your glass decor, your drinking cups or wine glasses, as well your candles. They can bring an elegant look to whatever purpose you see fit for your lace charm.
These charms are the most elegant way to serve your beverage. Lace is a stunning feature that always brings that extra “wow” factor. I love anything lace, so I always try to use it when I can. Creating something that looks so stunning while still on a budget is a win in my books. Instead of spending big bucks at the store, make these ITH charms with thread and stabilizer you may already have on hand. Not only do you save money, but you’ll also have something one of a kind.
They make great gifts, are quick to make, are budget-friendly, and can be personalized by changing your thread color or by using metallic thread for that extra “bam.” They can be great party favors and help when having company over to differentiate whose drink is whose. They’re great decor, and there’s nothing better than getting to admire what you’ve created.
Since we’re going to do this project together, I’m going to go over some quick tips and suggestions for lace embroidery to help give you the best results possible.
Expand your embroidery world and have fun doing it with our new & improved Fun Effects Embroidery Course by learning 14 popular techniques, including freestanding lace, to skyrocket your creative potential.
Freestanding Lace Machine Embroidery Designs
Freestanding lace designs
The design you choose to embroider can have a significant impact on how your freestanding lace stitches out. There are many options available, but knowing which designs to use is difficult. You need lace designs that are properly digitized, or it could ruin your decor. You want your lace not to pucker and look smooth after it’s stitched.
Embroidery Legacy’s lace designs are true vintage. They were created in the 1950s by my great-grandparents and used in the bridal industry. Our lace was specifically digitized one stitch at a time by European Schiffli Masters. All stitches lock together to ensure it is freestanding. Please note we highly suggest not modifying or resizing any freestanding lace designs in any way, as there is no guarantee it will remain freestanding.
Check out our large collection of stunning freestanding lace designs that demand attention.
Lace stabilizer
Using the right stabilizer when stitching out freestanding lace is very important as you do not want any leftover stabilizer to show through your project. The solution to this is to make sure you use a dissolve-away mesh.
Use dissolve away mesh with your lace embroidery to get the best results.
This will not leave any residue, hinder your stitching, and will leave your lace soft and flexible. Using this stabilizer is very easy as you simply need water for it to disappear. We suggest soaking it in lukewarm to warm water. Learn more about embroidery stabilizers and when to use them.
Lace thread
When stitching out lace embroidery, we suggest using rayon thread. As it is often softer than polyester and can perform well during high-speed stitching, it’s perfect for delicate work and shows great results for lace.
Learn more about different Types of Machine Embroidery Threads and When To Use Them
During this tutorial, we’re going to be using metallic threads. They look pretty, but if you’ve used them before, you know the struggle can be real! Although the end result is great, the process of using them is frustrating. Metallic thread breaks are very common. To help relieve you of this frustration, take a look at our suggestion to stop your metallic thread breaks.
Want to learn more about lace? Check out our other Freestanding Lace Tips and Tricks.
Not that you know the basics of freestanding lace embroidery, let’s get started!
Supplies Required To Make These Metallic Wine Charms

- Wet-n-gone / wash-away mesh stabilizer
- Metallic thread is what we’ll be using, but you can also use rayon thread depending on the look you want to achieve
- Bobbin thread (make sure it’s a similar color to the thread color you’re using)
- Towel
- A bowl of warm water
- T-pins
- Lace Coaster Charm embroidery design
More of a visual learner? I’ve got you covered. Watch the our Youtube tutorial here.
Metallic Wine Charm Tutorial
Step 1: Hoop your wet-n-gone or wash-away mesh stabilizer. Use t-pins to secure it to the hoop.

Step 2: Make sure your top thread and bobbin thread tensions are not too tight. Load the hoop into the machine. Stitch the design at a slow speed.

Step 3: Once the first design is finished, you can sew out more.
Step 4: Trim away the excess stabilizer by cutting around the designs.

Step 5: Rinse the designs in warm water. You don’t want cold or too hot water, make sure it’s warm. You want to make sure the stabilizer is in the design so you can reshape it later. Once you’ve rinsed them all, take a towel and press down to remove excess water.


Step 6: Shape the charms around your wine stems or whatever decoration you want to use.

You have successfully finished your DIY in-the-hoop wine charm.
Conclusion: Create These In-The-Hoop Metallic Wine Charms
As this project has multiple purposes and helps create different looks on a budget, nothing is holding you back from making these elegant DIY in-the-hoop lace charms. Whether you’re looking to spruce up your wine glasses, give a thoughtful gift, or create home decor on a budget, this is the right project for you. Now that you know how easy it is to create freestanding lace, it’s your turn! Don’t forget to check out the rest of our vintage freestanding lace designs.
P.S. Don’t forget to learn the secrets, tips & tricks behind the most popular embroidery techniques and have fun doing it with our new & improved Fun Effects Embroidery Course.

Leave A Comment