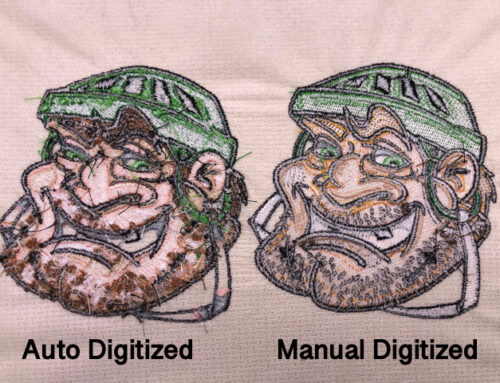
Digitizing for difficult fabrics can sometimes be, you guessed it, difficult! Many embroiderers consider knitwear a ‘difficult fabric,’ so how can we make embroidering it less difficult?

When tackling this type of fabric, you’ll need good embroidery and digitizing techniques. Let’s discuss how to machine embroider on knit fabrics.
Stabilizer For Embroidering Knitwear
Using the right stabilizer when embroidering on knitwear makes a big difference.
There are many stabilizer products that can aid embroidering on knits. One of my favorites is a “no-show mesh” that gives excellent stability and looks invisible when used.

The loose weave of knitted fabrics means that you must be careful of how the embroidery will distort. Because of distortion, it causes many embroiderers to use a thick cut away stabilizer to compensate.
Using a thick cut-away stabilizer is often a mistake. The outline of the stabilizer is as noticeable as the embroidery.
For designs with many fills, I also suggest using a ‘fusible no-show mesh’ ironed onto the garment before hooping. Mesh backings are helpful and offer support because they have the same kind of surface as the material.
Using embroidery designs from a reputable brand also helps your stitch-outs. Check out our high-quality embroidery designs for your next embroidery machine project.
Using a water-soluble topping when embroidering small detail or lettering will also improve quality.
Want to learn more about embroidery stabilizers? Check out our Complete Guide to Machine Embroidery Stabilizers for the best-embroidered results.
Digitizing Knitwear Stitch Lengths
Adjusting the stitch length for running stitches to 1.5mm to 2.5mm will cause the stitches to sink into the fabric’s weave. Doing this does nothing other than adding unnecessary stitches.

Adjusting your stitch length longer, say 3mm-5mm, will cause the stitch to ‘loft’ on top of the fabric. This will provide support to the design. This principle for running stitches also applies to the underlay (we’ll talk more about that below).
Want to learn more about digitizing basics? Check out our free Embroidery Digitizing 101 Course to properly edit and create your own designs.
Designs with fewer stitches run and look better on knitted fabrics than those with more because of the longer stitch lengths.
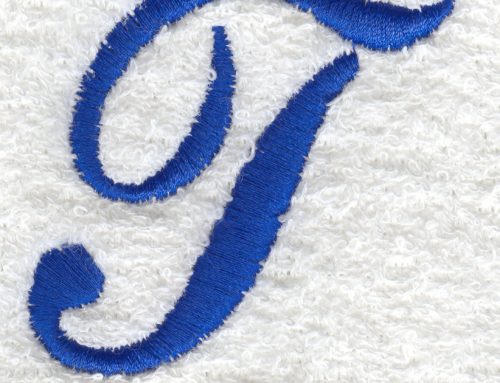
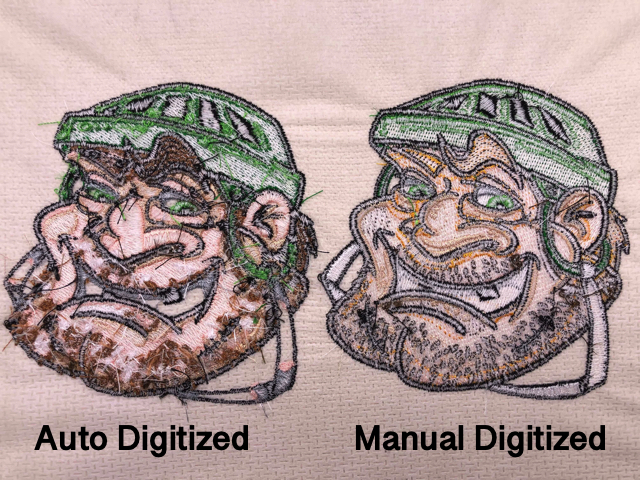
The biggest complaint I usually hear concerning embroidery on knits is that small lettering doesn’t embroider well. It will look jagged or saw-toothed in appearance. It helps if you look at how the fabric is milled. It is usually vertical and lose enough that you can see the ribs in the fabric.
Applying embroidery to knitting can cause a column to appear to have ‘moved.’ It happens when the column falls on either side of the ribs. This can be highly frustrating for a digitizer because what you see on-screen looks perfectly straight compared to the finished appearance once stitched.
Digitizing Underlay for Knitwear
On regular fabrics, an edge run underlay is the standard; but I suggest using a double zig-zag with knitwear. Even if your software has zig-zag underlay as an option, you should put the stitches down manually.
Learn more about Underlay Stitches for Embroidery & Digitizing to master the different types of uderlay and how to use them.
Manually lay zig-zag stitches in the corners of the columns. This will cover the ribs of the fabric. This will also prevent them from sinking.

If the column stitch is thicker, the cover stitch can be stabilized with the right underlay in the right order.
If the column is wider, you secure it using a double zig-zag. You can then hold it all in place by using an edge run underlay.

Knitted fabrics have stretch, and the topstitching will easily distort if the underlay foundations aren’t placed down correctly. Underlay types and stitch lengths should also be altered. Too many digitizers never experiment with these settings and keep their software on the default settings.
Digitizing Knitwear Topstitches
The main thing to look at regarding the topstitching is the direction of the stitches.
Because most knitted fabrics are milled vertically, you’ll want to avoid using the same stitch direction whenever possible. Fill stitches and satin stitches will sink into the material and cause it to distort horizontally.
Learn more about the different stitch types, digitizing theory, and more in our Digitizing Dream Course where you’ll be able to create quality embroidery with endless creative possibilities!
Standard densities will look sparse as the stitches sink into the fabric. This is when digitizers tend to increase the density of the fill stitch instead of changing the stitch direction.

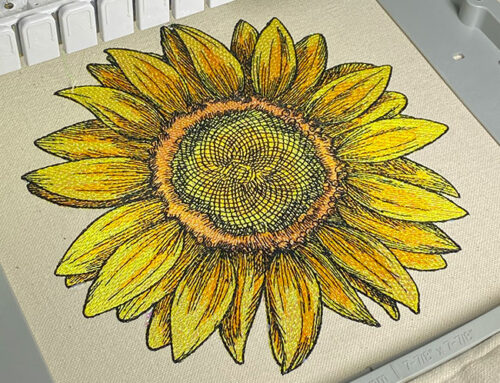
I have used a trick to avoid the “ditches” on knitted fabrics. This involves laying down a loose density fill. The fill provides a base for embroidered text, but it must be laid horizontally and have no underlay. You might see the underlay through the topstitching if the fill is loose.

Running the fill in the same color as the garment will make it unnoticeable. Unless you look very closely, it will be seen (as seen above).
Conclusion: Machine Embroider Knitwear With Great Results
Always consider minimum letting rights and column widths for embroidered designs on knitted fabrics. It’s also important to experiment and learn how to realistically reduce detail within a design.
Working with knitted fabrics requires careful consideration. It is better to have a clean-looking design with less detail than a detailed design that stitches terribly.
Let me know if you enjoyed this article or if you have any questions by commenting below. Happy digitizing!
P.S. Freel free to check out our Digitizers Dream Course to excel in your digitizing journey today.
Amazing tips. I absolutely LOVE John Deer and the knowledge he shares.
Thank you very much!
I absolutely LOVE our amazing fans 🙂
Every article and video I read from you guys, I always learn something. Thank you! I am new to learning digitizing and you give me the confidence to keep going. I greatly appreciate all of the resources you put out there.
Thank you for your support Christie, we appreciate your kind feedback!
Best tip for digitizing for wide columns on Peter Millar stretch polos?
Hi Bradley, I’m not familiar with that exact brand, but I usually suggest a double zig-zag with a 3mm stitch length so it drops stitches in the underlay with a edge run… in that order.