Save money and get more creative while saving the environment! Sounds like a pretty great deal right? If you’re looking for ways to clean up the clutter, dump the debris, and use up/self recycle some embroidery leftover pieces and recreate them into usable items we’re here to help!

Your embroidery leftover stash maybe or may not be as jumbled as the one above, but whatever state it’s in, we’re here to give you tips to organize it into a usable stash!
Our first piece of advice is to use the Depression mindset (not the depressing mindset)!
They had a saying in the Depression, “Use it up, wear it out, make it do or go without.” When thinking about your ugly goodies, always keep in mind using them up. Ideally, we should not have anything go into the garbage, but if it does, make sure you think before you toss.
Using some creativity will make you something even better and result in you feeling good about it! Let’s go over how to clean up your fabric stash, how to store your stash, and how to be creative and use your embroidery mistakes!
Cleaning Up Your Fabric Stash Clutter
What you might have in your “stash”:
The bin of shame. We have it; everyone has one! That bin of ‘oops’ shirts, accidentally trimmed the shirt and not the stabilizer, wrong place, wrong size, and just….wrong. It is important to save these items because even if they embarrass you, the material they are on or even the embroidery themselves can be useful to you and save you money.
Do not cut up these garments until you know you can use them. Cutting them up to save room may take away from a larger project you need them for later. Lay as flat as possible and, if possible, sort into fabric type or color.
Save usable embroidery. A piece of embroidery on a garment that got ruined is still good embroidery! You can cut these out and applique them onto new garments or bags and still save the day!
Save notions like buttons, pockets, and zippers! It might take some time to “harvest” these items, but pockets and zippers can be used in whimsical ways (hint… embroider pockets by floating them and then applique them onto garments). You can put them in fun arrangements or even use them on a quilt. It is fun for children and adults.
Stabilizing the world (just because you can have all the stabilizers doesn’t mean you can store it)
Stabilizer costs a great deal, so we always want to get our money’s worth. As a rule for non water-soluble stabilizers, do not save pieces smaller than your smallest hoop. Water-soluble stabilizers can be used in several ways, as we will discuss below. Store stabilizer by labeling large zipper food storage bags with the type and then lay flat.
Interested in learning more about stabilizers? Click here for our Complete Guide to Embroidery Stabilizers.
Bobbins. For anyone who uses magnetic bobbins, read the back of your box! Many manufacturers will take bobbin cores (with or without thread) and recycle and rewind them. We will talk about some exciting projects to use these up below.
How To Store Your Embroidery Fabrics Scraps & Stash
- Bins – Buying large plastic bins is a fantastic idea but do it in a smart way! Remember that bins store better if they are all the same shape and size and clear so you can easily see what is inside. If you want to label them, put the label on the inside of the clear type boxes to not pull off if moving.

- Bags – If you are going to store in bags you may want to rethink that idea. Paper bags get old and torn and have a lot of acid in the paper, whereas plastic bags and totes can be slippery and won’t stay stacked for long. Bins are the way to go!
- How to rock, roll, and fold your stash – However you decide how to clean up your scraps, find a way to fold them all the same way. Need be, use a cardboard cut in the desired size and fold your fabric using that as a guide. The fabric will be easier to fold, store and see. If you have not thought about rolling your scraps (especially vinyl), try rolling them up and standing them in a bin.
- Environmental– consider reusing things to keep them out of a landfill! Vinyl material, many fabrics, and more are not biodegradable, and if you can use them in a quilted square to make a bag, please do!
- Labeling – Consistency is the key! Make sure that your labels read the same way and contain basic information. You can buy printable labels at any office supply store.

- Storing items, so they play nice – encourage your items to play nice by putting the heavier boxes or containers lower and the lighter ones higher. Make sure to store them away from heat and sunlight as that can damage the fabric and other materials.
How To Use & Recycle Extra Fabric, Scraps, Notions, and Embroidery Mistakes
Here’s where it gets good! We talked about some of the materials you might find in your stash, let’s think about ways to use them up because we all know there will be more. Take ideas from these and create your own “use up plan.”
1. Make Stabilizer Spray – when you wash away the stabilizer, where does it go? Down the drain, of course, but when you are getting ready to toss that in water, tear away the excess and save it. Water-soluble stabilizer is made with polyvinyl alcohol and is unstable in water and washes away.
To repurpose this, save your scraps, mix with water in a spray bottle, and use as a fabric stiffener. Some brands will have slightly different properties, but they all work the same. The brands which feel like cloth rather than plastic will have cellulose fibers that wash away but do not dissolve. Those will not go through a spray bottle as easily as polyvinyl. But you can still soak a fabric, a holiday ornament, or other projects and use this as a stiffener. Remember to make your solution as you need it.
2. The “Unusable” Stash – We realize that there will be things too small, not right, ruined, etc, which cannot be used conventionally. Take a recent suggestion in our Digitizing Made Easy Facebook group about stuffing scraps into an old pillowcase and making a pet bed. You can use them, donate them, or create fun “pet presents.” Depression Era seamstresses would use fabric scraps to line pockets, shoes, and other things. You may not see them, but that doesn’t mean they aren’t being used!
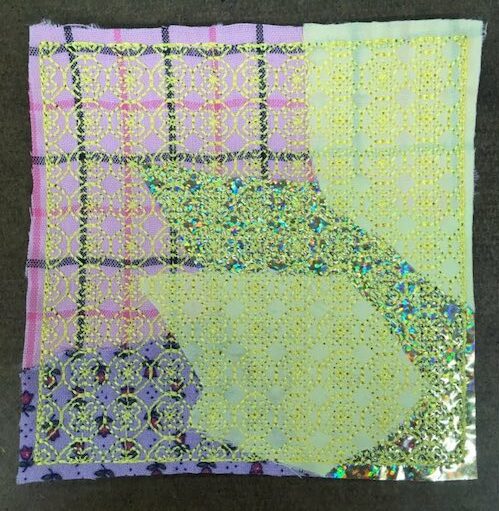
3. The Usable Stash – These are pieces large enough to make small things. Eyeglasses cases, phone cases, necklaces, lip balm holder, pint and quart jar covers, key fobs, ornaments, bookmarks, bowties, napkin holders, and more! Your useable stash can be sorted as discussed above, or you can donate these pieces to groups that make quilts for good causes. Make a new fabric! Take small scraps, and instead of quilting them together, quilt over them! Use a lace-like texture pattern and embroider over the scraps. You can then use that for a pocket on a t-shirt, cellphone case, or key fob.

The image above shows random scraps, laid down and embroidered over with a motif fill to create quilting squares or new fabric for other projects.
4. The “Embarrassing” Stash – you may not want to think about the things at the bottom of that stash, but there are some great ideas in there. Have a positive attitude and be creative. Let’s say you have a shirt that shifted in the frame- your design is crooked or ruined. Embroider a few more of those designs (unless they are too big) and scatter them about the garment. You can make it look like you planned it that way, and no one will know. Likewise, if you have a large design that did not quite make it to the end and something happened. Don’t cry! Cut that design up into smaller shapes and applique them to a new garment. Make covered buttons or a book cover. You won’t be able to tell what the design was, and you may end up with something even better. Create a new fabric. Take little scraps of your “embarrassing embroidery” and lay them on a piece of the base fabric. Embroider over them such as mentioned above and use this heavier durable fabric for key fobs.
5. Tramp Art – Tramp art in the late 1800s and early 1900s arose as folk art created from old cigar boxes carved with a penknife. Although not intended to “use up” materials, Tramp Art objects could be picture frames, boxes, toys, and more. The process involved layering materials such as wood, glue, nails, and things found along the road. You can make your own jewelry (remember those magnetic bobbins?), make refrigerator magnets, fabric beads etc. Tramp Art thrives on creativity, and your workroom will have plenty of suitable materials.
6. Crazy Quilt – Crazy quilts originated in the USA after the Japanese exhibition at the Philadelphia Centennial Exposition of 1876. It featured a type of quilting from Japan called Shasiko embroidery, which used small fabric scraps to cover holes or reinforce clothing to extend its wear. It was generally indigo blue cotton with embroidery in running stitch, creating geometric patterns. Crazy quilts were made first by upper-class ladies out of silk, velvet ribbons, and more. Make your own crazy quilt squares with your scrap fabric (and more!) and see your creativity and thriftiness come to life.
7. Repurposing Garments – Thrift stores are fantastic to get clothes for projects! Think of your embarrassing stash as a source for sleeves, pockets, shirts, etc. You can take sleeves from one garment to make another- use fabric for stuffed animals (t-shirts are especially good), make bags, and so on. Remember to look at these garments not as they are but what they might be. There is so much potential waiting in these dumpster-bound treasures.
Be Creative With Your Fabric and Notion Stash
- Be Creative– Creativity does not just happen; you need to work at it. Surfing the internet and looking at “idea boards” or sites can give you a lot of info. Make a list of things that interest you and save it for when you look through the “stash of shame” for quick and easy projects.

The image above demonstrates how to use scrap fabric onto your buttons, changing the fabric used on buttons can bring a whole new look to your garments.
- Look for ideas in all the wrong places- Ideas can come from crazy places—for instance, the news. You might see a news piece about a new trend or artist or clothing. Look at magazines and craft boards. Fashion magazines are fun because you see new styles and trends, but for us as embroiderers, using those materials in creative ways can get you thinking.
- Hide your mistake in plain sight- It is said the best way to hide is in plain sight. Let’s say you embroider a dog on a shirt, and “arrrrgh” something goes wrong on the face. Go to the local craft store and buy “googly eyes,” turning your dog into a whimsical critter. Having something go wrong in a large design in the middle? Applique over it or cut it out and applique behind—glitter, fabric glue, buttons, beads- bling your mistakes out. No one needs to know it was a mistake but you.
- Embroider over your mistake- Recently, a member had an error on a very expensive jacket. She changed the design and embroidered over the old mistake. Problem solved!
- Take a logo or design- break it apart– capitalize on creative design. A mistake on a design is a perfect way to take a piece of it and repeat in creative ways around it.
- Cutwork- if you can’t fix it, make cutwork! Place the item back in the hoop and embroider a satin edging (remember to be careful working over bullet-proof embroidery) then cut out the offensive stitching. If you are worried about modesty, you can cover the back with lace or sheer material.
Check out our many cutwork patterns available through Embroidery Legacy by clicking here. If you’re interested in learning how to create cutwork within your embroidery, click here for a step-by-step tutorial!
Conclusion
We have talked about so many ways to reduce your shameful stash and recover embroidery mistakes! Here are some things to keep in mind:
- Look for inspiration everywhere
- Be Creative
- Use a “Depression Era Mindset”
- Know when you need “can’t use” items
- Combine things that you would not have thought would work
- Hide mistakes in plain sight!
As you continue to add to your embroidery stash, be sure to store your fabric and other notions in the same manor, but in the way that works best for you while also keeping in mind its effect on your stash!
Stay inspired with the Embroidery Legacy!
For more fabulous inspiration and support, join our two Facebook groups, Machine Embroidery and Digitizing Made Easy and Wilcom Hatch Embroidery Software Facts.
So until next time, keep stitching creatively, and remember to share all your wonderful designs and ideas!! Your success is our success!
P.S. Try our free Embroidery Legacy Design Kit, where you get 11 fan-favorite designs for free, or check out our giant database of over 30,000 quality machine embroidery designs. Use these designs to help light your creative spark & help turn those embroidery leftovers into masterpieces!

Thanks for all the ideas……didn’t realise you’d been to my place when you were down under…LOL
Haha! Thanks for reading Susan
I love these ideas but would like to know where you got the thread holder/containers please? I have had a difficult time finding containers that actually work or don’t break.
The containers pictured are from Walmart 🙂