Underlay is the foundation of your digitized embroidery designs. Just as a foundation for a house is vitally important, so is underlay in your design. But what are the different types of underlay, and when do you use them?
")
Underlay stabilizes all the elements of your design before the visual stitches are laid. When you hoop your stabilizer and fabric, there may be some play and movement between the two. The idea is to bind them together, and the underlay assists in minimizing distortion.
In this article, we’ll dive further into underlay within your embroidery designs and digitizing while covering:
- The importance and difference of different underlay stitches
- Using underlay techniques for quick fixes
- Underlay on hats & caps
- Using underlay in your software
Are you new to embroidery digitizing? Whether you’re looking to create your own designs or simply better understand what’s happening underneath your needle, don’t forget to check out our Free Embroidery Digitizing 101 video course! It even comes with a cheat sheet pdf.
Understanding Underlay Stitches in Embroidery and Digitizing
Underlay stitches are simply running stitches placed in certain places, in certain directions, with varying stitch lengths to give an embroidery object (satin and fill stitches) a solid foundation.

Underlay also helps minimize the possibility of embroidery puckering once it’s finished stitching and out of the hoop.
Underlay helps keep all your digitized objects well defined, and it will make your top stitches look more clean and crisp. Underlay also allows you to build up layers of embroidery on top of each other while decreasing the densities and keeping your design clean.
Why Are Underlay Stitches So Important In Embroidery?
I’m going to show you how underlay works and why it’s essential to know how to place underlay stitches. We’re going to show three simple column stitches using a satin stitch
Example 1: running stitch with underlay in the middle of the object.

In the example above, we’re using a running stitch and placing a couple of passes of underlay right in the middle of the object. What usually happens is that this satin stitch will look a little jagged when it is stitched and won’t have a crisp, clean look. I’m sure you’ve probably looked at a finished sample that’s come off your machine and wondered why it doesn’t look clean. It’s not that your machine needs an overhaul; it’s because the underlay was in the wrong place.
Example 2: same column stitch with underlay placed very close to the edge of satin stitch.

In the example above, we have the same column stitch. But this time, the underlay is placed very close to the edge of the satin stitch. This placement will have disastrous results as the underlay stitch may pop outside the satin stitch, and then you have to pick out all those undesired threads painstakingly.
Example 3: underlay is .4mm away from the outside of the object.

In the example above, we place the underlay in a specific place, exactly .4mm away from the outside edge of the object. When you run this sample on your machine, you’ll see that the embroidery stitches out crisp and clean, with the underlay acting as a break wall.

The diagram above shows a side view of what is happening. The top thread will pull towards the center of the column, but the underlay stitch will stop it dead in its tracks so that it won’t pull in any further.
This helps when you’re stitching designs on loosely woven fabric types. Like the fabric of a golf shirt, a woven fabric would look like a series of hills and valleys from the side if placed under a microscope. Because of their nature and the way these fabrics are milled, they tend to stretch more horizontally than vertically as garments are sewn/constructed in this manner. Thread might fall on either side of a hill or valley even if it appears perfect on your computer screen. Properly positioned underlay will greatly reduce the likelihood of this type of distortion happening.

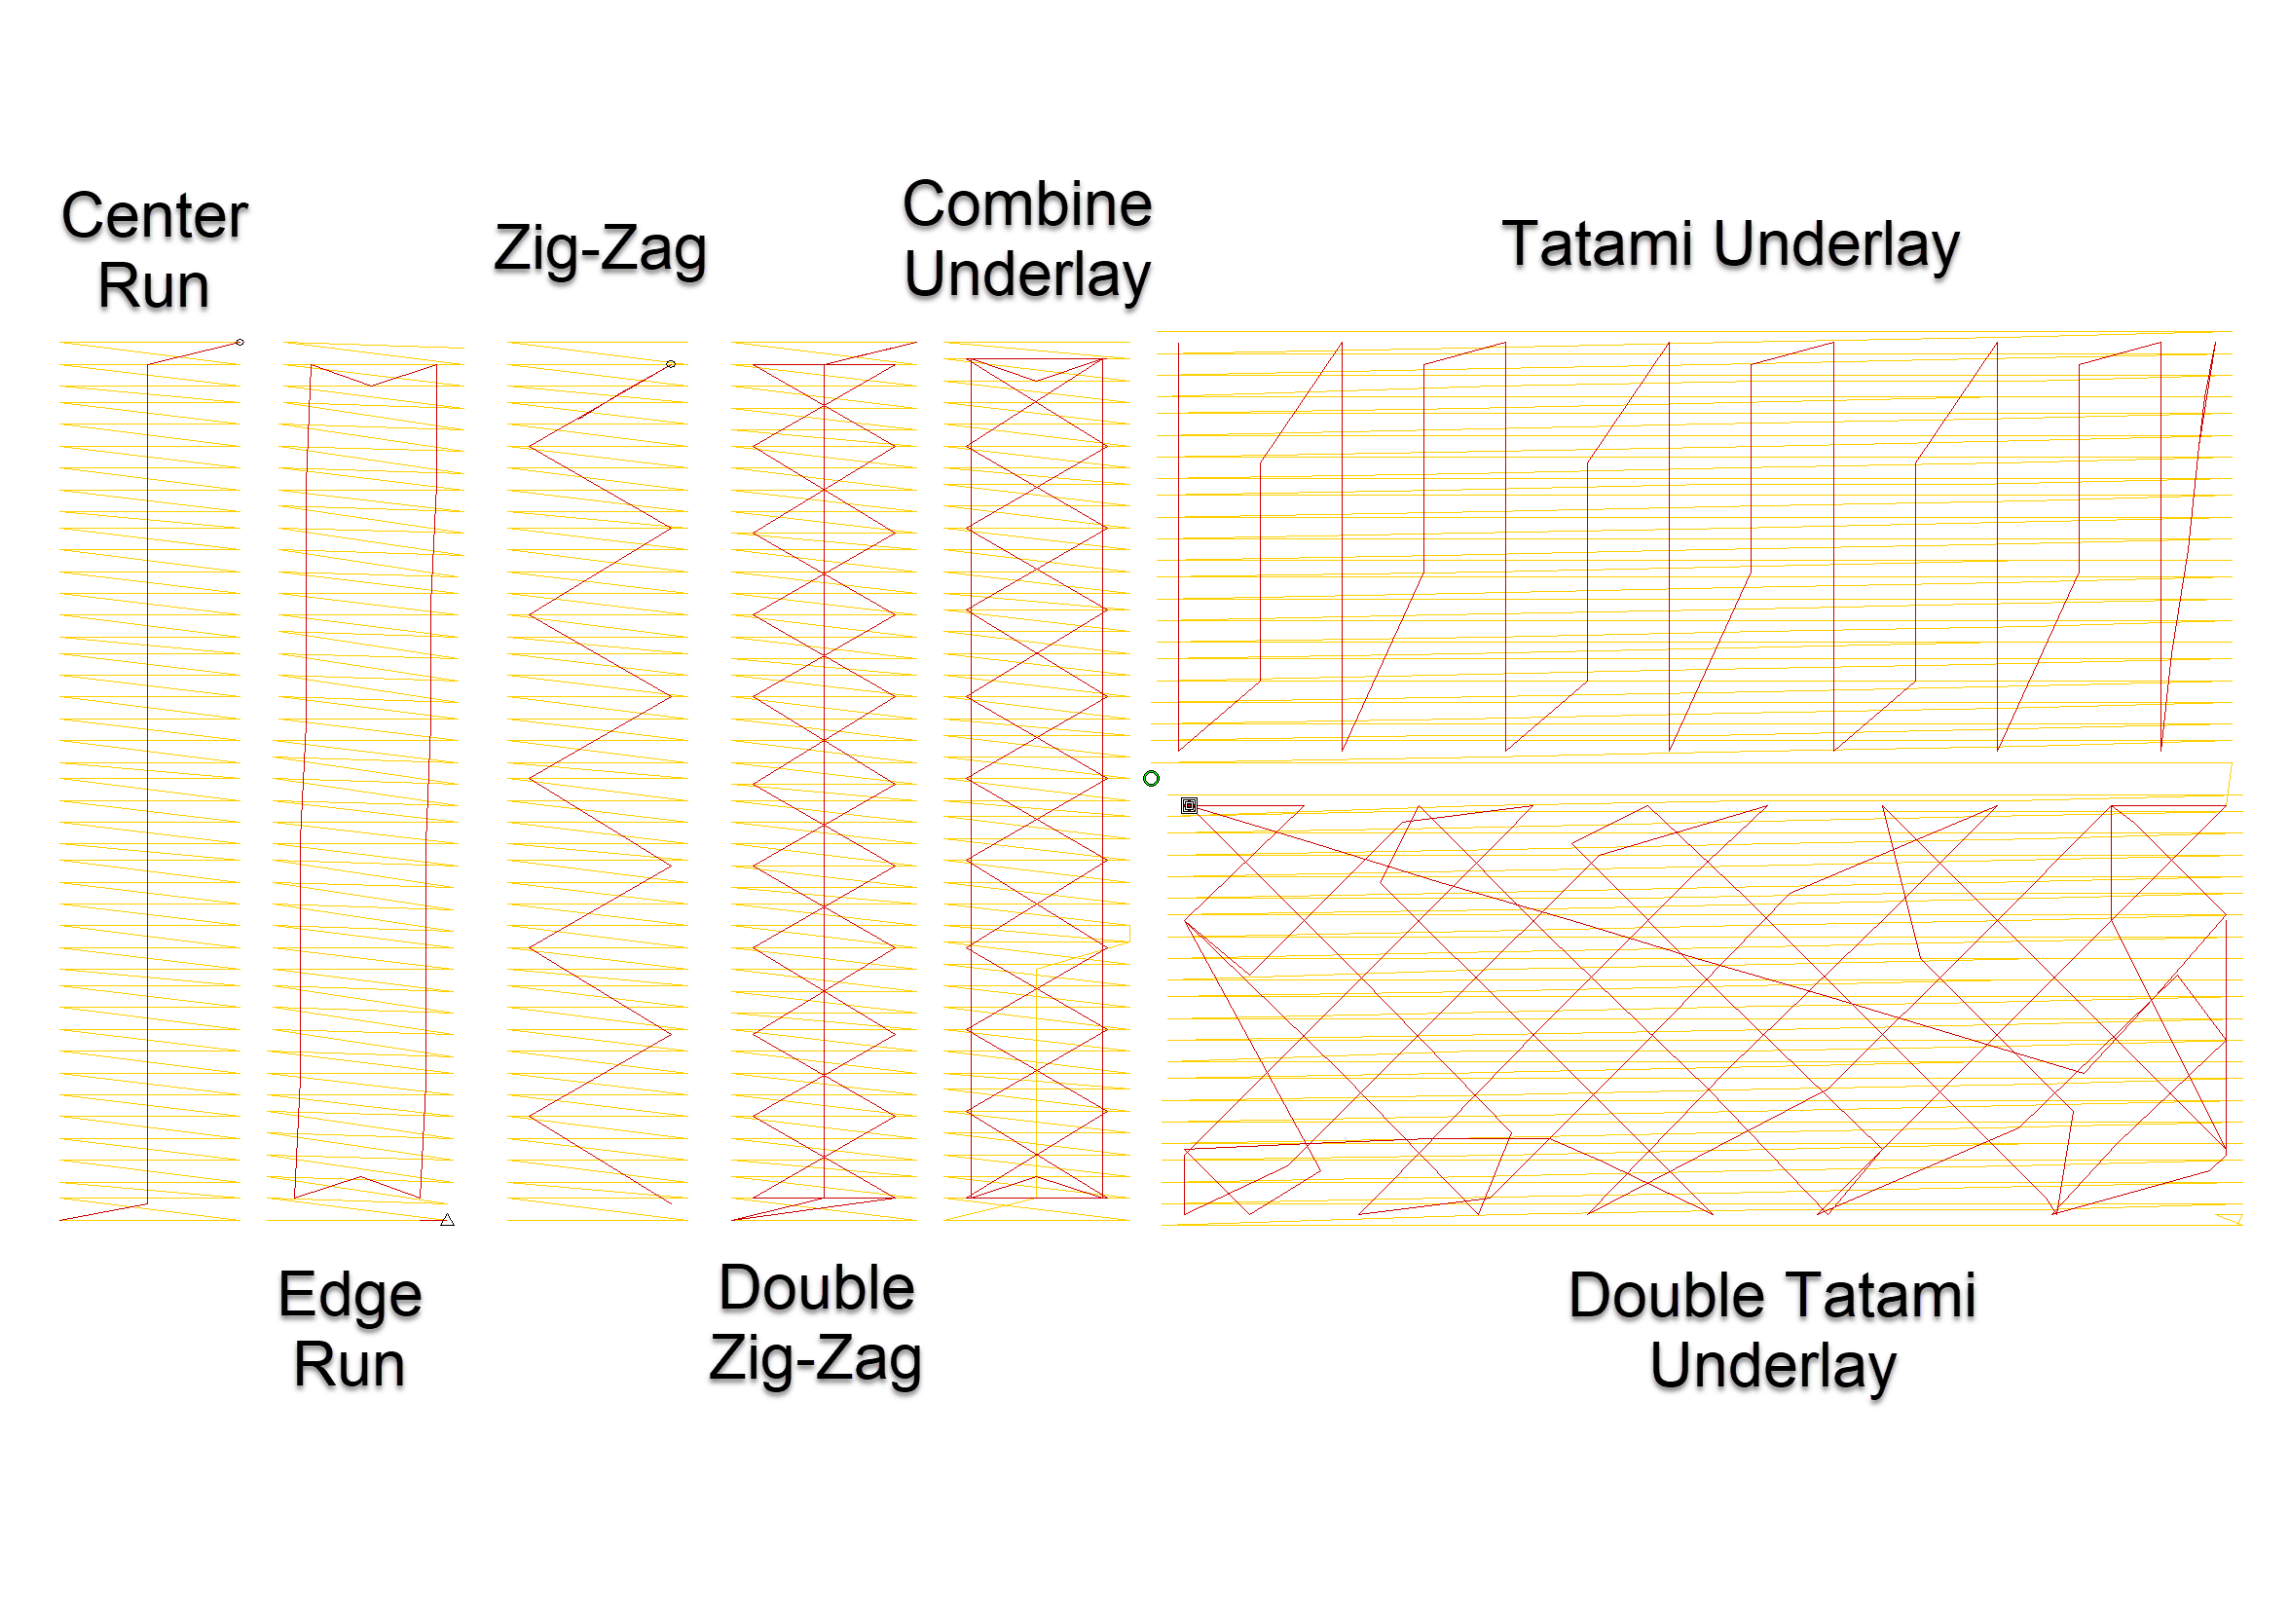
Different Types of Embroidery Underlay
The different types of underlay are center-run, edge-run, zigzag, double zigzag, fill-stitch underlay, and combinations of underlay used together. Both the application and fabric types will determine the combination and the order in which they stitch.
Center-Run Underlay
Center-run underlay is used on very small column satin stitches ranging between 1.5mm-2mm. They run directly through the center of the object because of the limited space involved.

Edge-Run Underlay
Edge-run underlay is used when the column stitch gets a little wider and needs more foundation, ranging from 2.5mm-3.5mm. This type of underlay provides the break wall effect we covered earlier.

Zigzags and Double Zigzags Underlay
Zigzags and double-zigzags are generally used along with an edge-run underlay. These are used when applying underlay to a column width of 4mm and up. Because the column is wider, it leaves an area between the column stitches that has no foundation. If there is no zigzag securing the empty space, the column stitch will experience too much pull.
Do you want to learn more about push & pull compensation and why it’s essential within your embroidery? Click here to read about Push & Pull Compensation now.
It is important to note that it does matter in which order the two underlay types are laid down. The zigzag needs to go down first to secure the fabric, and the edge run is placed. If you do the opposite, the zigzag will pull in the edge run, and it will no longer serve its purpose of being a specifically placed break wall.

Fill-Stitch Underlay
Fill-stitch underlay is a running stitch that runs back and forth in the opposite direction of the fill stitch being placed on top. This underlay type secures the area in which the full stitch is being placed, and placing it in the opposite direction helps to reduce the amount of pull in the design.

Suppose a filled object is not being outlined with a satin stitch and is left as an open edge. In that case, using a combination of fill-stitch and an edge run underlay will help secure the foundation of the fill and promote clean lines around the edges of the fill.
Stitch Length Underlay
Underlay stitch lengths generally depend on the nature of the material/fabric being embroidered on. The standard stitch length I use for most underlay applications is 2.5mm. I will lengthen the stitch length if I’m embroidering on fleece, terry cloth, leather, vinyl, or any other medium that may cause short stitches to sink in / cut the fabric and disappear prohibiting them from doing their job.
Using Underlay Techniques for Quick Fixes
I’ve often seen designs that have poor registration simply because the underlay has not been used properly to secure the design. This can be especially evident with larger jacket-back designs. If you look at how fabric and stabilizer are placed within a hoop, you’ll notice that you can have some play between the fabric and the stabilizer.

If you place a running stitch horizontally, it will help secure the fabric to the stabilizer and smooth out the area before all the top stitches of the design are placed. This is a good practice for digitizing large solid designs with a lot of fills and details.
This technique can often work with designs that have already been digitized and have registration problems.

Underlay On Hats & Caps
This quick edit technique is also very practical with finish caps. Caps can be one of the most challenging items to digitize for and embroider on because the surface of the hat is not flat.
Interested in learning more about embroidery & digitizing for cap hats? Check out the rules we suggest following for best-embroidered results by clicking our Complete Machine Guide on How to Embroidery Hats & Caps here.
Digitizing for a curved surface is an entirely new subject unto itself, but what do you do if you’ve been given a design that is not registering correctly and may not have been digitized properly for a curved surface? In this situation, I would bring the design into my digitizing software, keeping in mind that I will digitize a running stitch right on top of the designs.
The first thing I would do is digitize 4-5 vertical running stitches up and down on the very center of the design. The reason why is because in the very center of any 6-panel cap is the seam; that center seam is the Bermuda Triangle of embroidery!
You can lose a letter i in the seam of a cap, and if you’re running a fill stitch horizontally, the stitch can change in appearance when they go over the center seam. We call it a stitch in the ditch; the running stitch going up and down a few times will fill in the center seam, and the embroidery will then look flatter in that area.
Once I’ve digitized the vertical stitch, I’ll next start to digitize a horizontal stitch from the center out (maybe 10-15mm to either side). Then I’ll do the next pass 20-30mm and so on. Think of it as moving back and forth, slowly smoothing out the curved surface from the center and eventually hitting the outer limits in each direction. This really does help provide a foundation for designs that may not have been pathed to consider the curved surface of a cap.
I generally leave the underlay stitches I’ve just created as a separate color change and then simply move it up in the stitching order, so it embroiders first. If you match the first thread color as close to the color of the cap, it’s a good safeguard. If any of those stitches are exposed after the design is finished embroidering, they will not be noticeable because the colors match.
Using Underlay in Your Embroidery Software
Many software brands in today’s market allow you to choose and control the type of underlay and the properties assigned to the objects you create. This is where I feel most embroiderers struggle. It can be challenging to learn which underlay to use for specific stitch types, the width required based on the objects being digitized, and the settings for all the varying fabric types available to sew on. However, knowing all the correct values requires tons of experience.
Now, we have an easier solution than wasting time figuring out the rules of underlay for yourself or trying to piece together dozens of videos/articles posted online like a broken jigsaw puzzle. If you want to understand how to use underlay within your embroidery, allow me to make it easy for you… We have a complete underlay video guide included as a bonus within the first level of our Digitizer’s Dream Course.
Our Digitizers Dream Course gives a hands-on approach to learning how to digitize for better, quicker results. We believe that seeing and doing provide the best results when trying something new. Using underlay as part of the Dream Course’s learning process will help you truly understand how to use and apply underlay like a pro. Click here to learn more about our Digitizer’s Dream Course now.
Underlay Within Your Hatch Software

If you’re looking for embroidery software to make applying underlay more automated, I’ve personally been an advocate of the Wilcom platform for decades. With the release of Hatch software, Wilcom has made its industry-leading technology available to embroiderers from all walks of life.
One of the reasons I’m a solid supporter is because Hatch automatically assigns the correct underlay settings for you.
Amazingly, Hatch sets the parameters automatically. It works based on the stitch type and width of the given object you’re digitizing. It also changes all the properties of a design’s underlay at a click of a button based on the Fabric Type you select. Yes, I said automatically! This is one of the many reasons Wilcom is the world leader of embroidery software and why most commercial embroiderers globally use Wilcom.
Are you interested in trying a free 30-day trial of Hatch embroidery software? Click here to use Hatch like you own it with all its amazing features now.
Now don’t get me wrong, all software brands will allow you to apply underlay to your designs. However, most don’t always do it automatically, and from what I’ve seen, those that do are not nearly as advanced as Hatch.
Want to see Hatch’s auto underlay in action? Watch our quick video below:
Sometimes you may receive poorly stitched designs, and then where do you go from there? Rather than re-digitizing a whole new design, it is easier to change a few underlay and stitch-type options to create a better-embroidered result.
Join me in our video below as we go step by step analyzing a poorly stitched church design. Instead of re-digitizing, I’ll show you how to fix this design with a few tweaks.
Want more great embroidery tips and tricks? Subscribe to our Youtube Channel below now:
Conclusion: Understanding Underlay Is Essential To Quality Embroidery Designs
As you now know, underlay is essential to the foundation of your embroidery designs. For the best-embroidered results, it is best to understand underlay. Understanding underlay properly will minimize distortion, decrease densities, and will keep your design clean.
I hope this article helped you to better understand what underlay stitches are, why they’re so important, and the different types available. If you enjoyed this article, please don’t forget to share it with your friends and leave a comment below. I’d love to hear from you!
P.S. Don’t forget to check out our Digitizers Dream Course to better understand underlay within your embroidery designs and how and when to use it. Click here for a hands-on approach to achieve your best embroidered results possible.
Thank you for this article. A great reminder and tips to improve the files I run
You’re most welcome Kathie 🙂
Thank you, yes this article was helpful
Thanks JoAnn, glad I could help!
Light Bulb Moments Happening! LOL- Sue Ryan
Haha glad we could help connect the dots Sue!
hey, what a great ARTICLE. I never know before it the various types of embroidery Underlay. especially I like the zigzag and double zigzag types. thanks for sharing great knowledgeable content.
Glad you enjoyed it 🙂
Good job explaining. I’m new to the whole embroidery machine and how it all comes together..thanks
Happy to help Penny! Glad you enjoyed it.
Hi John, first of all thank you so much for all the content you share with us. I have been looking for information about embroidery design in Spanish like mad but there is nothing compared to your blog, website, etc… it is a bit hard to learn because it is not my native language but step by step I am learning a lot with you. since I am a beginner I have a lot of doubts I would like to ask you about when you say you usually use 2.5mm stitch length as a standard, is it refering in every kind of underlay? I hope you can help me. I can’t wait for the webinar on saturday.
Thank you
Aythami
Hi Aythami, thank you for your kind words! I don’t like giving absolute rules with regards to properties as every design, fabric, and application varies. The reference to 2.5mm is stitch length that is usually production friendly in most cases. Hope this helps!
So helpful. Wish I would have read this earlier. I had things a little backwards. You’re great. I’m now going to settle down and continue the Digitizing Made Easy Course.
Glad to hear Jelane 🙂 enjoy the course!
Hey, Thanks for this great article, double zigzag type is incredible. I’m a little confused about that, Can I use the digitized file on any fabric?
Hi Stuart, in most situations the extra underlay won’t affect the finished appearance, better a little too much than too little.
Question? Which underlay is best to get crisp text?
That would depend on the fabric application and the size of the font, unfortunately there are always many variables with regards to embroidery.