If you’re a contract digitizer, you may deal with many different customers in different embroidery sectors. With such a broad range of clients, do you ever feel like you’re always under a microscope and never know whether your reward for a design will be praised or criticized?

You might as well be psychic as you have to constantly adjust yourself to the type of customer you’re currently doing the job for. Some want quality, rich in appearance, and on the higher end of the density scale, while others are only price conscious because that’s how they operate their business. Then you can get either end of the scale getting overly cutthroat because many companies may be bidding for the same job.
The best way to keep a happy customer is to get to know their specific needs. This can get confusing when your customer base grows into the hundreds, so start documenting or categorizing your customers right at the beginning. I’ll leave it to your discretion as to what names you wish to give them.
At the beginning stages of getting to know your customer, let them know that “special requests” must be addressed when the order is placed. If they do not identify the “special request,” then be sure to charge them for any edits that need to be done after the fact; time is money, after all! “Special request” can fall into many categories; terrycloth, polar fleece, foam embroidery, leather, and the list goes on.
How To Lower Embroidery Design Stitch Count With Digitizing
There are many ways to cut down the stitch count of a design depending on the customer’s flexibility of graphic options, stitch types, densities, application, and how much they are willing to bend to achieve their objective.
We have all had that customer who gives you a design that, if you digitize it properly, would have 10,000 stitches. However, they are insistent that it only has 5,000 stitches. You see, that’s all they’ve budgeted for, but they still want top-notch quality! Sound familiar? In that situation, I’ll tell the customer, “Let me digitize it properly so you know how it should look, then I’ll give you a second file processed by the software at your desired stitch count. When your customer says it looks like crap, use the first file I sent you.” The point is we need to be realistic!
If you take away too many stitches, it will inevitably affect the appearance of your design. Here are a few suggestions that can help keep the stitch count down in those awkward situations.
Reduce Embroidery Design Stitch Count By Edit Digitizing
Our first option is to play with underlay and running stitches’ stitch lengths and values. You can then adjust the density values of column stitches and densities and stitch lengths of fill areas. The trick is to play with values enough to make a difference in the stitch count without dramatically affecting the visual integrity of the design.
Interested in learning more about underlay, density, and other terms that sound like gibberish? These terms are very important for knowing how to digitize properly. Luckily, we’re here to help! Let us help teach you the theory, which is a key piece of embroidery education to create your own stunning designs! Click here to learn more about our Digitizers Dream Course and see why this course stands above the rest!
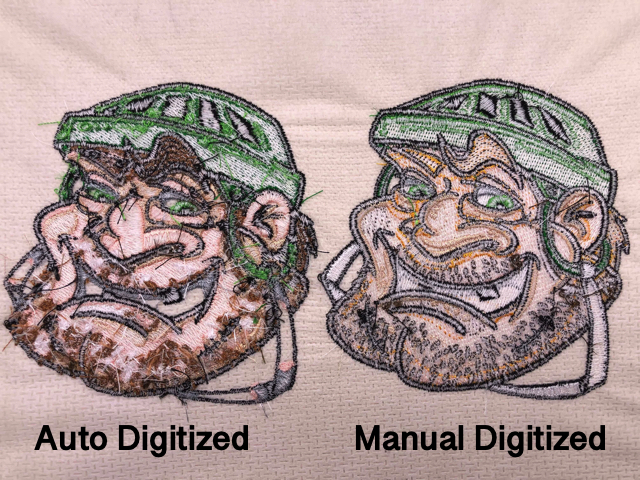
Here is a before and after example of how this can affect the stitch count without drastically affecting the design’s run ability and visual appeal.

This original file has 23773 stitches.

This edited file has 19966 stitches, a savings of 3807 stitches
If you are a contract embroiderer with 200 pieces to embroider, it equates to over 781400 stitches of saved running time. Well worth spending 15 minutes editing and a couple of sew-outs!
You can further reduce the stitch counts in some situations by converting some of your fill-stitched objects into satin stitches. Sometimes this can be a little misleading because if the stitch length of the column is too long, the machine’s speed will automatically slow down, and you won’t really save much time at the production level.
Reduce Embroidery Design Stitch Count By Editing Artwork
Secondly, you can work on altering the customer’s artwork somewhat to try and meet the desired stitch count. However, these changes usually affect the quality of what one might consider good embroidery.
Some of these changes might include not putting borders around fill areas, using walking stitches instead of column borders around objects, and simplifying or deleting details of the customers’ art. These changes don’t usually go over as well, so get any changes approved and in writing. The above is one of those you get what you pay for.
Reduce Embroidery Design Stitch Count By Adding Applique
This suggestion directly involves production more than it does the digitizer. Usually, you get an immediate cold response when you’re on the floor and bring up the word appliqué. And rightly so, the traditional appliqué process has a lot of cutting out, lining up, and excessive downtime on the machine.
Being lucky enough to have run production and be a digitizer at the same time, I was able to play around with using unorthodox appliqué methods when I felt I could get away with it.
What we did was pretty simple; we would use certain materials (colored plastics, tear-away pelons) as a base on which we would digitize and stitch a very loose fill.

The trick is to run your underlay stitches for the area first and then program a stop.

Lay down your material with little regard to placement, and then stitch the loose-fill area.

Immediately after stitching the fill area, program a run stitch with a slightly closer length value to help perforate the edge

Program a stop after the run stitch and tear the material off

before embroidering the column edge around the fill.

In some instances, you can even wait until the cap comes off the machine and tear the pelon off at the finishing stages. This is the original design at a stitch count of 7812

This edited file has 6531 stitches with a savings of 1281 stitches with little or no visual effect.
This isn’t a difficult process and can be executed quickly at the production level. There are a few criteria in determining whether the job in question is a good candidate for this technique; is there a large enough filled area to make it worthwhile? Does the quantity of the order merit the specific programming, and are the goods being embroidered friendly for the type of application given the appliqué materials being used?
We used this technique often on goods that you wouldn’t be washed after every use, such as jackets and caps. If you spend the time and source the appropriate materials, it can also be successful with your washable items. It’s just a matter of taking the time to experiment.
Reduce Embroidery Design Stitch Count Using Hatch Auto Fabric Assist Tool
The best way to lower stitch counts with designs while digitizing is to make sure you save and edit the native format of the design. The native format within each software program will save the original nodes and properties used when creating the embroidery file, and it is “object-based,” not just converted stitches.
This is important because if you have both the original file and access to the program it was digitized in, you can adjust all the properties within the file. These will include densities, pull compensations, and the underlay used… all of which should be changed for specific items and fabric types.
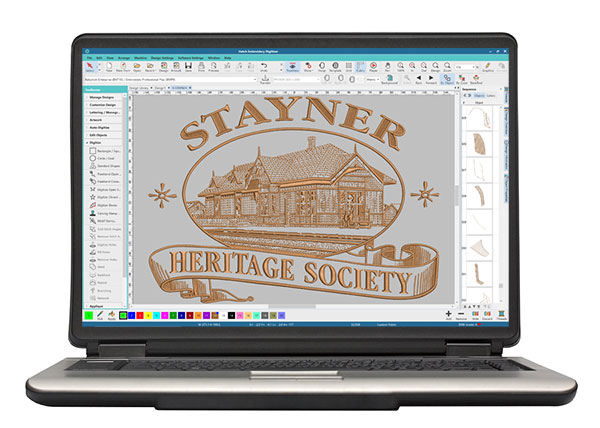
Within the Hatch digitizing platform, I can digitize an entire design using a specified fabric type. Then, with a couple of clicks using the “Auto Fabric Assist” tool, I’m able to change all the properties, which lowers the stitch count.
Want to try a free 30-day trial of Hatch embroidery software? Click here to use Hatch like you own it. See for yourself how easy-to-use this software really is!


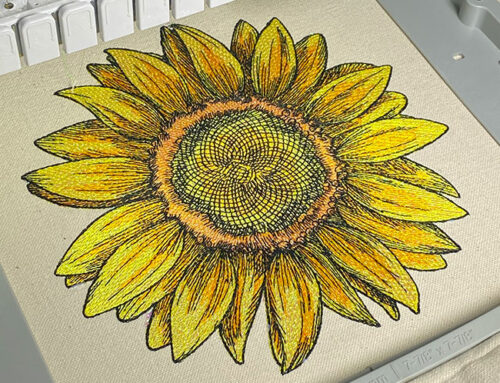
In the examples above, I was able to take a design that was digitized for Terry Towelling and change it to Silk and then Leather, change the stitch count from 47,301 to 36,384, and then all the way down to 33,058 stitches. In the screen capture, you can visually see hardly any difference between them, but the numbers don’t lie; reducing a design by over 14,000 stitches is a big deal.
Watch our video below as John discusses how to create production-friendly embroidery designs within your Hatch software.
Conclusion: Lower Your Embroidery Stitch Count With These Techniques
If you need to reduce your design stitch count, be sure to use one of our suggestions below to ensure your embroidery design is still of great quality!
- Edit your digitizing by adjusting underlay, density, and other essential theories
- Edit the artwork (such as removing borders, and using simpler stitches)
- Add applique and use a very loose fill
- Use Hatch auto fabric assist tool
Let us know which technique you’ve tried; happy stitching!
P.S. Don’t forget to check out our Digitizers Dream Course by clicking here to learn the fundamental embroidery knowledge to create the perfect design at any time.
Thank you for the article John. I think about digitizing for others and have no idea where to start or what to do…for now I will keep thinking LOL LOL and when my skills become better I will think about it again…and return to your tips.
You’re most welcome. If you’re looking for a place to start I highly suggest you checkout our free Embroidery Digitizing 101: Cheat sheet video course here: https://www.digitizingmadeeasy.com//embroidery-digitizing-beginner-cheat-sheet/
Hope that helps 🙂
Hi John, I am wondering if you could clear up some confusion about the pic in Fig. 3. Are you laying down the underlay stitching directly on the hat or is there a stabilizer underneath there. Also what is the purpose of doing so? Is that to give the base stabilty? Could you not hoop your pellon/stabilzer and embroider?
Hi Gail,
The underlay is to provide stability and laying the tearaway stabilizer then just assists with the white thread not showing the darker fabric showing through. In theory it could be done multiple ways, if I remember correctly that order was done on hats and garments on different colors. On the lighter colored fabrics it wouldn’t be necessary. The goal to to make sure the white fill loose solid without adding density to the design. Hope that clears it up!
You have described everything in deeply way this is really informative article for improving skill of beginners.
Glad it helped you!
Happy stitching 🙂
The fact is that minor differences in stitch count do not affect the overall looks of the design. It is hard to distinguish between two designs, one having optimized while the other having more stitches than actually required. The thing is that the quality of digitizing for embroidery design is not solely gauged by the way it looks. The quality of the digitizing is also determined by the production efficiency and comfort of the wearer.
Correct, I’ve always looked for a balance of being sure the designs is visually attractive as well as production friendly. Especially if one is embroidering for profit.
Thanks for commenting Stuart 🙂
Hi John.
What is a quick way to digitize fill stitches so that they sew out in one direction so that there is no gap? Is there a secret with the nodes? I am aware that the stop and end points need to be opposite each other. I am spending so much time try to get it right.
Thanks,
Ramona
Hey Ramona,
I usually try to control the gapping by adjusting the start and stop positions to promote pathing in one direction. I find gapping occurs when stitch directions change 🙂
So after reading this article. I found a special at a print shop for 24 beanies with a 5,000 stitch count. But before I took advantage of the deal I went to my current print shop and ask them why is this shop cheaper for the same product. They explained for my design it would be a 10000 stitch count oppose to 5000. All I want is my beautiful Logo to look amazing on some beanies for the winter. I’m so confused.
Hi Brandon,
Usually a lower stitch count would equal a cheaper price as each beanie would spend less time being embroidered on the respective shop’s machine.
Now a lower stitch count is usually a good thing, but quality all comes down to how the design was digitized. Stitch counts can vary on a number of factors such as the size of the design & the type of fabric you plan to embroider on (not to mention the other points outlined in this article). Assuming they are doing the digitizing themselves, I would say your best bet is to show the digitized files to an expereinced digitizer who knows what they’re doing and ask them which one would run better and produce better results.
Best of luck with your beanies!
– Jesse
Hi John,
I am new to embroidery. Doing small things for my personal use.
I found a design I like and purchased it from a company. When I went to stitch it out I discovered my machine has a stitch count and my design it over the limit.
I asked to have the file resent in the .art format to see if my sister could edit it and then save it to a format my machine will read.
We are having problems…
Can you tell me how to reduce to the stich count…the design is 112 stiches to many.
To complicate matters I would like to keep the design on my computer and all I have is a basic Wilcom Trusizer e4 editing software. My sister has a rather expensive program. Neither one of us can figure out how to reduce the stitch count.
Can you help?
Hi,
Usually the best way would be to contact the company you purchased the design from as they would have the original format which would make that type of change relatively easy. Without seeing the design file I’d only be guessing as how to adjust the design.
If your sister has a high end “quality” program simply reducing the size a couple of percent could reduce the stitches marginally, but not seeing the file and knowing the software she owns I’m just guessing.
Hope this helps,
John
Very informative blog. Thank you for sharing your experience about embroidery with us.
You’re most welcome Louise
HI, I’m not sure why but my machine will not read certain design files that I have create on hatch embroidery. Some of them it reads just fine but others do not show up at all when i put in my usb. I’m hoping I can get help with this issue because I am completely stuck.
Hi Alyson, feel free to join our Hatch facebook group and post your Hatch related question here. https://www.facebook.com/groups/HatchFacts/