Ever wander into a beautiful garden and wish you could just pluck the flowers off and put them on your shirt? We wish it were that easy! But luckily, there are still ways to bring that beauty from nature to your embroidery machine with great results!

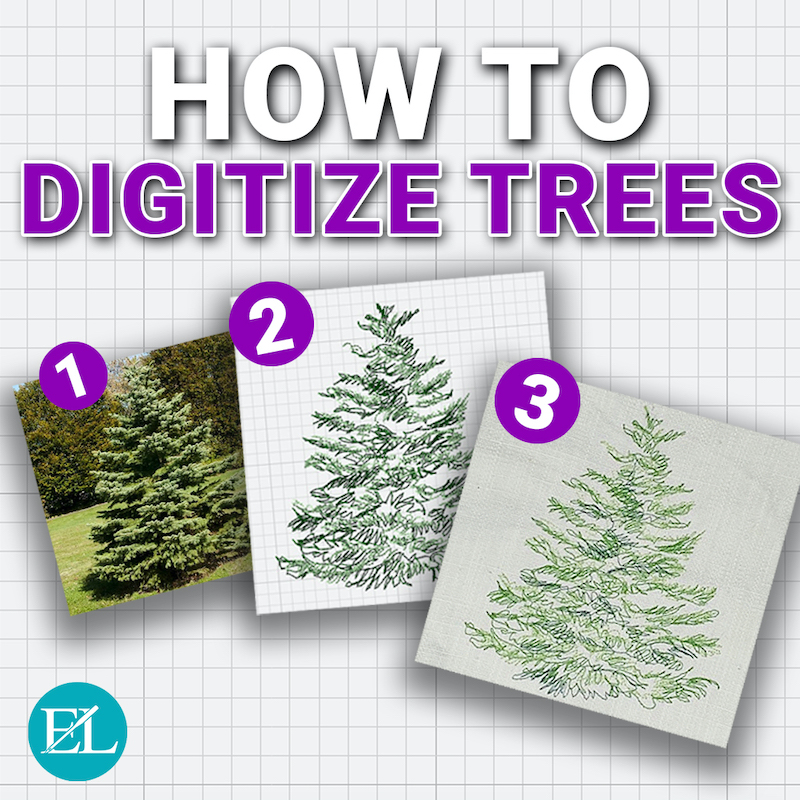
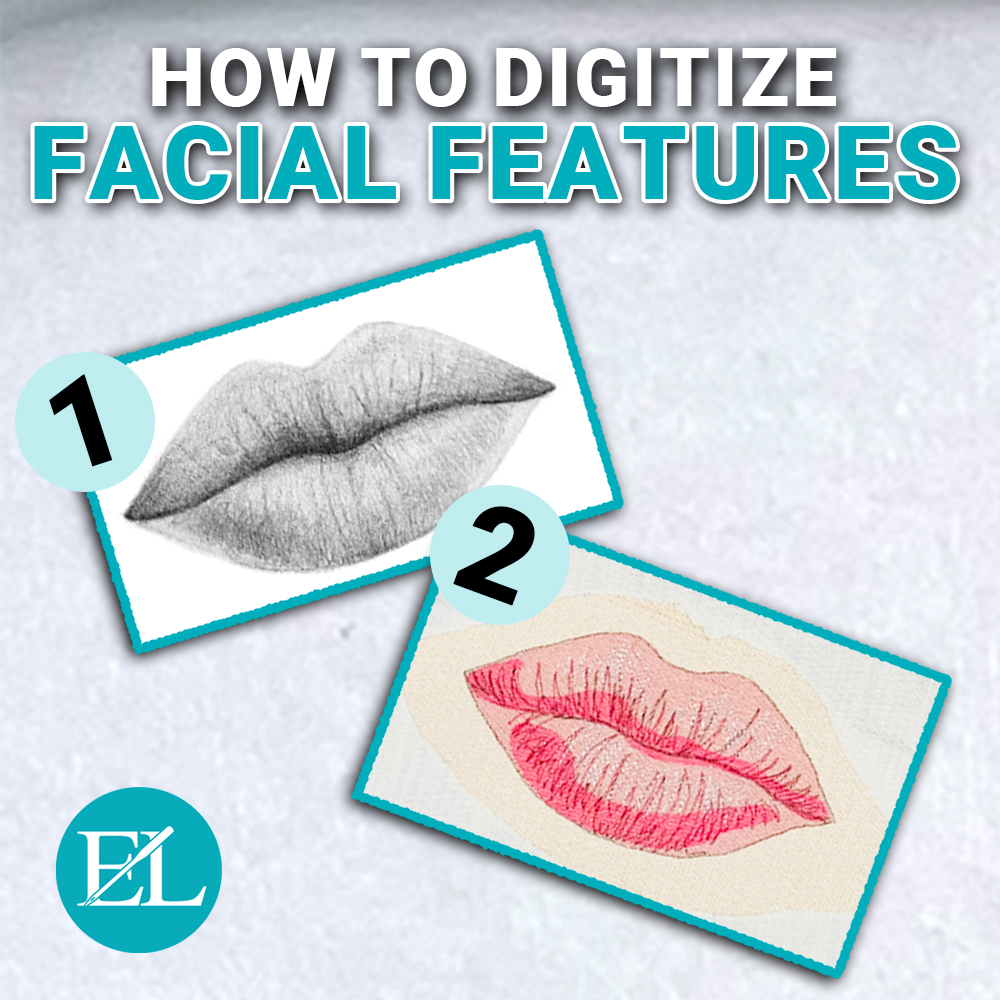
Of course, there are many times we want to create a perfect image, in a graphic, a logo, or cartoon. Today we are focusing on the “perfectly imperfect” and giving you some ideas on making your embroidery look more lifelike with layout, texture, and more.
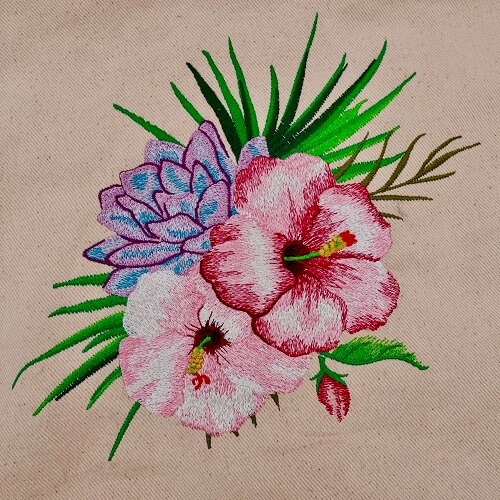
Did you know we offer over 2,500 high quality floral embroidery designs? Browse our large category of embroidery machine flower designs by clicking here if you don’t want to digitize your own design, but would still like a perfect stitch out every time.
Guidelines for Nature & Flower Machine Embroidery Designs
Before we get into the actual process of digitizing nature, let’s talk about three things that will help you get the best results in creating beautiful flowers, plants, and more! These rules are not hard, but they will help you take a different look!
- Odd is good: In the case of nature- it is great to be odd! Nature loves odd numbers. When working with leaves, petals, etc., you will find that a more natural look can be created by using an odd number of objects. An odd number of objects in your arrangement better captures your gaze. Odd numbers force your eyes to move around the grouping, and that forced movement is the heart of visual interest. This is not to say that everything has to be odd, there are many examples of even arrangements which are lovely, but the message is that variety is good!
- Drooping is normal: We always associate drooping or wilting with a dead plant, but this is not necessarily bad. Even though leaves and flowers can be arranged “pointing up” as they get larger, their weight causes them to bow their heads. Also, keep in mind that flowers like fuchsia normally droop over.
- Forget perfection: Even though we have discussed several “perfect” nature arrangements, the perfection in your design often comes from imperfection. A leaf got knocked off, a flower has an insect, a missing petal from an insect’s lunch, or sometimes nature misses a beat and makes a wonderful four-leafed clover.
How To Digitize Lifelike Plant and Flower Embroidery Designs
Now the exciting part! We are going to talk about translating nature into embroidery. The takeaway from this exercise is to always keep in mind that they do not have to be perfect! Having that in mind will help you “grow” a wonderful embroidered garden. Let’s make an arrangement!
Don’t have embroidery software? Click here for a free 30-day trial of Hatch Embroidery Software, where you use it like you own. You’ll see how user-friendly and easy it is to create your own embroidery designs!
Digitizing Embroidery Flower Stems
We will start with three stems for our main flowers (remember odd is good)! You can add branches in an alternating or opposite pattern. Generally speaking, a satin stitch stem or a backstitch for smaller groupings works well. For an easy arrangement, start with three curved stems. Not every flower has to have a stem; we do not usually see (or notice) them in an arrangement.

Digitizing Embroidery Flowers
When personalizing your flower design, make sure you choose a few flower machine embroidery designs for your bouquet from a reputable embroidery design company.
Interested in floral embroidery designs? Check out our 3,450+ different floral and plant embroidery designs we offer by clicking here.
After selecting three flowers, you can resize them, flip and rotate them to “re-use” the designs in a creative way that looks natural and saves time. Remember that flowers of even the same variety come in many sizes and shapes.
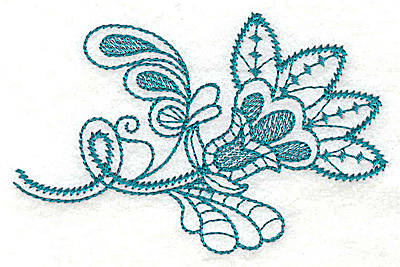
I have selected two roses and a daisy design in the flower example below. I changed the size on one rose and used the “flip” and “rotate” tools to make them just different enough. You can rotate an object by selecting and rotating by 15 degrees or clicking again to access the free rotate tool!

Remember that your flowers do not always have to face up or forward- Here is a great example of flowers being just as pretty even when looking away.

After you have placed your flowers in their desired places, you can add a few leaves to complete your bouquet with either preexisting embroidery designs or, if you have Hatch software, use an ESA glyph leaf.
Check out all of our leaf embroidery designs to accent your bouquet by clicking here.
Interested in using re-sizable ESA Glyph leaf shapes with your Wilcom or Hatch embroidery software? Make things easier by checking out our ESA glyphs by clicking here.
Remember that leaves look good hiding in the back too! You can send a leaf to the back of the design using the sequence order- the first things to stitch at the top appear in the back, and the last objects stitched appearing in the bottom of the order will show on top.

Essential Digitizing Tools For Beautiful Floral Embroidery Designs
Circle Tool in Hatch Embroidery Software
The Circle tool in Hatch is a great way to make wreaths and circular bouquets!
Simply create a small arrangement of flowers and a few leaves.
Select your object and create a layout using the circle layout tool. (Hint hint… the “odd number” theory works wonderfully here!)
Click here for step-by-step instructions posted in our Hatch Facebook group on how to create your own wreath using the circle tool within your Hatch software.
Check out the example below for an idea of how many combinations you can make using a simple sprig of flowers arranged with this tool.

Copy and Paste Tool in Hatch Embroidery Software
If you don’t know the “copy and paste” secret, you are in for a treat! It saves time and brainpower!
If you want to experiment, digitize a leaf or a grouping of leaves. Select them all and copy, paste them into your workspace. Now the real fun starts. You can resize them, flip them, tilt or rotate them and voila, you have a new leaf set with a fraction of the work! Your brain will not notice the difference, and you can create bouquets or clusters of leaves with a tiny amount of work!

Use ESA Fonts To Create Flowers in Embroidery
Here is another little tip! Who says a flower has to look a certain way? Let’s get creative! Create your own flower by using squares, triangles, or any other shape for petals. You can save these as designs or motifs in your Hatch software.
Here is an example of a standard shield shape in Hatch used for petals, then arranged using the circle tool and copied and repeated in different fills and textures.

Check out all of our different shaped ESA Glyphs by clicking here to easily create your own floral arrangement at the click of a button. Not feeling too creative? We’ve got you covered there too! Click here to check out our Springtime ESA Glyphs to adjust these perfect flowers exactly how you want.
Using Texture in Embroidered Flowers
The texture is an area most people forget! You can create SO many textures for your leaves and flowers using Hatch, from silky satins to candle wicking, embossed designs to fringe. Check out the floral fringe technique below, as it really makes your embroidery POP!

Remember that using fringe flowers sparingly will make your bouquet 3D. Try stitching them in lighter colors so that they are the highlighted flower in the arrangement, or use them for texture here and there. Using too many textures, your bouquet will become a raised “flat” flower grouping. In this case, even though they are amazing, less is more.
Want to create your own embroidery fringe, foam, and other textured designs? Unlock the secrets in our Digitizing Dream Course! Stop being frustrated with your embroidery software and turn your creative ideas into a reality. Click here to learn more about our Digitizing Dream Course.
Adding Special Touches To Flower Embroidery Designs
- Dewdrops – Using some silver metallic or shiny rayon machine embroidery thread can create excellent dew drops. They can be digitized as a circle or a satin-filled circle. Remember that using metallic will not be as effective as they get smaller, and dots smaller than a quilting pinball head probably will not work filled in. Try a running stitch circle. Clear glass beads can be hand-applied later for an additional effect.
Are you struggling with thread breaks when using metallic thread? Let us help! Click here to check out our solution to preventing the metallic thread from breaking whenever you put it on your machine.
- Insects – They come with the territory! A little ant, bee, or grasshopper can make your arrangement lifelike. You can find insects such as ladybugs on the website.
Check out our 200+ insect embroidery designs by clicking here to help make your floral design more lifelike.
- Threads – Do not be afraid of using variegated thread or contrasting colors. Play around and remember that roses are not just red, the sky is not just blue, and clouds are not just white.
Interested in learning more about color palettes and how the colors you choose impact the outcome of your design? Click here to learn more about choosing the right colors for your embroidery designs.
- 3D – Just like the fringe flowers and texture bring some life, why not try real 3D life? There are many amazing in the hoop projects for you to create lifelike, long-lasting flowers that can bloom all year long in your” indoor” garden.
")
Create your own 3D sunflower embroidery design free by downloading our free Embroidery Legacy Design Kit. Experience the different quality digitizing makes.
Conclusion: Creating Your Own Flower Machine Embroidery Design Is Easier Than You Think
Your options are endless when creating your own beautiful floral arrangement embroidery design. Whether you’ve downloaded embroidery designs from a trustworthy site or you’re digitizing your own floral designs, how you decide to put your design together will be “perfectly imperfect” for you!
To create the most lovely floral arrangement designs, keep these things in mind:
- Use high-quality embroidery designs! Click here to access thousands of high-quality embroidery designs to create your own flower design stitch out for a stitch out that’s soft and supple every time.
- Practice, practice, practice. It will take you time to develop your “gardening” skills. You need to experiment with stitches, placement, color, texture, and layering to see what works for you. Don’t forget to check out our Digitizers Dream Course to take your designs to the next level.
- Learn to digitize – It has never been easier to learn to digitize in your very own home from one of the best teachers in the industry. Using John’s methods and step-by-step videos, you will learn how to produce your own soft and supple stitch outs from start to finish. Don’t have embroidery software, or looking for software more user-friendly? Try Hatch! Click here for a free 30-day Hatch trial where you use it like you own it. Or if you already do own digitizing software (even if it’s not Hatch) or just want to see what digitizing is about before you dive into software, check out our Free Embroidery Digitizing 101 Cheat Sheet PDF & Video Course!
P.S. Don’t forget to check out our Digitizing Dream Course by clicking here. We teach you how to learn how to digitize flowers & fruit designs so you can stop endlessly searching for the right design & start creating them instead!

Leave A Comment