Who’s in the mood for love…. of embroidery! Ever wanted to wear your heart on your sleeve, coat, or hat? With this project, we can do it with embroidery.

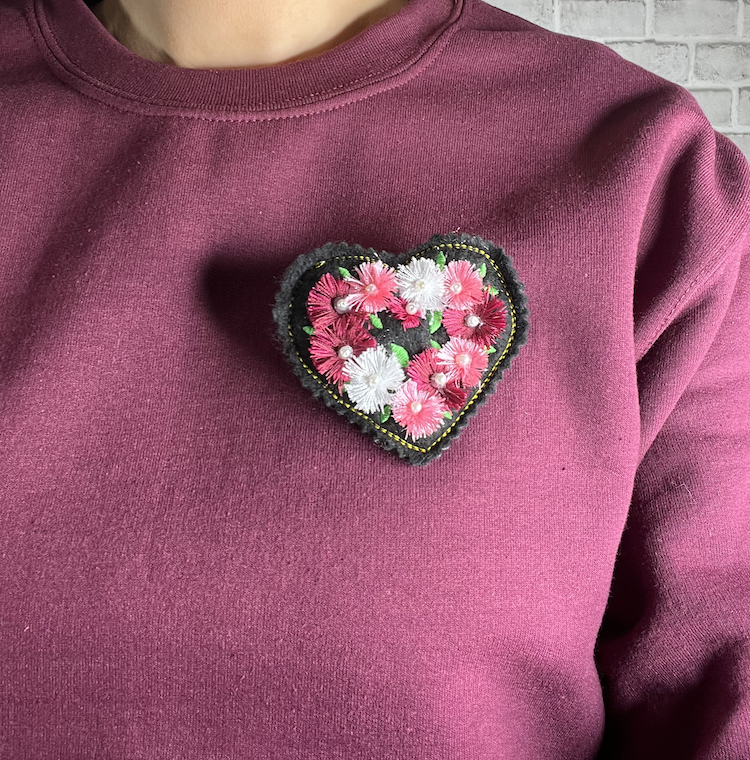
In this tutorial, embroider your own elegant fringe flower heart brooch that can be easily made with simple materials already in your stash! Simply embroider and add a pin back from a craft store, giving you a great gift or perfect addition to any outfit.
Why Create This Modern Fringe Flower Heart Brooch
Valentine’s Day is fast approaching, and now is the perfect time for all things love! Stitch out this fun and easy puffy brooch for your loved one and yourself. Because they are so quick and easy, you can spread the love to everyone and personalize them as you see fit.
This project requires simple materials- felt, batting, embroidery thread, plastic pearls, and a pin back. While each one costs pennies, they are worth a mint. Let’s get started!
Supplies Needed To Embroider Fringe Flower Heart Brooch

- Tear-away stabilizer
Check out our embroidery stabilizer guide to learn more about stabilizers.
- Embroidery thread
Learn about different types of embroidery threads & when to use them.
- Embroidery machine
- Hot glue gun or glue
- Adhesive spray
Want to learn how to properly apply and master using embroidery adhesives without the headaches?
- Scissors
Do you know the 5 things you need to know about embroidery scissors?
- 2 4×4″ pieces of black felt
- 2 3×3″ pieces of batting
- Pearls or beads to embellish
- A bar pin
- Fringe flower heart brooch embroidery design
Looking for high-quality machine embroidery designs? Check out our other 120+ fringe embroidery designs. Also, don’t forget to check out our free embroidery designs.
Stylish Embroidery Fringe Flower Heart Brooch Tutorial
Step 1: Hoop a piece of tear-away stabilizer
Learn some great tips & tricks for embroidery hooping.

Step 2: Spray adhesive to the back of one of the black felt pieces and place it in the middle of your tear-away stabilizer.
Always remember to spray the fabric before it goes on the hoop to avoid gumming up your hoops.

Press down the felt to make sure there are no bumps.

Step 3: Run the design on your machine, but stop your machine as soon as it’s finished with the fringe flowers. You want to save your stitch border for later.

Step 4: Remove the hoop from our machine and place the hoop bottom side up

Step 5: Carefully clip the thread on the back of the flowers for the “fringe” effect
Depending on the look you want, cutting “the embroidery thread” along the outer edge of the fringe will cause it to fray. If you cut just the bobbin, the thread stays connected and creates a loop.

Step 6: Take your 2 pieces of batting and create a heart shape that is a bit smaller (0.25″) than the running stitch border; place the double layer of batting over the back of the embroidery

Step 7: Using spray adhesive, spray some onto your last piece of black felt and cover the batting.

Step 8: Return the hoop to your machine and stitch the remaining triple-stitch border

Step 9: Remove your hoop from your machine and activate the fringe on the flowers on the front of the design (you can use tweezers, chopsticks, etc.) by brushing the thread sideways.

Step 10: Un-hoop your design and tear away the stabilizer from the felt
Step 11: Use scissors to trim 0.25″ away from the stitched border.
Use pinking shears for a more dramatic edge.

Step 12: Using your glue or hot glue gun, glue your beads in the center of your flowers. Using tweezers can be easier to put them in place.

Step 13: After they’ve dried, turn your heart over to the back and either sew or glue your pin back.

Step 14: Let it dry completely, and you now have a beautiful fringe flower heart brooch.

Conclusion: It’s Easy To Create The Perfect Embroidered Addition To Any Outfit
Beautiful gifts do not have to be expensive, and techniques like the fringe flower don’t have to be hard! Often, we have all the things we need to create beautiful gifts right in our craft box, but we need a little spark of imagination to get started. Try new techniques to help your projects be fresh and get you thinking about how to use the techniques you just learned.
P.S. Want to expand your embroidery world and learn the secrets, tips, and tricks behind 13 other popular embroidery techniques? Check out our Fun Effects Course and skyrocket your creativity with embroidery.

Leave A Comment