We can all feel the holidays sneaking up on us… frost on the walk and icy cold hands and noses. The one thing that warms our body and soul is friends and family gathered at home, enjoying each other around a table full of holiday goodies. What better way to enjoy than with some lovely embroidered decor?

Let’s create some embroidered Christmas-themed placemats using our creativity and using up some of our embroidery and fabric stash.
Why Create This Easy DIY Embroidered Holiday Placemat?
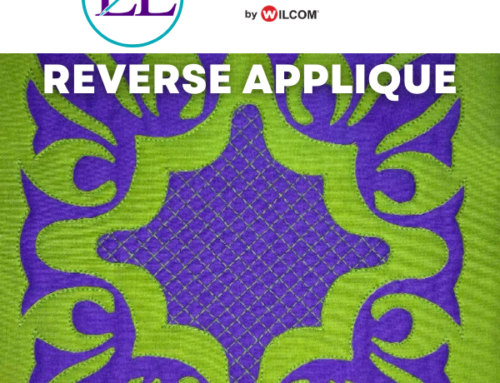
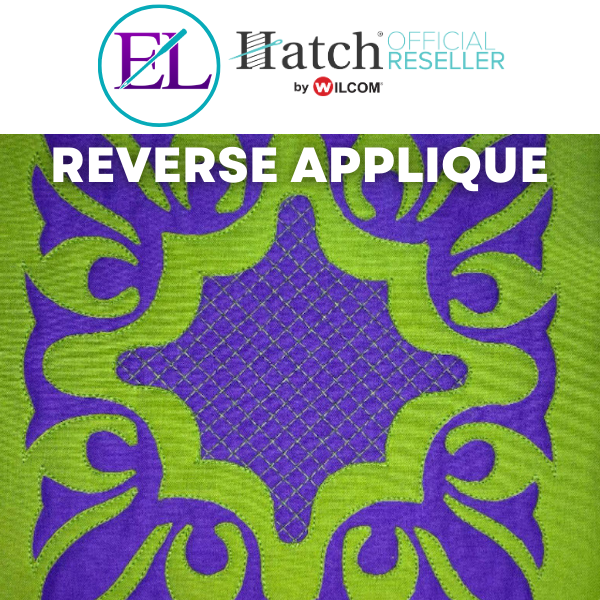
Besides being easy to create, this placemat will teach you a new skill, reverse applique! In reverse applique, you cut away the top layer to reveal some sheer fabric below. On that sheer fabric, you stitch embroidery designs.
The bonus is using up some fabric we might only use occasionally. Ever change out your drapery sheers and not feel good about throwing away that fabric? It goes into your stash, and you circle back to it, passing it up each time because you can’t think of anything to make. Today you can use up that polyester drapery sheer material and have fun at the same time.
This holiday placemat makes excellent home decor for your home when entertaining guests and great Christmas or party gifts! Who doesn’t love something personalized and made from the heart?
Expand your embroidery world by learning the secrets, tips & tricks behind 14 other popular embroidery techniques with our Fun Effects Embroidery Course.
Supplies Needed For Festive DIY Holiday Placemats
Well, this is easy! Check your stash for some sheer polyester material and a heavier-weight material such as cotton or linen, but any heavier variety can be used.
- 1 piece of approximately 14×20 woven heavy-weight material (you can fray the edges)
- 1 piece of drapery sheer material (polyester) 12×16 (approximately) inches
- Wash away stabilizer (not topper film)
New to stabilizers? Check out our embroidery stabilizer guide.
- Embroidery software
Looking for the best machine embroidery & digitizing software? We’ve got an article for that!
- Embroidery machine
- Embroidery thread
- Embroidery designs, for this project we used:
Holiday Embroidery Placemat Tutorial
Digitizing A Holiday Placemat
First, ensure you’re familiar with embroidery digitizing. To create your template for this project, follow these simple steps:
1.Digitize an outside border in a neutral color for the center of your placemat
2. Digitize a “window” for your placemat (we used the installed Hatch shapes in Hatch embroidery software)

3. Copy both of these and place in place in your final color
4. Select the rectangle outside frame and use the “create outlines” to make an inside and outside triple stitch line (this looks neat & tidy!)
5. Insert your lettering or designs!
That’s it!
Embroidering A Holiday Placemat
1. Lightly spray a piece of water-soluble stabilizer with temporary embroidery adhesive.
Check out our tips and tricks when usingembroidery adhesives to avoid problems.
2. Lay the sheer material on your stabilizer
3. Lay a piece of woven material on top, creating a three-layer sandwich
4. Hoop your sandwich
Get professional embroidery hooping results with our top tricks & tips.
5. Place in your embroidery machine
6. Stitch the first two placement lines
7. Remove from the machine
8. Using curved scissors, carefully trim away the top (woven) fabric to reveal the sheer material below. Trim as carefully and closely as you can.
9. Return to the machine and stitch until the end.
10. Remove from machine
11. You will then rinse your placemat under the hottest water and lay it flat to dry.
")
12. Once dry, you can “fray” the edges by unweaving the threads and pulling them out. Pull as many threads as you can to create a textured frayed edge.
Once completed, iron your placemat using light steam and get ready to impress your friends and family this holiday season!
Design Ideas For Your DIY Holiday Placemats
Let your creativity loose on this easy-to-make project. Here are a few other suggestions to try!
- Use iridescent mylar under white stitching for a sparkly snow-like effect
- Accentuate colored stitching by adding holographic mylar underneath
- Make your borders festive by adding a motif border in a metallic color
- Stitch on the body of your placemat before you begin; you can even quilt!

Conclusion: Creating Festive Placemats Is Easy & Budget-Friendly
Once you set this template up, you can use it repeatedly, inserting holiday-seasonal and personalized embroidery designs and machine embroidery fonts! Try different fabrics from your stash. Denim or recycled tablecloths would work great too! Your options are endless &
P.S. If you’re new to Hatch or looking for great embroidery software, try our free 30-day Hatch software trial to start creating your own embroidery projects & see how user-friendly this software really is!

An excellent tutorial, I am inspired and motivate to create! Thankyou so much.
Oh, of course! We hope you were able to create something lovely for the Holidays 🙂
Merry Christmas and a Happy New Year too
Thanks Maureen, to you as well!