Have you ever found baby car seat covers to be too expensive, while also not finding exactly what you’re looking for? If so, you’re not alone…

Instead of dumping money into something you don’t like that much anyway, why not create one you’ll like yourself? In this article, we’ll show you how to create and personalize them while on a budget.
Why create & embroider a customized baby car seat cover
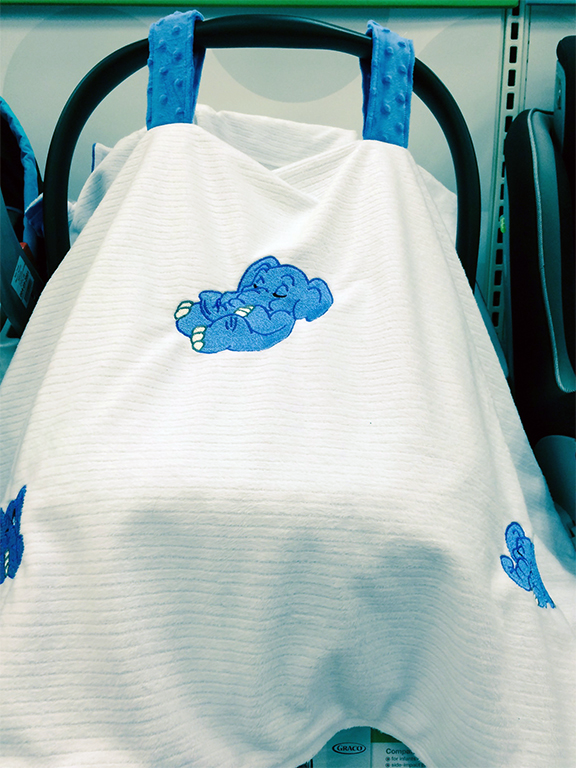
Buying baby items is always so expensive, stores know baby items are essential, so they often upcharge their prices. When creating and embroidering this baby car seat cover, it will only cost a fraction of the price of a store-bought item. You will be able to customize the car seat cover with the baby’s name or nursery theme to give it more of a personalized feel.
Now keep in mind, you don’t have to use this cute elephant design that we’re showing throughout this tutorial for your car seat cover. To really personalize your custom embroidered baby car seat cover, you can choose any design from list huge list of children’s embroidery designs, or you can create your design text or image with our free 30-day Hatch embroidery software trial!
Creating a baby car seat cover can be necessary during the colder winter months as it can be suggested not to put your baby into their car seat in a snowsuit. As they will not have as much insulation, this can help keep warmth inside for your baby to retain heat. A car seat cover can also help block the sun, wind, and snow when out for a walk or to transport them from inside to your car. Throughout this pandemic, the cover can also help guard your baby as a shield from any coughs, sneezing, or mouth secretions that can occur from people around you.
This baby car seat cover is multi-purposeful. It shields your baby from outside temperatures and people, and can also be used as a blanket if you forget yours or dirty the one you have. You can also lay the car seat cover down if you didn’t bring a changing pad to protect your baby from any dirty surfaces, or use it as a nursing cover to shield your baby if you feel the need to do so.
Since you’re able to personalize your baby car seat cover, you manage the thread color, stabilizer, and fabric, which means you can choose the best fit for your cover. Whether you choose a thicker material to ensure a warmer temperature or choose an easier fabric that is easier to continue washing, there are plenty of choices.
Unsure of what stabilizer to use? Check out our complete guide to embroidery stabilizers
Interested in finding out more about embroidery thread and how to use them? Click here
Want to know more about the different embroidery fabric types you can use? Click here
Supplies required for this baby car seat cover:
- 1 yard each of two complimentary fabrics (I choose two microfiber fabrics)
- Perfect stick stabilizer
- Heat n gone topping
- Cute elephant design snoozing
- Cute elephant design with eye open
- Cute elephant sleeping
Baby car seat cover project tutorial:
Step 1 -Cut two 4″ x 12″ pieces for straps from the back of the project fabric from the width of the fabric.
Step 2 -Cut remaining fabrics 36″ by the width of the fabric.
Step 3 -Hoop perfect stick stabilizer paper side up to fit your hoop. Score an X in the paper and peel the paper away. Set your hoop aside.

Step 4 -Fold the front piece of fabric lengthwise in half, measure 8″ down from the fold.
Step 5 -Place 1st design template centered 8″ down from the fold.

Step 6 -Center the fabric in hoop and stitch design.

Step 7 -Place second design template approximately 5″ down from the first design and 8″ from the left edge and stitch the design.

Step 8 -Place your third design template approximately 5″ down from your first design and 8″ from the right edge and stitch your design.

Step 9 -Place the front piece of fabric (with designs) right sides together with the second piece of fabric for the back.
Step 10 -Stitch around all four sides, leaving an opening to turn right side out.
Step 11 -Turn right side out and topstitch all sides closing the opening.
Step 12 -Fold one piece of the 4″ x12″ fabric right sides together and stitch the long edge. Turn inside out and topstitch around the strap to close both ends, with the seam in the center.
Step 13 -Repeat step 16 for the second piece of 4″ x12″ fabric.
Step 14 -Fold car seat cover in half to find the center of the project. Mark 4″ over from the center in both directions.

Step 15 -Stitch the center of each strap at the 4″ marks.

Step 16 -Place velcro on both ends to attach the strap to the car seat handle.

Step 17 -Attach to the car seat by fastening straps around the handle.

Voila! You’ve created your cute personalized baby car seat.
Conclusion: embroider your own baby car seat cover
Create and embroider your baby car seat for your own personal use or gift for a loved one. With nothing else on the market quite the same, you’re sure to get compliments wherever you go. Excellent quality and budget-friendly, there’s no reason not to start your customized baby car seat cover for your children, a loved one, or a personalized gift.
P.S. If you need an applique design for any of your projects, browse our giant collection of machine-friendly embroidery designs, or if you’ve never tried our designs before, download our free Embroidery Legacy Design Kit.

Leave A Comment