Your embroidery machine is stitching its little heart out, and then you turn away for a second and…. Whirruuuuuh. Total silence envelops the area as your machine comes to a stop!
From the top, it looks fine, but when you try to remove the hoop from the machine, it’s stuck. When you try to look underneath, all you see is a complex web of threads holding it together. What is this, how did it get there, and how can you prevent this?

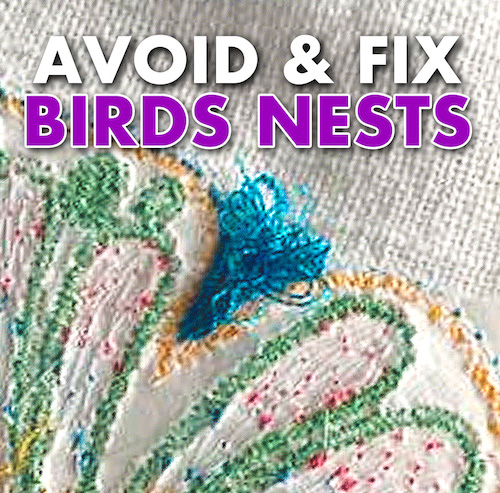
Birds’ nests are cozy homes for birds, but they don’t evoke the same warm feelings in machine embroidery. After frustration, destroyed garments, and a loss of time, the word “bird nests” in embroidery is like saying a bad word!
What are Embroidery Bird Nests & Why Do They Happen?
A bird’s nest is bunching up of thread on the underside of the stitching. From above, it appears good, but it gets stuck in the bobbin hook and eventually halts your machine.
An imbalance of thread tension usually causes this issue if the bobbin or upper thread is not threaded correctly.

Let’s discuss further the different causes of embroidery birdsnests. Bird nesting occurs when:
- The top thread was threaded with the presser foot down, all the tension discs are locked, and your thread cannot get between the discs.
- You bypassed the take-up lever on the home machine, now allowing the thread to be drawn through the tension discs.
- If you do not secure or insert the bobbin thread correctly, it will spin freely, creating a tangled mess (a bobbin bird nest).
- If your bobbin is backward, be sure to check your manual. Putting it backward can allow it to have too little tension.
- Dirty or poorly maintained embroidery machines. Keep your machine and bobbin case free and clean of dirt and grime.
- Burrs on needle plate which can catch a thread.
- The orientation of the embroidery needle is wrong; remember that needles have a front and a back.
- Bobbin tension needs adjustment (always consult your manual before changing bobbin tension). A properly adjusted tension may mean you never adjust the top tension knobs. You can adjust the bobbin case tension one-quarter turn at a time, but that should be a last resort. Most malfunctions like this happen because of bad maintenance or a design that doesn’t let the thread fix itself.
- Flagging occurs when a commercial frame bounces or the garment pulls on the hoop on any machine. The material can experience extreme flagging if you loosely hoop your items. I prefer securely hooped items over floating ones on a hoop because hooped items always have better quality.
I’ve encountered some significant issues with stuck, tangled threads that wouldn’t come off the embroidery machine. Sometimes, the garment can “pop” out of the hoop, causing the fabric to tear and potentially ruining the clothing. (This is why proper hooping is important; you never want your garment hooped too loosely.)
Commercial or tubular machines may experience more mechanical issues, as incorrect rotary hook timing or needle bar height can increase bird nesting problems.
So, we need to answer two questions:
How Do You Prevent Birdnesting Embroidery?
This sounds so easy, but it can be easy to forget.
- Keep your machine clean, and remove stray threads.
- Because it’s easy to get distracted, you should take time when loading bobbins and prevent incorrect threading. Make sure the presser foot is up to disengage the tension discs.
- Always visually check your thread path; trace with your fingers.
- Use good quality thread and needles.

Preventing bird nests comes from prevention, which is pure and simple. When you start using your embroidery machine, pay attention. Take your time threading it and inserting the bobbins. If the machine is new, make sure to read the manual.
How Do I Fix Thread Nesting On My Embroidery Machine?
If the item hasn’t torn the fabric or made a hole, you can probably fix it carefully and with the right tools. But don’t start “manhandling” the situation by pulling on the hoop aggressively.
Gently create space between the bobbin plate and the hoop, and then use your “tools” to do the rest of the job.
If you can get the hoop off without disrupting the garment, you’re back in business quickly!
- Don’t pull or tug (you can tear fabric or existing embroidery)
- Don’t start cutting without knowing what is happening underneath
- Don’t unhoop if you don’t have to
Two ways exist to clear bird nests.
- Cut embroidery threads and remove the hoop.
- Slowly pick out tightly packed threads from the needle plate.
There are “bird’s nest toolkits” to easily cut away threads. Keep your knife below the hook to cut against the hook, not the fabric. Remember that cutting the fabric damages the garment.

DIY note: use a cheap metal fork to flatten the prongs with a hammer. This will help you slide it under the fabric and over the needle plate to cut the threads more safely. Beware of scratching the needle plate.
Cut threads singularly and leave the garment hooped to continue stitching if possible.
After the embroidery process, you may discover the nest on the needle plate. However, extracting the bobbin or bobbin case could be challenging. Pick out the threads one by one until you can reduce the nest enough to remove it. After you have cleared it, check the needle plate and/or bobbin case for damage and replace it.
On to the garment!
You have two choices…
- Cut loops on the back and pull the remaining threads from the top to remove stitching. You must restitch this or think of another way to cover the damage.
- Trim the nest so that only short (1 cm/.25 in) tails remain, and secure with an iron-on stabilizer. Although the threads may not stay put when washed, you can save them for items you don’t use often.
Conclusion: Thread Nests Aren’t The End Of Your Embroidery
Bird nests are unfortunate occurrences, but luckily, they are not the end of your embroidery project! Keeping your machine clean and threading correctly reduces the chance of a nest popping up (or down) in your stitching. If a nest should happen, try the different ways we’ve discussed to salvage your garment.


It is really a nice and helpful piece of information. I’m glad that you shared this helpful info with us. Please keep us informed like this. Thanks for sharing.
My pleasure, glad you enjoyed it!
Thanks for the info. Know more about bird nesting now than ever
Glad to have helped Gary, thanks for reading!
My nq1700e was bird nesting. I cleaned the race area, changed bobbin and re thread the machine to no avail. Took it to a reputable brother repair shop , they said it was mechanical error. Brought it home at approximately 24000 stitches it started bird nesting again. Repeated all the above again but to no avail. Any recommendations. I am ready to scream as you can imagine
Hi Marcia, sorry, the repetitive birds-nests you are describing are most likely a mechanical issue with relation to timing of the needle and bobbin case. Back to the shop 🙁
Thank you for your very thorough explanation of birdnesting causes. As my skills have improved, I thankfully don’t have them much anymore. (Knock on wood.)
Great to hear! Thanks for reading 🙂
nice to know that the item can be fixed. great article
Thanks for reading Rosie 🙂
Birds nests are the ABSOLUTE worst. Thanks for the good tips.
We couldn’t agree more! Thanks for reading
This was a very knowledgeable read over my morning coffee. Thank you so much. So far 🤞my bird nests have been fixable with careful monitoring. Thank you so much. Love these tips snd tricks
We’re happy to help Helen! Nothing goes better with embroidery than coffee 😛